How to Select the Best “film” for a Specific Image
with both Film and Digital Capture
Part Five of Nine
Article and Photographs by: Alain Briot
Alain Briot is one of the most successful landscape photographers working
in the U.S. today. He was educated at the Ecole des Beaux Art in Paris,
has a Masters degree in Fine Art, and is currently working on his Phd.
 |
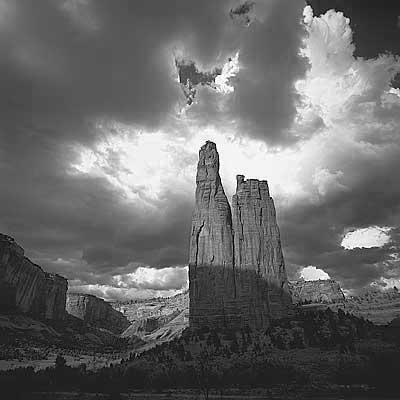 |
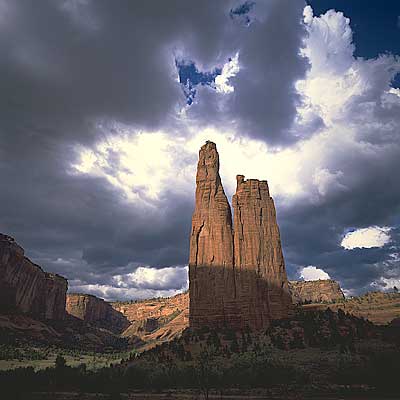
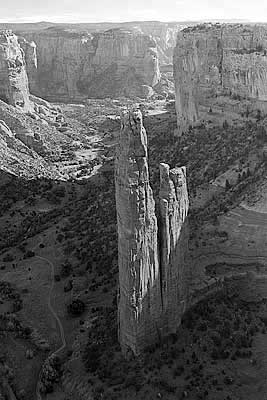
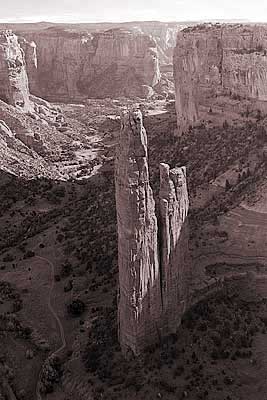
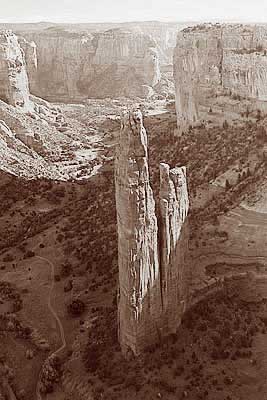
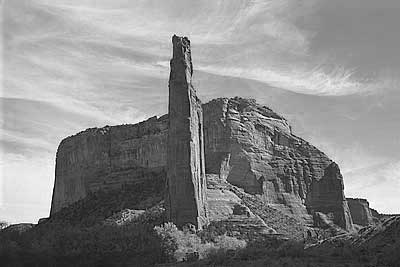
“Spiderock and Clouds”
Original color transparency with black and white version created in Photoshop.6
All the photographs featured in this article feature Spiderock in Canyon de Chelly National Monument, Arizona. I wanted to make your comparison of the different images I used as examples easier. While the films and image files are different, the subject remains the same throughout this article. Although unrelated to film choice, this approach shows that endless variations from the same subject can be achieved. These photographs were created over the seven and a half years I lived in Chinle, at the mouth of Canyon de Chelly.
1 — Introduction
Film choice. The subject seems quaint and outdated. “Besides the point” you might say. After all, most of us have done away with film altogether and those who haven’t know it is only a matter of time until we do so. Myself, while I insist on using film, do so solely because of the cost and the impracticability of 4×5 digital backs.
I was reminded of how fast film was fading away from our collective unconscious when I was asked, by a teenage photographer, “how photographers recorded their photographs before digital capture was invented.” Well, before we shot digitally we used film. And before that we used light-sensitive devices called glass plates and daguerreotypes and, even worse, paper coated with light-sensitive emulsions of various types.
2 — Let’s Take a Look at History
The ever-increasing portability of camera equipment has redefined what being a landscape photographer means. Today, we go in the field with cameras that are light, have instant capture, are rugged, and are reliable. Of course, we still have to carry equipment, and the weight of this equipment depends on the format we use and on how much gear we want to take along. However, no matter how we look at it our job today is a lot easier than it was less than a hundred years ago.
For the first American landscape photographers, people such as Timothy O’Sullivan, William Henry Jackson and Carleton E. Watkins, carrying their equipment in the field meant using a beast of burden, not a camera backpack. Donkeys and horses were just as important as cameras and lenses. Taking a photograph meant first setting up a tent-darkroom so you could coat your glass plates with the proper emulsion. An emulsion which you first had to mix, meaning photographing near a water source was primordial. A dry camp meant no photographs. A river or a lake meant a productive and creative opportunity. After exposure the glass plate had to be developed right away, which meant going back under the tent and doing whatever it was you had to do to get an image to appear on the plate. After that, it was either stay there for the night or take down the tent, pack up the equipment, and move on to the next photographic location. We are far from what many of us do today, driving from one photographic opportunity to the next, shooting digitally without a care in the world and downloading our images while we drive on.
Another option for early landscape photographers was the Daguerreotype. While mostly used for portraits, some daguerreotypes of landscapes also were created. Again, the use of a tent-darkroom was necessary and so was the use of mercury as developper. Typically, a Daguerreotypist (the name given to photographers who used the process invented by Daguerre) developed his daguerreotypes with a cloth over his head, watching the image emerge on a metal plate, while breathing mercury fumes by the lung full. Many of them ended up in mental hospitals, their brains and nervous system hopelessly damaged by mercury fumes. Interestingly, mercury was also used by hatters as part of the hat-making process. This practice had equally damaging results to the mental health of the hatter, resulting in the metaphor made famous by Lewis Carroll in Alice in Wonderland: the Mad Hatter. Mad Daguereotypist would be just as accurate, but for some reason the term never gained favor. Perhaps if Lewis Carroll had included a photographer in his cast of characters this dangerous aspect of photography would have gained a more widespread reputation.
At any rate here we are: film is dying, digital capture is taking over, and I am writing an article about film choice. Have I breathed mercury fumes myself?
Well, rest assured, I am no more (or no less depending on how you look at it) mentally challenged than I have been in the past. In fact this article is arguably more relevant today than it has ever been. Now that we have digital photography, the choices in regard to “film” i.e. color or black and white, saturation or lack of it, etc. are more important — and numerous — than they have ever been. Why? Because when you shoot in raw mode with a digital camera you are, technically, responsible for the “development” of your image. You are also responsible for deciding whether you want this image in color or in black and white, and for deciding how much saturation and contrast you desire. In short, you are the lab operator. Let’s see what this new digital film reality implies.
3 — Film and Seeing
The first thing to keep in mind about film choice (or raw converter choices as we will see in a short while) is that these choices start with seeing. Photography is about seeing, as I explained in the first article in this series. All the articles in this series are not only related to each other but related to seeing as well.
What you see before you take a photograph influences all the decisions you will take later on regarding this photograph. In regards to film choice you need to ask yourself:
— do I see this scene in color or in black and white?
— if I see this scene in color do I see it with low saturation or high saturation?
— if I see this scene in black and white do I see it with high contrast or low contrast?
— if I see this scene in black and white do I see it as straight black and white or as a sepia (or other tone) print?
One accessory which will help you see, in regards to film choice, are viewing filters. The most popular viewing filter is the Kodak Wratten #90. This filter removes all colors from the scene allowing you to see in black and white. In practice, the filter gives a faint yellowish tone to the scene but after using it for a while your mind gets used to it and you see in black and white. You no longer see color, you see only contrast ratios and shades of grey, white and black. Because black and white is an abstraction — the natural world is in color — seeing in black and white is not necessarily easy. Using a Kodak #90 filter is therefore very helpful. Calumet photographic sells black and white viewing filters. Theirs were originally manufactured by Zone VI studios. Peak also manufactures a black and white viewing filter and so do other manufacturers.
There are also viewing filters for color films. These attempt to duplicate the contrast of specific color films. However, with today’s digital workflow, contrast is not as much of an issue as it used to be. Plus, a filter is an inaccurate way to estimate the contrast level of a scene. A spotmeter is a lot more efficient for that. I personally prefer to use my sunglasses to see how a scene will look in color. I wear polarizing glasses so that I can see how the scene will look polarized without having to get my polarizing filter out of my bag.
Of course if you are shooting digitally you do not need a color viewing filter. A look at the LCD screen is enough to tell you exactly how the camera sees the scene in front of you. This is one of the huge advantages offered by digital cameras.
4 — The Importance of Raw Conversion
As you know, if you are shooting digitally your raw file is your latent image and your raw converter is your “film” development. In this respect raw conversion is more than film development: it is also film choice. It is during the raw conversion process that you decide whether you want your image to be color or black and white. It is also during raw conversion that you decide how much color saturation you want in your images, in effect making choices similar to using a more or less saturated color film in your camera.
Traditionally, photographers have selected color films based on their desire to get specific colors in the final print. For example, Fuji Velvia has been a popular choice among landscape photographers because of its high color saturation and contrast. While the high contrast limits the range of values which can be recorded by Velvia, the highly saturated colors, and the faithfulness of these colors, offer a trade-off that many photographers consider to be favorable. Kodachrome was favored for its warm colors and its ability to reproduce reds tones. Ektachrome was favored when a cooler color quality was desired because of its slight bluish cast.
Other choices are possible. For example, I personally like to use Fuji Provia, a lower-contrast and lower color-saturation film than Velvia, and then bump-up the contrast and saturation in Photoshop if I feel like it. In practice I rarely do, since I favor low contrast and soft saturation images at this time.
Another choice, among many, available to film-based photographers, is negative film. Long shunned by publication editors because one needs prints along with color negatives in order to actually know the “real” colors, negative film is now comparable to transparencies once it is scanned. When looking at a digital photograph it no longer matters whether an image was created on color positive or color negative film since all digital images are positives. Scanning cancelled one of the challenges offered by negative film. The main advantage of color negative films is that, for the most part, they offer a much wider range of contrast than positive films. This allows one to capture a much greater range of values and thus photograph in higher-contrast situations. Color negative films also have a lower color saturation, something which can be a plus if you are looking for soft, subtle colors.
5 — Color or COLOR?
Now that saturation is no longer a factor of film alone, or a factor of the digital camera you use, the question of how much saturation we want in an image becomes a matter of personal taste. How saturated is saturated enough is a question we each have to answer for ourselves. Furthermore, it is a question we can answer in endless ways since we can endlessly fine-tune the color saturation of a photograph in Photoshop.
This endless choice means we must rely on our personal judgment and good taste rather than on the characteristics set by film manufacturers. It also means that if our choices are not pleasing to our audience (and we do have an audience, as we will see later on in this article series) we can no longer blame the film manufacturers for excessive color saturation or contrast. Instead, we must take the blame (if there is blame) and the responsibility for making these choices ourselves.
Personally, I currently favor soft, lower color saturation images as I said earlier. This has not always been the case. I have had my Velvia moments as I like to say, and I have jumped on the Velvia-Cibachrome bandwagon for a while. But it’s all in the past now. Over the last few years I have grown increasingly tired of in-your-face, super-saturated, super-contrasty images created with film that has such a limited contrast range that it dictates which light you must photograph with. This doesn’t mean I will never, ever print a color-saturated image. It means that my current work is aimed at exploring the possibilities offered by today’s technology as well as discovering what can be achieved through subtle and lower color saturation images.
6 — Let’s Use Film, or Digital Capture — Let’s Not Let Film Use Us
Color transparency films, such as Velvia, increase contrast and color saturation. When using such a film, a scene which appears dull and “colorless” to the eye turns out to have fully saturated colors when you look at the same scene captured on the resulting transparency.
This characteristic of Velvia, which has been explored by countless photographers, has in turn influenced the choice of light conditions in which Velvia has been used. Because Velvia increases both the color saturation and the contrast of the original scene, it is important to select scenes that have a low contrast range and low color saturation. In turn, this means you will have to avoid certain specific natural situations which, if photographed with Velvia, will result in blown highlights and overexaggerated colors.
A typical Velvia scene is one of low contrast and soft light. The favorite light of many Velvia photographers is either open shade or overcast conditions. Or, in canyons and slot canyons, the tendency is to avoid including areas of direct light — otherwise known as hot spots — in the photograph. Sunsets and sunrises are also favored, although more technically challenging due to their still-high contrast, because the light is both soft and colorful in the morning and in the evening. A graduated density filter is often used to compensate for the high contrast ratio between sky and land.
The characteristics of Velvia can be used to your advantage: simply select a scene which appears flat to your eye knowing that the film will bump-up the contrast and the saturation significantly. If you select a scene which is already contrasty the resulting transparency will be most likely too contrasty and unpleasant to the eye because the contrast range of the scene is too much for the film to handle.
You may be shaking your head at this point, thinking that what I just wrote pretty much describes the approach most landscape photographers follow, regardless of whether they shoot film (any film) or use digital capture. In a sense, you are right. Open shade, overcast conditions, sunrise and sunsets are ideal condition for landscape photography no matter what we record our photographs on. But, the problem is that with certain high contrast and high color saturation films, such as Velvia, these are pretty much the only lighting situations in which you can photograph without either blocking the shadows or blowing the highlights.
If you love these types of light, you might be just fine. But if you want to explore other types of light — such as direct light either past sunrise or before sunset — or want to include directly-lit areas in canyon and slot canyon scenes, then Velvia will severely limit your endeavors.
What I am trying to express here is that we have had, and still have, an entire generation of photographers whose style has been shaped by the use of films such as Fuji Velvia. Nothing wrong with that. The work of many of these photographers is magnificent and worthy of both attention and praise. But, let us not forget that there is life after Velvia, and that there are other possibilities besides what Velvia excels at. It is these other possibilities that I am currently engaged in exploring, and it is these other possibilities that I want to make you aware of. This is not a criticism of “Velvianism”, as we may someday come to know this trend, but rather a statement that it is a trend, and not the only type of color photographs we can create.
7 — Color or Black and White?
Just like we have to make choices regarding color, we also have to make choices regarding black and white. Prior to digital photography, this choice had to be made in the camera and at the time of exposure. We needed to use color film for color images and black and white film for black and white images. We could, possibly and in the darkroom, use a paper manufactured by Kodak called Panalure which allowed us to print color negatives in black and white. However, although the results were at times pleasing, I was never able to match the quality of a fine black and white print (which today has come to be known as a Silver Gelatin Print) from a properly developed black and white negative.
Today the choice of color or black and white can be postponed, and in effect often is postponed, until the image is in the computer. With film, I wait until after scanning the image to turn it into a black and white file, if I so decide. With digital, this choice is done during the raw conversion process. With both Photoshop Raw and Capture One it is possible to see your thumbnails in black and white so that you have a 100% black and white workflow. With Photoshop Raw you simply set the sliders to the black and white settings which give you a pleasing result. With Capture One you do the same, then save these settings as a profile and then select this profile as default.
Whichever methodology we follow in order to create a black and white file we eventually face the decision of whether or not we want to have a black and white image instead of a color image. Color can be so compelling, and color reproduction so accurate, that removing color is not only difficult but often not even considered. However, black and white is a serious option for photographers, an option that allows you to do what color cannot do.
I have often noticed that good color images are also good black and white images. To see this for yourself simply look at a color photograph with a Kodak #90 filter. My explanation for this fact — that good color photographs are also good black and white photographs — is that good photographs have good composition. Composition is in a sense the “backbone” of a photograph, the supporting framework, and because composition relies on the placement of objects in the scene, on leading lines and on perspective, it is by nature not linked to color per se. Rather, composition is to photography what drawing is to painting. While paintings are done in color drawings are in done black and white or sepia. Many painters draw sketches before they start painting. Their drawings are aimed at defining a compositional arrangement. Composition is a black and white process, a line-based, element-organization process, and by nature a black and white process. What matters for good composition is not color but shapes, forms, lines and objects arranged in a pleasing and depth-creating fashion.
Of course, one can create a composition based on color. A composition where color is not just an element of the scene but the element of the scene. However, I will be so bold as to say that color-based compositions are the exception rather than the norm in landscape photography. In my experienc, they define a personal style rather than establish an approach anyone can follow. Why? Because color-based compositions in nature are quite difficult to find. With man-made objects color can be the main element. A wall painted in bright colors, a set of dishes each of a different color, multicolored garments pinned on clotheslines are just a few of the examples that come to mind. In nature, color is rarely the main element. Instead, color is often one of the accompanying elements. The main element, the backbone, the drawing of a natural scene, is usually somewhere else. It is the trees, the rocks, the mountains, the canyons, and a myriad of other natural objects.
I am sure that this point can be debated further and, if you do not agree with me, I encourage you to do so over email at alain@beautiful-landscape.com. At any rate, whether you agree, disagree, or do not have a definite opinion on the matter, I do encourage you to look at color photographs through a Kodak #90 filter. There is something to be learned from doing so.
 |
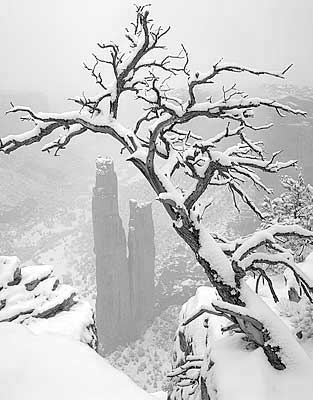 |
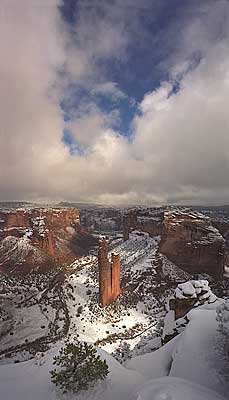
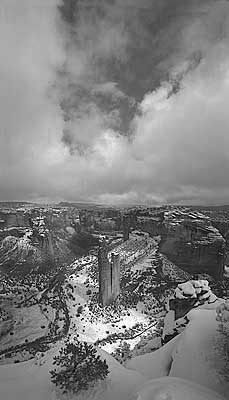
Spiderock in Snowstorm.”
The original color photograph is at left. The black and white version was created in Photoshop. I thought I would like it better since there is so little color in the original. However, I actually never printed it. It turns out that the little bit of color is an essential part of the image. Take it out and the image looses its unique quality.
8 — Duotones, tritones and quadritones
I also encourage you to explore the alternative to pure black and white offered by Photoshop. Namely: duotones, tritones and quadritones. These are images in which more than one tone of ink is used to create a subtle hint of color. In pure black and white, and when printing with ink, only black ink is used, either pure black or different shades of black and light black. In duotones, tritones and quadritones, Medium gray may be replaced with magenta and white may be replaced with yellow, resulting in a sepia image. In a duotone, two colors of ink are used. In tritones a third color is added and in quadritones a fourth one as well. The combinations are endless and open a wide field of experimentation for creative endeavors. This is certainly an area worth exploring if you are so inclined. A set of predefined duotone, tritone and quadritone curves is provided with Photoshop. You can alter each of these curves to your liking and create your own set of curves. Sepia is only one of many possibilities.
 |
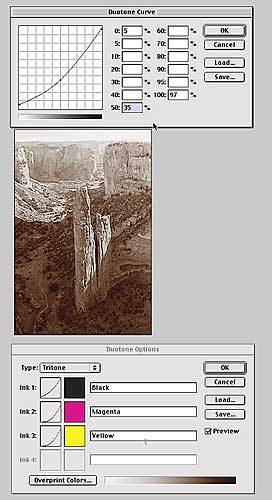 |
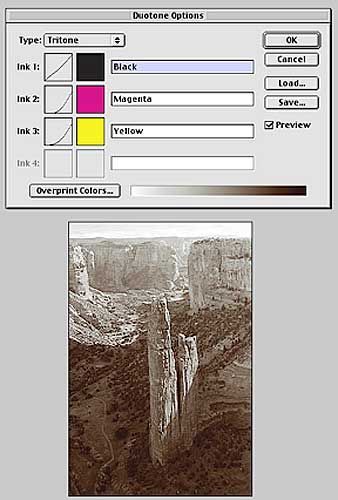
Tritones in Photoshop
Here are the settings I used to create the sepia images that appear in Practice Exercises #2 later in this article.
9 — Film Speed
Film speed is rarely an issue in landscape photography and this is why I have waited until now to discuss it. In my case, and in the case of most landscape photographers, I use either the lowest, or one of the lowest, film speeds available. Currently, I use Fuji Provia which is an ISO100 film. Velvia is an ISO 50 film, however the grain diference between these two films is minor. An ISO 100 version of Velvia is also available, with hardly any additional film grain when compared to the original ISO 50 Vevia. As a rule, in landscape photography, the slower the film, and/or, the less noticeable the film grain, the better.
Another rule which I personally follow is to use the same ISO for all my films if I use different film types. For example, if I use both color and black and white film, I will use an ISO 100 black and white film, such as Kodak T-Max 100, together with Fuji Provia. Or, if I use both color negative and color positive films, I will use an ISO 100 color negative film and an ISO 100 color positive film. The reason for this choice is to avoid getting confused when calculating the exposure for either films. Having the same ISO means I can set my meter to that ISO once and for all. In my case, I hardly ever move the ISO setting on my lightmeter. Having several films with different ISO numbers means there is a chance you will forget to make the necessary adjustment and either overexpose or underexpose at least one of the two films. Of course, if you use only one camera or camera back, and if your camera has DX coding abilities, this is not an issue. But, if you use a handheld light meter, like I do with 4×5, it is a definite concern.
With digital the issue of film speed is very different since you can change film speed “on the fly” and in “mid-card” while you are shooting. A push of a button and a twist of a dial and there you are: ISO 1600 instead of 100 while the light level is going down and you need to photograph hand-held. Also, in the best digital cameras, there is little loss of quality between ISO 100 and 400 (and sometimes higher).
However, unless there is a need for higher shutter speeds, it is a good idea to continue using ISO 100 as your standard setting. You do get, even if marginal, a small quality gain. And, for landscape work, unless you are photographing hand held you normally use a tripod which means that shutter speed is not an issue. If you are not using a tripod start using one! Doing so will definitely improve the quality of your images.
 |
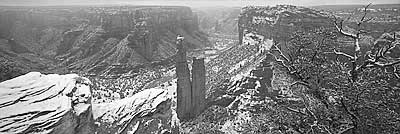 |
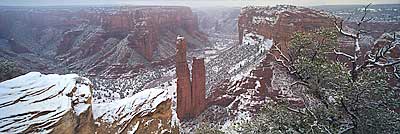
Spiderock Snowstorm Panorama
Here too the original image is a color transparency. I created the black and white version solely for the purpose of using it as example in this article. While the color image is displayed in my home as a 5 foot long panorama, I have no intention of printing the black and white version. The comparison of these two images is worthwhile nevertheless.
10 — Photographic Skill Enhancement Exercises
Conducting the following exercises will help you build up knowledge in regard to “film choice”. They will help you visualize what film, or RAW conversion software, can do in terms of transforming (literally) a specific photograph into an entirely different photograph.
Photographic Skills Enhancement Exercise #1
Take the same photograph, with the exact same composition, in both color and black and white. Use a Kodak #90 filter to preview the scene in black and white prior to photographing it. Look for a scene which looks good in both color and black and white. Make sure you take the two photographs one after the other so that the light and the clouds are the same in both images.
With film, switch films (or use 2 camera bodies or backs). With digital transform the RAW file to black and white in your raw converter software. Compare the two photographs to see how the same scene looks in color and in black and white. Decide which one you like best.
Clearing Winter Storm over Spiderock
The original is a color transparency. I transformed it into a grayscale file in Photoshop. While I photographed in black and white for years I have more and more difficulty finding as much visual enjoyment in black and white than I do in color. In this case I have never printed the black and white version.
Photographic Skills Enhancement Exercise #2
Starting with one specific photograph, create as many color, black and white and sepia variations as you possibly can. With film, scan your color original and then turn it into a black and white image and a sepia image first. If you used black and white film, bypass the conversion to black and white. Create different sepia variations by adding more or less of a brown tone to the print. Explore the possibilities offered by duotone and tritone and quadritone conversion. The exact process of converting to a duotone, tritone or quadritone is beyond the scope of this article but the Photoshop manual has good information on this subject. Finally, going back to your color file, create variations using different levels of color saturation. Try a very saturated image and see how far you can go without making the image overly saturated. Also try a desaturated version and again see how far you can go without making the image black and white. Save each version, print them all in 5×7 size or so, and compare the prints. Find out which one you like best and which one you like least. There is no limit to the number of variations you can create. Also notice how some variations may be so close to each other that there is no meaningful difference.
Spiderock in the Spring at Sunrise
Six variations from one original color transparency. The original image is at the top left of this series. The other 5 images are variations created in Photoshop by either increasing or decreasing color saturation, creating a grayscale image, and creating two sepia tritone images. An endless number of alternate variations are possible.
11 — Conclusion
Which “film” to use is as relevant today as it was when film was the only choice. This is because film meant, and still means, which kind of photographic images we want to create. We make choices regarding “film” unconsciously, whether we know it or not. We make these choices when we convert an image from Raw to Photoshop. We make these choices when we adjust scanner settings, and we make these choices when we fine tune an image for printing. Knowing why we make these choices, and how to make the appropriate choices to achieve a specific result, will no doubt result in better images. It will also result in images whose final appearance is under our control rather than under the control of the film, the camera or the software we use.
The best way to learn and explore this subject is to practice. While I encourage you to practice on your own I also encourage you to attend one of my workshops. Workshops are a wonderful opportunity to work on specific aspects of photography while conducting Photographic Skill Enhancement Exercises. Workshops are also an opportunity to work with other photographers, compare photographic approaches and equipment and have your work reviewed. I just announced a new series of workshops. There may be one for just for you!
The next article in this 9 parts series is titled How to Determine the Best Exposure for a Specific Photograph. Exposure is an important aspect of photography, whether you use film or digital capture. Again, a must read.
As we say in French, this series is . . . a suivre.
 |
 |
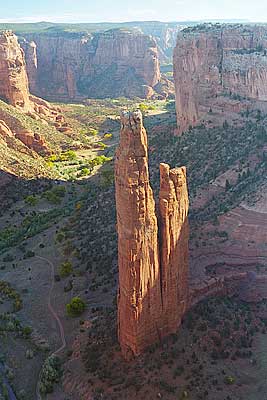
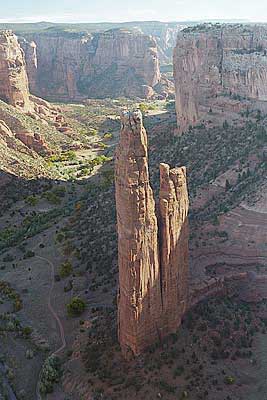
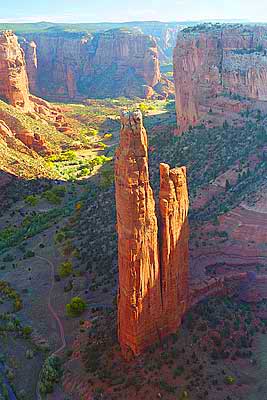
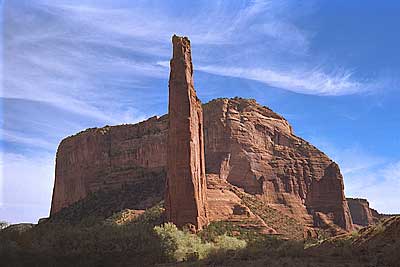
Spiderock from the floor of Canyon de Chelly
I created a black and white version of the original color transparency. While I love color sometimes black and white is just as pleasing. Deciding which one I like best can be difficult.
Alain Briot
Sonoran Desert, Arizona
December, 2003
_________________________________________________
Other Articles in this Series
_________________________________________________
© 2003 Alain Briot
Beaux Arts Photography
http://www.beautiful-landscape.com
alain@beautiful-landscape.com
____________________________________________________
Alain is conducting a series of weekend workshops in the Phoenix AZ
area that are linked to his Esthetics Essays. You can find out more about these by clicking here.
____________________________________________________
Alain Briot creates fine art photographs, teaches workshops and offers DVD tutorials on composition, raw conversion, optimization, printing and marketing. Alain is the author of Mastering Landscape Photography, Mastering Photographic Composition and Marketing Fine Art Photography. All 3 books are available from Alain’s website as well as from most bookstores. You can find more information about Alain's work, writings and tutorials as well as subscribe to Alain’s Free Monthly Newsletter on his website. You will receive over 40 essays in PDF format, including chapters from Alain’s books, when you subscribe.
You May Also Enjoy...
Suggestions for the Next 1 Series Canon
As this is being written the biannualPhotokinatrade show in Cologne, Germany is just 9 months away (September, 2006). By the time of Photokina it will
