Authors Note, (May 1999):
This article was originally contributed toPHOTO.NETin 1997. The text has been updated to correct typos and factual errors but is otherwise unchanged. For a considerably updated discussion of technical topics, seeEquipment & Techniques.
Authors Note, (January 2000):
In January 2000 I returned to Southern Utah and spent 4 days shooting in Canyonlands, Arches and Dead Horse State Park. The experience was quite different, as are the images created. There is nowa new galleryof images from these locations that you should visit once you’ve read this article.
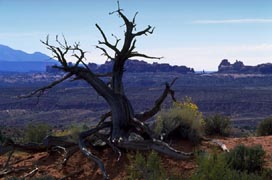
 Bare Branches, Arches N.P., 1996
Flying out of Salt Lake City airport early on Monday morning I could see in the distance the breathtaking expanse of south-eastern Utah that encompasses both Arches and Canyonlands National Parks. The 3 day weekend that I had just spent doing photography there was among the most satisfying I’d ever done. I did more good photography in those 3 days than almost anywhere or anywhen else. This essay is to try and help you to have a similar experience.
Getting There
South-eastern Utah is remote. The town of Moab is the base from which to explore both Arches and Canyonlands parks. The best way to get there is by flying first into Salt Lake City. The airport is efficient and you’ll be on your way in a rental car quickly. From SLC the drive takes about 4.5 hrs, and is quite scenic. Take Hwy 80 east out of the airport to 215 south. This connects to Hwy 15 south which you follow until the Hwy 6 exit at Spanish Fork. Here the scenery immediately becomes interesting and you continue on Hwy 6 to Hwy 70. Take 70 eastbound to Hwy 191 and then south on 191 to Moab.
On 6 you will pass through the town of Hope. Be very careful of your speed. The local police are always out in force with radar. I had been forewarned. In 4 days and 1,000 miles of driving in Utah, other than in Hope I only saw 1 highway patrol car. Unfortunately he clocked me at 79 MPH in a 55 MPH zone; sigh.
Moab
Moab was not what I expected. Despite its remoteness it is a well developed town with extensive services for tourists, including a great many motels. Much of the year you’ll find them heavily booked, so reserve early. Incidentally, I was surprised at the number of Europeans, especially Germans who were there. The weak US dollar has made a trip to the USA very economical for them. One local told me that as many as 40% of this year’s visitors were European.
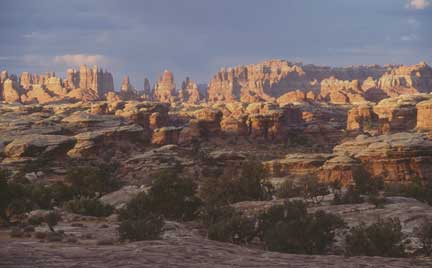 Canyonlands N.P., 1996
The entrance to Arches lies only a 10 minutes drive from the town, while Canyonlands is further away — about a 45 minute drive. As a photographer you are bound to want to be out shooting at first light. Check the time of sunrise and plan on allowing plenty of time to drive to the park and reach a suitable site. The dry and clear air of the high desert makes early morning light very special.
Normally, I use an 81A or B warming filter when shooting before actual sunrise. It’s not needed here. The red sandstone more than makes up for any pre-dawn blueness.
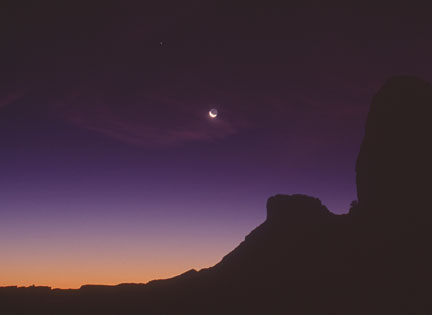
In late September sunrise was at about 7.15am. This meant getting up at 5am to arrive on location in time for first light at about 6.30am, particularly when going to Canyonlands. In the summer it will mean getting up even earlier. Remember to check on moonrise and moonset times as well. I did, and by planning was rewarded by a thin waning moon sliver rising over the LaSalle mountains just minutes before the sun, with first light already illuminating the clouds and sky. A stunning shot with a 300mm lens.
I won’t provide here a detailed guide as to what to see and what to shoot. It would be redundant in the light of the many fine guide books and pamphlets that are available locally in Moab. In only 3 days I wasn’t able to see everything anyhow, and any recommendations as to locations would be incomplete at best. I would suggest though that you pick up a general guide book before you leave home. This will enable you to develop a sense of where things are and what to plan for.
National Geographic has just published an excellent jacket pocket sized guide to the US National Parks. This provides a very good overview before your trip.
What to Shoot
This region is a feast for landscape and nature photographers. In 3 days I shot 19 36-exposure rolls of transparency film. Depending on your style and preferences you’ll encounter everything from grand vistas to minute desert wildflowers. I’ll make two location recommendations though. In Arches there is a section called the Petrified Dunes. Pull into the parking area before dawn and walk 50 yards or so into the dunes area. Sunrise will be in front of you, rising from behind the LaSalle mountains in the distance. Behind you are a range of very high sandstone cliffs that turn fiery red as the first rays of the sun strike them. On the ground around you you’ll find a virtual moonscape with fantastic vegetation. It doesn’t get much better then this!
By the way, though I’ve never had much success with graduated ND filters the shot of the cliffs at sunrise demands one so as to hold detail in the foreground and the cliffs at the same time. Be prepared.
For both sunrise and sunset vistas from a sole location I can highly recommend Dead Horse State Park. (Great name)! This park lies just before the entrance to Canyonlands. Don’t miss a sunset there whatever you do, but get there at least an hour before the sun goes down. The vistas are stunning.
Another area not to miss is route 128, just north of Moab. This road parallels the Colorado river and has some spectacular scenery. Early or late in the day are great times for this drive. Thanks to Gene Collison for this recommendation.
What John Shaw & Your Mother Never Taught You (Sorry John)
The following are some general tips both about shooting in this region and outdoor photography in general. I assume that a trip such as this represents a considerable investment of time, money, and energy, so here is some specific advice about both general and photographic field equipment and techniques.
I’ve found that some basic preparation and anticipation goes a long way to increasing productivity as well as ensuring comfort and safety in the field.
Weather
This region is a high plains desert. This means that during spring, summer and fall the nights are cold to cool and the days warm to hot. Dress in layers. A long sleeve denim shirt and a photo-vest are convenient. A sweater for early mornings is also welcome. Jeans, in my opinion are a must. I saw many people in shorts, but as a photographer you’ll be kneeling and climbing a lot on rough stone surfaces. Your knees will thank you.
Because of the climate, locale and altitude, water is a serious issue. The air is very dry and even with moderate exertion you’ll need over a gallon per day to avoid dehydration as well as serious thirst. There is very little water available in the parks, and no food whatsoever. I found that a half dozen small bottles of spring water per day were needed. When hiking, a water bottle is a must to carry along.
Since there are no food facilities in either park make sure to prepare a picnic lunch the night before. Fruit, nuts and the like make good hiking snacks.
Be aware of the altitude. The region is at 5,000 to 7,000 feet. This means that for lowlanders even moderate exertion is going to make you feel winded easily. Pace yourself. A few people will find that they can get headaches and nausea from altitude sickness for the first couple of days, if they overdo it.
A photo-vest is a great tool. All of the miscellaneous items, from film to filters to candy bars will find a convenient and accessible pocket. I particularly like the one made by Domke. It is cool enough to wear on a hot day and very sturdily made.
Bring a brimmed hat, like a baseball hat. Not only will it keep you cool but the brim will be very convenient in keeping the sun out of your eyes when looking into the viewfinder while the sun is low in the sky. Since shading the lens is vital when the sun is low, a hat held in the right position in front of the lens makes a great sun shield as well.
Wear low sided hiking boots if you have them. Buy a pair if you don’t. Sneakers are OK, but as you’re going to be doing a great deal of walking, much of it over rough terrain, boots are definitely a plus.
A small flashlight is indispensable. Getting to a site before first light can be hazardous without one, and changing film and lenses by feel alone awkward at best. Naturally sunglasses are a must, but be careful if you have Serengeti or similarly tinted lenses. The red color of the sandstone becomes highly exaggerated for some reason, and while very beautiful can mislead you into believing that the film is capturing a similar level of color saturation. Take off sunglasses regularly for a reality check, or use about a 30cc magenta filter. (Just kidding).
I usually take a change of clothes and shoes along with me in the car when out shooting for the day. The number of times I’ve gotten wet feet and muddy pants have taught me that hard lesson. While I didn’t think I’d experience anything like that this trip, I was glad of a change of clothes after shooting in a section of trees and brush that had experienced a small brush fire earlier in the year. I came out looking like I’d been in a coal bin from brushing against the burnt branches. As Gilda used to say, “If it’s not one thing it’s another”.
Filters
Speaking of filters, this is big sky country, and a polarizer is a must. Remember that the effect is strongest at 90 degrees to the sun and if you’re using a lens wider than a 35mm, the effect will become uneven across an expanse of sky.
Tripods
For many serious landscape photographers the following observation will be redundant. Do use a tripod at all times. Tripods aren’t just for low light and long lenses. Just because your camera can be handheld, doesn’t mean that it should be. It broke my heart seeing amateurs at these two parks hand holding long zoom lenses, shooting images that clearly needed lots of depth of field. Unless they were shooting ISO 400 negative film (maybe they were), they’ll be disappointed.
You really should have two tripods, a heavy duty model for use from the car and a lighter weight one for hiking. This trip I only brought a light weight unit, but I regretted not having a heftier one for some moonrise images, where I put a 2X extender on my 300mm Nikkor for an effective focal length of 600mm, while shooting at 1-2 second exposures. Even with mirror lockup and self-timer release only 1 in 3 frames were critically sharp. At 300mm with these conditions the odds improved to 1 in 2. Oh yes, Murphy was at work and there was a strong breeze blowing.
A good ball-head is another must. Both Foba and Arca Swiss make great models. Shooting without one is a huge waste of time and energy. Of course quick mount plates for all bodies and long lenses which have their own tripod mounts are also necessary.
Film
This is of course a matter of personal preference, but here are a few observations. I assume that you are going to be shooting slides. A slow film such as Velvia is ideal since you’ll be doing most of your shooting tripod mounted. Since my final image destination is Ciba prints (Ilfochrome), I generally shoot Provia 100, which though a touch grainier than Velvia has a more pleasing pallet and softer contrast range, not to mention the extra stop of speed in general use.
Bring a lot of film — for two reasons. The first is that the picture opportunities are truly amazing in their diversity. I sometimes found that a single location would produce as many as 3 or 4 striking images within a few minutes. Critical or difficult ones would get 2 or 3 exposures and at least 4 bracketed shots; plus and minus a third and two third stops.
Even without exposure bracketing, I always take 2 or 3 frames of every scene. This gives that many originals, (consider it on-location duping), which comes in handy for publication submissions as well as backup in the case of a processing mark, scratch or other disaster. Transparency film is not cheap, but compared to the opportunity cost, why be frugal?
Film Processing
Iusually have all film processed by my favourite lab after I return from a trip. In Moab I made an exception for two reasons. The most important was that there is a pro quality lab in town which came highly recommended. The name is Westlight Photography and their number is (435) 259-7943. They do E6 in just a few hours, and the quality as well as speed is first rate. I would bring film in at 4pm and they would drop it off at my hotel by 7pm that same evening. What service! They also stock many pro emulsions in sizes from 35mm to 4X5″. If you run out, try finding Velvia or Lumiere at a 7-11 store in rural Utah!
In anticipation of having results available for viewing I brought a small battery operated light box along as well as an 8X loupe. It’s a real joy to sit in the hotel room after dinner and review the days shooting. Instant feedback.
The reason why this approach was important to me was that I was testing a new lens (usually not a good idea on a major trip), and happily ended up using it for at least 40% of my shooting. The lens turned out to meet and even exceed my expectations. If that had not been the case I would have been able to use alternative lenses after viewing the first day’s results.
Cameras & Lenses
 These are, of course, a highly personal matter. Here are some hints that apply to all systems. A camera body with an illuminated viewfinder or display panel is a real plus for dawn shooting. So is a mirror lockup feature to dampen vibration during long exposures. First light exposures can run from a half second to 4 seconds or more, and especially with long lenses you’re fighting vibration at every turn. I use the self timer instead of a cable release as well, since this seems to give less vibration.
Forget autofocus. My Nikon system, as do many fine cameras, has a competent autofocus system. But, since you’ll be tripod mounted with stationary subjects, autofocus serves no purpose in landscape photography. Unless you have a serious vision deficiency you are capable of focusing more accurately visually than can the camera, at least at the contemplative speed at which you’ll be working.
Lenses are a tough call. I own 8 lenses for my Nikon and took most of them with me. When shooting from the car this presents no problem since having a selection of tools is ideal. For hiking though, and you’ll be doing a lot of it, these lenses can turn into a back-breaker. So, I usually carry a second much smaller hiking bag. Film, filters, extra end caps and other gizmos go in the photo vest pockets. The camera with one lens attached (wherever happens to be on it) goes over one shoulder or remains attached to the tripod which I carry like a rifle at the port-arms position. In the hiking bag I carry 3 additional lenses.
Here’s what they all were. 20mm, 60mm macro, 28mm~70mm zoom, 70mm~210mm zoom, and a 2X extender which makes the long zoom a 140mm~420mm. The 20mm and 60mm are treated as one for packing purposes, because I’ve epoxy glued two end caps together and then carry the lenses back to back; a real space saver.
Other lenses, including a 300mm stayed in the car. The ratio of usage on this trip was as follows:
20mm – 10%
28mm~70mm – 40%, (mostly at the 28mm to 35mm end of the range)
60mm macro – 5% (only for close-ups)
70mm~210mm – 40% (mostly at the long end of its range)
180mm – 0%
300mm – 5%
2X extender – 1% (usually on the long zoom)
My 28mm, 35mm and 85mm were unused and left at the hotel because of the success of the zooms. I’d expected the zooms would dominate usage, and they did. The 180mm F2.8, normally one of my favourite lenses, got no use at all. It usually serves as my prime medium-long hiking lens, but the need for a zoom under these conditions was so strong that the Sigma 70~210 got the nod, as you’ll see shortly.
Since I am almost neurotic about image quality, I usually favour using prime lenses from my camera maker, Nikon. But, for a shoot like this zooms are vital. Much of the time one simply can’t move a few feet forward or back to accommodate a single focal length lens, particularly when standing at the edge of a 500 foot precipice or with your back against a rock face..
Since 95% of the shooting I did was tripod mounted, I was able to always shoot at at least F8, if not using an even smaller stop for greater depth of field. This meant that I was at the lens’s optimum aperture. Both zooms are F2.8 maximum aperture, and based on my own prior test as well as those of others, have been found to be at their best at F8 or F11. At smaller apertures than this diffraction effects start to limit image quality, and these were only used when maximum depth of field was needed.
As mentioned, neither of these zooms are Nikkors. This is for two reasons. Nikon’s 80mm~200mm F2.8 is a great lens, but not for me. I simply don’t like push-pull zooms and the lack of a tripod mount on a lens of this size and weight is a serious drawback. I have been using the Sigma 70mm~210mm F2.8 for the past 2 years and have found it to be optically excellent and mechanically robust.
 My newest lens, and the one I was field testing for the first time, is the just introduced Tokina 28-70mm F2.6-F2.8 Pro zoom. This lens is based in part, I am told, on a justly famous design by Angenieux. It was recently tested by a major British magazine, and out of a group of 50 medium focal length zooms came out in the top 3. It is optically first rate. Mechanically, over the long term I expect that it will be just as competent. The construction is all metal, and the zoom and focus rings wide and comfortable to use. From F4 onward I can detect no significant difference in centre or edge sharpness at any part of it’s zoom range compared to Nikon primes. Distortion is very low and contrast high and smooth. My 28mm, 35mm and 60mm Nikkors aren’t ready for retirement just yet, but the convenience of this zoom, in a situation like this, is not significantly compromised by any lack of image quality with this lens.
My only criticism is that the lens is quite susceptible to flare. It handles the flare well though, without much contrast degradation or veiling. I suppose this problem is inevitable given the large number of lens elements. A well positioned hat saves the day when shooting at a wide angle setting when the sun is anywhere near the image.
In summary, for this shoot these two zooms alone would cover 90% of most photographer’s needs, and can be highly recommended.
Exposure
Correct exposure with transparency material is vital. A third stop error is noticeable and a half stop, particularly on the overexposure side, is nearly a loss. Though this sounds extreme, when making Cibachrome prints properly exposed images are quite critical for maximum quality.
Before a shoot like this, confirm by doing tests that your camera’s meter readings are accurate. When shooting, I generally use the F4’s built in spot meter for tricky lighting situations, but usually trust the matrix metering for general shooting. It has proven to be highly accurate in most situations. I always carry a hand held meter though, just for backup and double checks.
I usually shoot on fully manual exposure, since it’s the easiest way to bracket exposure. If the lighting and subject are easy, and I don’t think bracketing is needed, I’ll shoot in Aperture Priority mode. On the F4 these are also the only two modes where the depth of field button stops the lens down to the actual shooting aperture rather than all the way. Of course because I’m shooting tripod mounted, exposure time is largely irrelevant.
Batteries
 Ah yes, batteries. The small MB21 battery grip on my Nikon F4 takes 4 AAs. I put in new batteries before the trip, and though a set are usually good for 30-40 rolls, I found on the third morning that the batteries were dying, even though I had only shot about a dozen rolls to that time. Why? Maybe because the ones I’d loaded weren’t as fresh as they might be, but also possibly because it was close to freezing and I’d been using the body’s built in illuminator a great deal. Where was I? About a half mile from the car. Where were the spare batteries? In the car, of course.
Happily the batteries held out till I finished shooting at that location, but my lesson was learned. A set of fresh batteries now live in my photo-vest, to be with me at all times.
This brings up the issue of whether or not to use a second camera body as a backup. Because I was tripod shooting, a second body was redundant for rapid lens switching. I usually bring a second body in case of a technical failure, but after thirty five years of taking pictures, ten of them during the 70’s as a professional photojournalist, I have never had a camera body fail. You carry the weight and you take your chances.
Summary
If you want a photo weekend that will inspire, exhaust and delight you I can highly recommend south-eastern Utah and these two national parks. It will challenge and develop your skills and hopefully lead to a great many satisfying images.
Postscript
(July 1999)
If you have ever visited Arches, or just love the canyon lands and high desert landscape you must read…
Desert Solitaire—A Season in the Wilderness, by Edward Abbey. ISBN 0-345-32649-0.
Written with passion and clarity of vision, this book chronicles a season spent in Arches NP, Utah, and the canyon region by a Park Ranger. Now, almost a cult book, it describes the beauty and harshness of the Desert Southwest as it was in the ’60s. Anyone who loves this part of the country owes it to themselves to read this, not once, but once a year.
In January 2000 I returned to Southern Utah and spent 4 days shooting in Canyonlands, Arches and Dead Horse State Park. The experience was quite different, as are the images created. There is nowa new galleryof images from these locations that you should visit once you’ve read this article.
Michael Reichmann is the founder of the Luminous Landscape. Michael passed away in May 2016. Since its inception in 1999 LuLa has become the world's largest site devoted to the art, craft, and technology of photography. Each month more than one million people from every country on the globe visit LuLa.
You May Also Enjoy...

Turning Photographs Into Art Part 2: Simplicity
FacebookTweet Simplicity is the ultimate sophistication. Leonardo da Vinci 1 – Walking in a canyon I am walking down a canyon in Northern Arizona. The
SM-Editing 101
A Weekly Column By Mike Johnston © Mike Johnston 2002 The little three-letter word "pro" (it aspires to be a four-letter word but comes up a
