By: Alain Briot
Alain Briot is one of the most successful landscape photographers working
in the U.S. today. He was educated at the Ecole des Beaux Art in Paris,
has a Masters degree in Fine Art, and is currently working on his Phd.
This article is the first in a series of nine essays focused on the aesthetic aspects of photography. The overall goal of this series is to help you create a photograph which is aesthetically pleasing: a beautiful photograph.
This series of essays is related to my (2003-2004)Workshop Series. These new workshops will focus upon implementing in the field and through exercises, the concepts, techniques and approaches discussed in my essays. Together they provide a strong foundation on which to build and refine your photographic skills.
This first essay starts with an introduction to the series and continues with the first of the eight areas in the series:How to see photographically.
____________________________________________________
Part One – How to See Photographically
1 — Introduction
When Michael Reichmann first asked me to write an essay on “aesthetics” for this site my initial reaction was “What do you mean by aesthetics?” When we further discussed this essay idea while photographing together in theEscalante Grand Staircase National Monumentarea and Michael further described what he meant by aesthetics, I continued to be slightly at a loss about what to say on this subject . Even now, after having launched body and soul into the topic, I still find it difficult to write on something which is clearly an essential aspect of my work.
Why is it so difficult to explain the things you do everyday, the things you do intuitively, almost unconsciously? The reason I believe is simple: it is difficult because these things come naturally, almost easily, without having to purposefully have to think about them.
In my case it is also difficult to put into words a system which has largely been developed through years of trial and error, years of learning what works and what doesn’t work, until, someday, I find myself looking at one of my images thinking “I really like this one. How did I get there?” I, and you, got there, I am tempted to say, because of perseverance, because we never gave up, and because we loved photography so much that we somehow found both the motivation and the finances to continue in the face of less than satisfying results.
I am a visually oriented person. I have a long experience not only in photography but as a visual artist working in several different media. While I started photography in 1980 I was trained as a fine artist in painting and drawing before then and practiced art, under the guidance of my parents, since my early childhood.
Furthermore I am focused upon representing what I perceive as being beautiful in the most aesthetic way I can conceive of. I practice aesthetics on a daily basis, except I do not call it aesthetics. I don’t actually have a name for it. I create beautiful images of natural places, that’s all.
I am therefore looking for an effective way to teach what I do. But, I am also concerned with not making the subject unnecessarily complicated. After all it would be easy to approach it from a theoretical perspective, using lengthy and obscure terminology and creating a text which although it may be of interest to academics would provide no help whatsoever to photographers wanting to create better photographs.
So how do you explain, in a manner as clear and concise as possible, something that you do unconsciously? Well, one way is to explain how you proceed step by step, breaking the topic down into major areas. This is the approach I will follow in this series of essays. It has the advantage of being simple, of going straight to the point, and of moving from one concept to another in a logical and organized fashion.
At this time I see nine major areas, all related to aesthetics, which together encompass what I work on when I photograph:
1 — How to see photographically
2 — How to compose a photograph
3 — How to choose the best lens for a specific composition
4 — How to find the best light for a specific photograph
5 — How to choose the best “film” for a specific image
6 — How to determine the best exposure for a specific scene
7 — How to decide which photographs are “keepers” and which are not
8 — How to assemble a body of work
9 — How to establish a personal photographic style
In this series of articles I will cover these nine areas by describing my personal approach, and by describing the tools that I use (and those tools are not only cameras as you will see). I will use my photographs as examples, choosing images related to the topic being covered and describing how and why specific images were created.
Finally, the organization of this series follows the steps I take when creating photographs and the steps I recommend you take for the time being: find something you want to photograph, compose a photograph, choose the focal length you want to use, determine if the light is right, decide which film to use, calculate the proper exposure, decide which photographs you like best and, eventually, assemble a body of work and develop your own photographic style.
If this list, this process, sounds daunting right now don’t worry. It was daunting to me when I started and in some ways it still is. Keep in mind that the goal of this series is to walk you through this process step by step and to provide you with both skills and techniques that will enable you to work your way through both the long journey ahead and the long list above. This list is here only as a blueprint. We will work our way through it one step at a time starting today with the first skill on our list —seeing.
____________________________________________________
2 — Seeing
What I am talking about here is seeing photographically, or seeing like a camera. How to learn how to see like a camera is the purpose of this essay.
I firmly believe that I cannot take a photograph of something I have not seen photographically. In other words, I must first see something, see a photographic opportunity, see a photograph, before I can set up my camera and compose an image. This may sound obvious. It is not. I have met many photographers who “shoot away” so to speak in the hope that when they return home they will find a “good shot” somewhere in the mass of originals they are bringing back. Unfortunately this approach often results in disappointment.
This is not to say that taking a lot of photographs is bad practice. Many professional photographers take a lot of photographs and have excellent results. However, they do know how to see photographically and are not just shooting in the hopes that something will turn out. My comment is not based on how many photographs one takes. Rather, it is based on why and how one photographs, and on the premise that what one sees directly influences what one photographs.
Creating photographs is all about seeing and in this sense it is no different from other two dimensional arts such as painting and drawing. Creating photographs is really about studying and practicing “the art of seeing”.
____________________________________________________
3 — Abstracting
I am walking through the landscape in the spring, surrounded by the chatter of birds and the smell of fresh flowers. A breeze is softly blowing by, swinging the leaves and the trees ever so gently. I feel both relaxed and energized by the warmer weather, the new growth and the overall rejuvenation of Spring.
However, if I am to compose a photograph which expresses how I feel I must remember that none of the pleasant fragrances, none of the gentle breeze, none of the feelings of respite I experience will make it to the photograph. None of this will be present in the final print unless, through my personal knowledge of photography, I can manage to translate these non-visual feelings into visual information. This is because in a photograph only visual information is present. What is left from the original scene is what we could see in this scene. What our other senses told us — scent,
touch, sound, emotions, — all those are gone.
Is it possible to translate these other feelings into visual elements? Yes, I believe it is possible, and the purpose of this series of articles is to explain how to do so. However, only study, practice and exercises aimed at sharpening your visual skills will guarantee success. This is actually one of the most challenging aspects of photography, and one that separates the Master from the apprentice so to speak. As Ansel Adams put it: “Photograph not only what you see but also what you feel.” This is certainly a tall order, but not an impossible one.
____________________________________________________
4 — Focus
Focus on the visual side of the scene. As we have just seen it is easy to be fooled by our senses and think that what feels good, sounds good and smells good will also look good. We now know that this is not necessarily the case. What captures our attention when all our senses are at work may or may not be the visual aspect of a scene.
Therefore, in order to create successful photographs, we must at this point ask ourselves these questions:
1 — Is there something visually interesting in the scene I am looking at?
2 — If yes then what is the most important visual interest of this scene?
3 — Provided that I have decided to photograph this scene how can my photograph visually convey the feelings I have now?
To answer these questions we first have to learn to see the way a camera sees.
____________________________________________________
5 — Learning to See in Two Dimensions
So how do you learn how to see photographically, the way a camera sees?
A camera sees differently from the way we see. One of the main differences being that a camera has one lens, one eye, while we have two. We have binocular vision while cameras (except for stereo cameras) have monocular vision.
What does this mean in terms of seeing? It means that if we do not learn to see with only one eye, either by closing one eye or looking through a viewfinder while composing a photograph, we will end up with such mishaps as the proverbial tree sticking out of someone’s head. In this instance, when looking at the scene with both eyes, the tree does not appear to come out of that person’s head because binocular vision allows us to measure the distance between the person and the tree. Monocular vision removes all sense of distance — all sense of depth — leaving us with only height and width, and placing the person’s head and the tree on the same plane of vision.
A photographic print has only two dimensions as well: width and height (8×10, 16×20, etc.). Because depth, the third dimension, does not exist physically a photographic print has no physical depth. But depth is part of our world and thus necessary for us to make sense of a photograph depicting this world. In order for a photograph to be realistic and pleasing to our eyes depth must be simulated. If we were sculptors we wouldn’t have to worry about any of this. We would have width, height and depth as part of our medium. But since we are artists working in a flat medium we must learn how to recreate depth.
____________________________________________________
4 — Recreating Depth
Recreating depth , the 3rd dimension , in a 2-dimensional medium: So how do we simulate, or re-create depth? With the help of perspective. Well then how do we use perspective to recreate depth? By using these simple techniques:
A — Converging lines
We have all seen photographs of roads going from near to far until finally disappearing in the distance. Such photographs create a very strong sense of depth since the roads act as lines leading our eyes into the distance. The photographic print, or digital image on a monitor, is still absolutely flat. But to the eye it appears as if we are looking into a scene many miles deep.
B — Foreground Background Relationships (Large and Small Objects).
We know that to our eyes nearby objects appear larger than faraway objects. For example a Ponderosa Pine tree appears gigantic when we stand right in front of us but seem to shrink to the size of a large match stick when viewed from several miles away. Placing such a tree in the foreground of a photograph, or just part of the trunk of the tree, and then placing another similar tree in the background will definitely give the viewer a clear indication of distance. Comparing the relative size of the two trees will allow the viewer to actually gage the distance relatively accurately if he is personally familiar with natural settings and with Ponderosa Pines. Of course, any other plant or object can be used to the same end with the same result. Wide angles are often used for this purpose. However, any lens can be used as it is the intent that matters and not the equipment. I have personally done near-far relationships with wide angle as well as telephoto lenses.
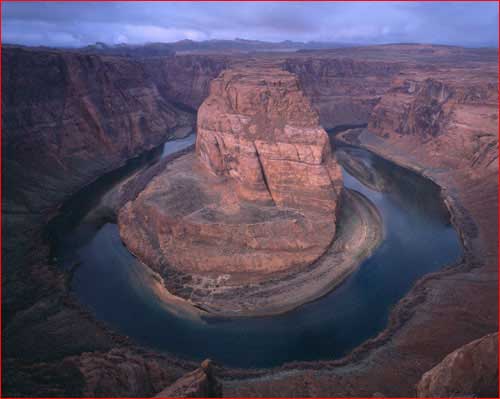
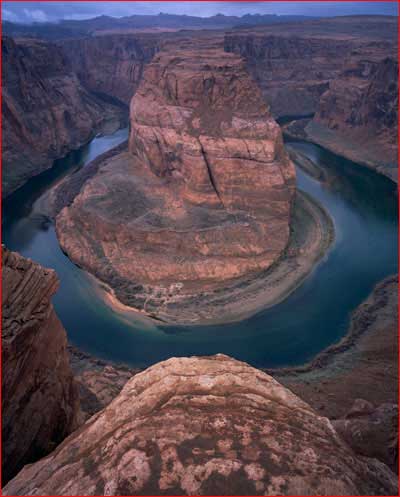
Horseshoe Bend, Glen Canyon NRA, Arizona. Linhof Master Technica
4×5, Schneider Super Angulon 75mm, Fuji Provia. (both photographs).
These two images were created in March 2003 during my most recent visit to this great location. I first created what I consider to be the “classic” view of the Horseshoe Bend, the horizontal image at left. I then realized that I had never seen a vertical composition of this scene. Realizing there was an opportunity to create a fresh image of an often-photographed location, as well as a foreground-background relationship (an horizontal foreground-background composition of the Horseshoe Bend is difficult to do since nearly all the space in the image is used by the Bend itself) I “walked the scene” looking for a foreground element .
After searching for a few minutes I found a rock formation with a shape which echoed the shape of the butte at the center of the Bend. To me this composition offers a much stronger sense of depth and distance than the horizontal composition. It almost makes me feel dizzy.
D — Overlapping
This fourth technique relies on one simple rule: we know that objects that are in front of other objects are closer to us physically. Using that rule we can purposefully compose a photograph so that certain objects overlap over objects thereby giving a strong sense of depth to the image.
E— Haze
Haze is another way to recreate depth. We know intuitively and from experience that haze (and fog) gets thicker as the viewing distance increases. Distant object, in hazy or foggy conditions, are thus harder to see than nearby objects. Atmospheric haze, so despised because it makes distant objects harder to see in the summer (the Grand Canyon is a case in point) also makes it easy to tell that the North Rim (for example) is quite a ways from the South Rim (16 miles precisely at Grand Canyon Village). Haze can thereby help us recreate depth in an otherwise flat medium.
F — Combining Several of the Above Techniques
These depth-creation techniques are often used in combination with one another. For example, I have created images of overlapping mountains, or mesas, in hazy conditions (again, a Grand Canyon for example). In this instance the two techniques reinforce each other resulting in a photograph which is visually stronger, and more powerful than if a single technique was used.
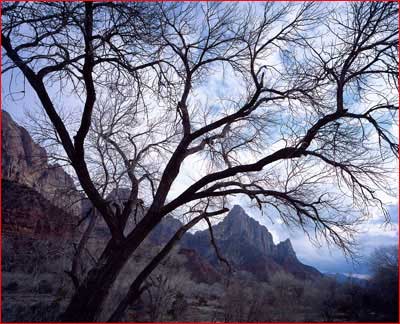
Similarly, overlapping objects are often used jointly with foreground-background relationships. For example a plant in the foreground which is emphasized through the use of a wide angle lens can be purposefully located in the compositions so as to partially hide a mountain in the background. Or, again, this same mountain can be seen through the branches of a tree as in this photograph of Zion National Park:
The Watchman seen through a Cottonwood tree, Zion NP, Utah.Linhof Master Technica 4×5, Schneider Super Angulon 75mm, Fuji Provia.
In this instance I did not think that the rock formations (the Watchman) were enough to create a successful image. The sky was nice because it wasn’t completely blue or overcast, but again something else was needed. By walking the scene I found this tree through which I could frame the scene since it was winter and the tree had no leaves. The tree also leaned slightly to the right following the line of cliffs which drop towards the right of the frame as well. It is a bold composition which does not emphasize just the tree or just the cliffs but instead balances visual interest between the two.
In the next installment we will study Part 2 in this series: “How to compose a photograph.” This is both one of the most important and one of the most challenging areas of photography. Definitly an article you do not want to miss.
Part 2 —How to Compose a Photograph
Coming in May, 2003

© 2003 Alain Briot
Beaux Arts Photography
http://www.beautiful-landscape.com
alain@beautiful-landscape.com
Lorem ipsum dolor sit amet, consectetur adipiscing elit, sed do eiusmod tempor incididunt ut labore et dolore magna aliqua. Ut enim ad minim veniam, quis nostrud exercitation ullamco laboris nisi ut aliquip ex ea commodo consequat. Duis aute irure dolor in reprehenderit in voluptate velit esse cillum dolore eu fugiat nulla pariatur. Excepteur sint occaecat cupidatat non proident, sunt in culpa qui officia deserunt mollit anim id est laborum.
Alain Briot creates fine art photographs, teaches workshops and offers DVD tutorials on composition, raw conversion, optimization, printing and marketing. Alain is the author of Mastering Landscape Photography, Mastering Photographic Composition and Marketing Fine Art Photography. All 3 books are available from Alain’s website as well as from most bookstores. You can find more information about Alain's work, writings and tutorials as well as subscribe to Alain’s Free Monthly Newsletter on his website. You will receive over 40 essays in PDF format, including chapters from Alain’s books, when you subscribe.
