Article and Photographs by: Alain Briot
Alain Briot is one of the most successful landscape photographers working
in the U.S. today. He was educated at the Ecole des Beaux Art in Paris,
has a Masters degree in Fine Art, and is currently working on his Phd.
This article is the second in a series of nine essays focused on the aesthetic aspects of photography. The overall goal of this series is to help you create a photograph which is aesthetically pleasing: a beautiful photograph.
This series of essays is related to my (2003-2004)Workshop Series. These new workshops will focus upon implementing in the field and through exercises, the concepts, techniques and approaches discussed in my essays. Together they provide a strong foundation on which to build and refine your photographic skills.

Zion Winter Sunrise
In the first essay we learned how cameras see the world and how this differs from the way we see with our own eyes. This month it is time to turn this knowledge into practice and create actual photographs. But before we can do this we need to learn how to compose a photograph.
Composing a good photograph is not easy. Teaching others how to create interesting compositions is even harder. In fact, composition is one of the most difficult areas of photography or of any visual art for that matter, so much so that my teacher, Scott McLeay, refused to teach composition. His only “guidance” in this matter was brief and succinct. He would simply explain that, in regard to composing a photograph, “each part of the image is equally important.”
If you are expecting rules you can follow to quickly compose better photographs, the previous paragraph is certainly not going to help you much (I will provide you with rules at the end of this essay). However, it carries within it, although in a cryptic manner, the roots from which excellent compositions can be created. Bear with me for a few minutes.
One of the mistakes that many people make when composing a photograph is to follow one of the tips that Kodak offers on the countless “How to Take Better Photographs” brochures it distributed a few years ago. This tip, addressing composition, recommends that you place the subject in the center of the frame and that you are careful not to accidentally cut off part of this subject. Since this tip essentially addresses photographing people, it says to place the subject in the middle of the frame, have the person look straight at you, and press the shutter. This is certainly the perfect recipe to create one of the most soporific photographs you will ever take. Yes, the person will be completely in the frame. No, nobody will ever care about your image except members of your immediate family and then only because they are courteous.
Kodak’s rule violates Scott McLeay’s statement. If, as Scott says, each part of the image is equally important, then placing the subject in the center of the frame is first, only one of several possible options, and, second, arguably the weakest composition, since only the center of the frame is used. In other words, what about the borders of the image? What about the corners of the image? And what about de-centering the subject to make the composition more interesting?
By thinking the way Scott McLeay proposes, we are moving towards a less superficial understanding of composition. Already we have understood a number of fundamental aspects of composition. Let’s recapitulate:
1. Composing a photograph does not necessarily mean placing the most important subject in the center of the image
2. De-centering the subject can result in more interesting compositions
3. Both the edges and the corners of the image can and should be used. They are not just “there” because there is no way to do away with them. They are there because they are important and can be used both effectively and creatively.
Kodak’s rule — to place the main subject in the center of the frame — was designed for one main reason: to enable photographers whose main purpose was to take family photographs to take photographs in which the main subject was completely shown. We have to keep in mind that several years back, when this rule was first established, most amateur cameras were rangefinder cameras which did not have a high-precision viewfinder. In other words, the viewfinder was not accurate enough to show exactly what was and was not going to be in the photo. The borders of the image were uncertain and thus objects placed close to the edges of the image may or may not be visible in the final print. They may be in or they may be out. Worse, they may be cut off, partly or completely, showing only half of someone’s body because this person was placed too close to the edge of the photograph. Placing the main subject in the center of the image, safely away from the uncertain location of the photograph’s borders solved all of these problems. The resulting photograph may not be contest-winning material but it certainly kept customers from complaining about Kodak’s products. No one created masterpieces but no one complained either.
Things are very different today. Modern SLRs which show 98% to 99% of the image in the viewfinder have eliminated the risk of inadvertently cutting off important parts of the image. The use of tripods enables us to not only compose each image precisely but insure that this composition stays exactly the same until we move the tripod to a different location. The use of transparency film, as opposed to color print film, means that what we see on the light table is the exact image we saw in the viewfinder. By comparison, most family photographs (for which Kodak’s rule was established) are done with negative film, developed at the local drugstore, and arbitrarily cropped by a one-hour photo operator. Finally, the fact that many of us scan and print our own work (or print it in our own darkroom) means that we have complete control over cropping or not cropping our images. If you shoot digitally you no longer need to wait to see your photographs. You can see the actual image on the LCD screen, in the field, when you take the photograph.
Today, we can precisely control what will be visible in the image and what will be left out of the image. We can do it by
First, paying very close attention to the elements we include in our photographs and
Second, controlling the exact location of these elements
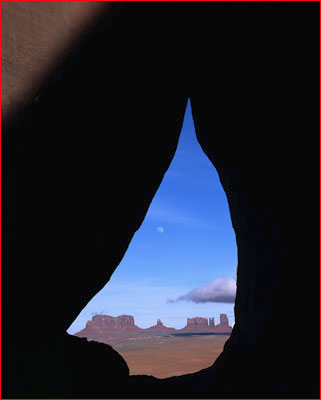
Tear Drop Arch and Moonrise
The Strongest Way of Seeing
Let’s look at another photographer’s take on composition: Edward Weston. When asked for his definition of composition Weston answered that “Composition is the strongest way of seeing.”
Weston’s definition contains two very important words about composition: seeing and strong.
We know, from reading the first article in this series, that photography is largely about seeing. We now are learning that composition is about strength: visual strength.
If composition is the strongest way of seeing, and seeing is the strongest way of photographing, then composition is the strongest way of photographing. If this sounds like Aristotelian logic that’s because it is. Is it accurate? Let’s see.
There is More Than One Way to Compose a Scene
Paying this much attention to composition implies that there is more than one way to compose a scene. Indeed, to the experienced and trained eye, the same scene can be seen and composed in a number of ways. This fact was to me a revelation when I first discovered it. For years I had been struggling with trying to re-create photographs taken by other photographers. These photographs amazed me and I literally sought to stand in the footprints of those who created them. The problem is that when I stood in the locations where those great images had been created I could see only one composition: the one that another photographer had created. I could not see or compose for myself. I was a slave to the way other photographers saw the world.
One day I managed to free myself from this enslavement (how I did this is the topic of another essay). That day I started to see the world for myself. I realized that there wasn’t only one possible image in a given location but a multitude of possible images. My mind had, somehow, opened up. That day my goal changed completely as I sought to capture on film not the images I had seen before but the images I could now see in my mind’s eye. I was composing my own images.
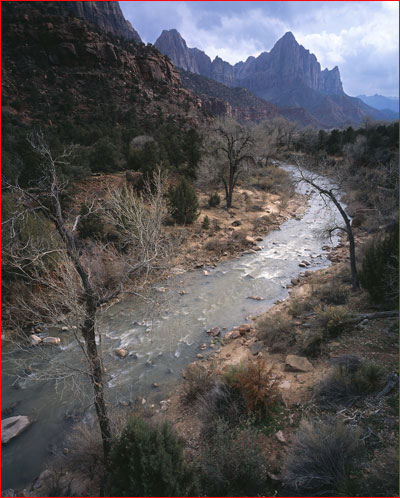
The Virgin River and the Watchman at Sunset
One Composition Among Many
But a new problem surfaced — I could capture only a few of the many images which now presented themselves to me. I had to make a choice because I had a limited amount of time to work while the light was at its best. It was then that I went back to Weston’s definition, and this definition allowed me to separate the wheat from the chaff, so to speak. What I was looking for wasn’t just nice or new compositions. What I was looking for was “the strongest way of seeing”. To implement Weston’s approach, I started walking around the scene I wanted to photograph, looking for the composition which stood above all the others, the one which would enable me to represent the scene in front of me in the strongest manner.
Walking The Scene
After this long conversation about what is composition, I am sure you want to know how you can do this, how you can compose better photographs. Well, here is the approach I use. Try it, even just once, to see if it works.
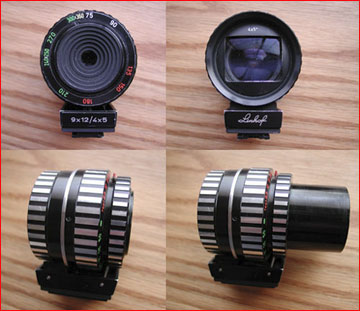
If you are watching theLuminous Landscape Video Journal(and if you are not you should because each issue is really worth your time), you may have noticed that whenever I photograph I spend a lot of time walking around and not photographing. I refer to this as “walking the scene” . While walking the scene I carry aLinhof Multifocus Viewfinder(LMFV). This is one of my most trusted photographic tools. Basically it is a portable viewfinder which allows me to see exactly the composition I can get with lenses from 75mm to 400mm. These are 4×5 lenses, my primary format, and they roughly equal 24mm to 135mm in 35mm format. Of course I could do this with a 35mm camera and a zoom lens but the LMFV is much lighter and compact than any camera. It also has the benefit of not showing any technical data in the viewfinder, such as shutter speed, f-stop, etc., thereby allowing me to focus my attention 100% on composition.
The Linhof Multifocal Viewfinder
With the LMFV I can compose hundreds of 4×5 photographs each day without ever actually setting up my 4×5 view camera. As I compose photograph after photograph, I evaluate the respective strength of each image (remember, I am looking for the strongest way of seeing a specific scene) . Many of these “photographs” are very casual and looking through the LMFV lets me know right away whether the composition is strong enough to make a good photograph. When I find a worthy subject, I investigate it further and look at the scene from different angles with the LMFV. Finally, when I find a composition that I want to photograph, I set up the camera knowing precisely what I want to do. Because setting up a 4×5 is time consuming, this approach is very time efficient.
The beauty of the Linhof Multifocus Viewfinder lies in its portability and excellent optical design. I can precisely visualize 4×5 images all day without having to set up my camera.
Of course, 4×5 requires a different approach than 35 or medium format because it is so cumbersome to carry and so time consuming to set up. But the point I want to make here is that what I am doing most of the time when I photograph is not actually photographing but rather looking for photographs. I spend much more time searching for a photograph than actually photographing. In other words, I first have to find a composition before I can create a photograph.
Using a “cutout” Finder
The LMFV is a great tool but it is unfortunately expensive. A low-cost alternative is to create your own viewfinder using a 4”x5” sheet of black cardboard, or black plastic, and cutting out an opening in it with an X-acto knife. Make sure the opening has the same proportions as your camera format (i.e. 24×36, 6×6, 6×7, etc.). Also, make sure you leave roughly a 1” border around the opening.
This simple finder will allow you to frame the scene and isolate elements without having to carry your camera around and without being distracted by the information in the camera viewfinder. I used such a finder for years before purchasing the LMFV. I carried several such finders, each with a different opening matching the different film formats I was using at the time.
Finally, certain rangefinder cameras come with detachable viewfinders. For example the Fuji 617 panoramic camera has a detachable finder for each lens. When I photograph with this camera I simply put the viewfinder in my pocket, leave my camera in my bag, and look at the scene through the finder. The finder shows me exactly what the camera will see and is much easier to carry and use by itself. Once I find a composition I like I set up the camera and take the photograph.
Rules of Composition
I know this essay will not be considered complete unless I go over some of the rules of composition. Here are some of the most important ones:
1. Rule of thirds
Lake Powell Sunset
This rule calls for you to divide your image in three equal parts and compose your image in thirds. This applies to both vertical and horizontal directions and vertical and horizontal compositions. The dominant subject matter in the photograph is placed one third up or down the image or one third from the left or right side of the image. In “Lake Powell Sunset,” for example, the lake and the rock formations take only one third of the available vertical image space while the sky and the cloudscape take up the remaining two thirds.
2. The Golden Rule
The Golden Rule came to prominence during the Renaissance when it was rediscovered by the Masters. It was, however, introduced in ancient Greece. The Golden Rule states that the most important area of an image is located near the bottom right corner of the image, roughly one fourth of the image height up and one forth of the image width to the left. “Zion Winter Sunrise” was composed according to the golden rule. The yucca, the most prominent foreground element, is located in the right bottom corner roughly at equal distance of the bottom and the right side of the image.
Why the bottom right corner? Essentially because theoretically we “read” images the same way we read a written text: from left to right and from top to bottom. Since our reading ends at the bottom right corner of the page this is the area where we hold our attention for the longest time as we either stop or pause before turning to the next page (or the next photograph). In line with this theory Japanese and Chinese readers look at images very differently.
3. Leading Lines
Lines leading the eye into the composition, and thus into the image, are another classical way to compose a photograph. The typical example is a road, or a pair of railroad tracks, leading the eye towards the horizon.
In landscape photography we do not have roads or railroad tracks unless we decide to include man-made elements. Fortunately we have other elements which can work just as effectively. One of them is rivers, as shown inThe Virgin River and the Watchman at Sunset. In this instance the Virgin River draws our eye deep into the image. The sweeping shape of the river adds a nice movement and helps make the image even more interesting.
4. Perspective
Perspective is a strong compositional tool. In the example above, as the Virgin River moves into the distance, its width is progressively reduced. This reduction is caused by perspective which dictates that the size of objects is proportionally reduced as these objects become increasingly distant from the viewer. Perspective is one of the most effective ways of adding depth and distance to an image
5. Framing the Photograph
Here, the main view, typically the background, is framed by another element of the scene, typically a foreground element. In Tear Drop Arch Moonrise, I used Tear Drop Arch to frame a distant view of Monument Valley. Without the arch this view of Monument Valley would be far less interesting and dramatic.

Next month I will discuss part three of this series:How to Choose The Best Lens for a Specific Composition. This crucial aspect of photography will take us further towards the creation of fine images.
A suivre…
Part 3 — Coming in July, 2003
© 2003 Alain Briot
Beaux Arts Photography
http://www.beautiful-landscape.com
alain@beautiful-landscape.com
____________________________________________________
Alain is conducting a series of weekend workshops in the Phoenix AZ
area that are linked to his Esthetics Essays. You can find out more about these by clicking here.
____________________________________________________
Alain Briot creates fine art photographs, teaches workshops and offers DVD tutorials on composition, raw conversion, optimization, printing and marketing. Alain is the author of Mastering Landscape Photography, Mastering Photographic Composition and Marketing Fine Art Photography. All 3 books are available from Alain’s website as well as from most bookstores. You can find more information about Alain's work, writings and tutorials as well as subscribe to Alain’s Free Monthly Newsletter on his website. You will receive over 40 essays in PDF format, including chapters from Alain’s books, when you subscribe.
You May Also Enjoy...
Pixels Vs Film
Pixels Vs Film A Draft Article by Brad Templeton How many pixels are there in a frame of 35mm film? A print?This is a somewhat
