By: Alain Briot
1 – Introduction
Exposure. The word contains a certain notion of risk and a certain amount of irremediable commitment. Once the exposure has been set on a camera and the subsequent photograph taken there is no way to physically change this exposure. You are done, set and have to live with the consequences. Hopefully the exposure is “right on” and the photograph holds details everywhere.
But what if the photograph does not hold detail everywhere? What if your calculated exposure isn’t absolutely, 100% correct? What if your calculations were off, what if you made a mistake! Then what? Is there a way out, a way back to a great image despite the fact you could have done better in the field exposure-wise?
More importantly, in order to avoid post-photographic-exposure stress, how can one calculate, with absolute accuracy, the perfect exposure, each and every time, in the field?
So many questions and, I am afraid, so few answers. Exposure isn’t the most widely discussed subject in photography. Articles on it are rare and many photographers skirt the issue. Not to be surprised. Exposure isn’t rocket science. There is a certain amount of leeway, adjustment and artistic interpretation involved.
Let’s take a closer look at an aspect of photography that is rarely closely looked at. And let’s try to relax and have fun in the process. After all, poorly exposed photographs are not deadly. They are just annoying and disappointing. The good news is, we can expose other photographs, and hopefully do better after reading this article.
2 – The Importance of Proper Exposure
Exposing each photograph properly is of utmost importance in order to get the best print possible from this one image. This is because, whether you use film or digital capture, your original film or digital image contains all the information you will ever get of the scene you photographed.
Ansel Adams was originally trained as a professional pianist. He often made comparisons between photography and music. In regard to exposure, he compared the negative to the score and the print to the performance. Today, we can extend this score to transparencies and Raw files. The performance, the print, has not changed. Neither has the overall idea behind Adams’ comparison. The better the score, the better the performance will be.
In order to get the best score possible, you want as much information from the scene you photographed recorded on film, or on the Raw file, as possible. Ideally, you want details everywhere in the scene. Since the two most important areas of this scene are the shadows and the highlights areas, you want to make sure that you have details in both.
The problem is that getting details in both shadow and highlight areas is difficult. This difficulty stems from the contrast range that can be captured by the specific film, or digital sensor, you are using. This contrast range, which is measured in f-stops, varies from film to film and from sensor to sensor. From this statement we can already deduce one of the most important tenets of exposure: in order to expose your film, or digital file, properly, you must know its contrast range.
3 – Grey cards, Overexposure and Underexposure
Before proceeding any further it is necessary to explain some of the terms commonly used when discussing exposure.
Grey Cards
A grey card is a card painted Medium grey. These cards are available from Kodak. Grey cards have a precisely 18% reflectivity meaning they reflect 18% of the light that falls on them.
This is important to know since light meters all over the world, irregardless of the manufacturer, are calibrated to give an 18% grey reading. This means that reading a uniform surface and photographing it without adjusting the exposure given by the meter will turn any surface into an 18% reflectivity grey surface. Whether you photograph a black or a white surface it will become 18% grey in the photograph.
In other words, a light meter is simply a machine designed to render the world 18% grey and calculate each exposure accordingly. To get a lighter or darker photograph based on the reading from a light meter you have to adjust the exposure accordingly and either overexpose or underexpose. If you trust what your meter tells you, you will get an 18% grey photograph of every surface you photograph!
If you photograph in black and white you will actually get a medium, 18% shade of grey. If you photograph in color you will get a color equivalent to an 18% reflectivity. It will not be grey, but it will have the same reflectivity as an 18% grey card.
Numerous cameras today calculate the exposure and then compare the scene in front of them to a database of thousands of photographs pre-recorded in the camera’s digital memory. Such cameras do not blindly follow what their light meter tells them. Instead, they compare the exposure provided by the meter to correct exposures for similar scenes pre-calculated and recorded in the camera’s build-in database. They then adjust the final exposure accordingly. These cameras will deliver a much higher percentage of correct exposures. However, in extreme exposure situations, you may still have to make exposure corrections yourself.
Overexposure
Overexposure is the process of exposing a photograph more than what your light meter (either in-camera or hand-held) tells you to. In other words, you are not following what your camera is telling you. Instead, you are making a call and saying “I don’t think the exposure my light meter tells me to use will result in a properly exposed photograph hence I will change it and expose more than what the meter is telling me.”
Overexposure gives you a brighter image.
Underexposure
Underexposure is the process of exposing a photograph less than what your light meter is telling you. Again, you are not following what your meter is telling you instead. This time you are making a call to expose less than what the meter is saying.
Underexposure gives you a darker image.
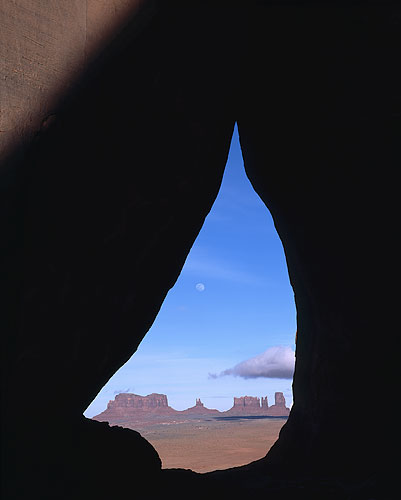
Tear Drop Arch Moonrise, Monument Valley, Utah
Linhof Master Teknica 4×5, Rodenstock 210mm, Fuji Provia F
This photograph could have easily been overexposed had I used an average meter reading of the scene. To hold details in the moon and clouds I had to considerably underexpose the arch. There is actually some details on the arch but I decided to print it pure black, except for the triangle of directly-lit rock at the top left corner, to emphasize the stark quality of this scene.
4 – How to determine the contrast range your film or your digital camera can capture
This brings us to our first exercise in this article: determining the contrast range of the film(s) and/or digital cameras you are using. Here is how to conduct this test with either film or digital capture:
– Find a uniformly lit and colored textured surface. You can use a wall that has a texture to it and is in open shade. Choose a wall that isn’t painted in a dark shade. Ideally, you want this wall medium grey or as close to this as possible.
– Get as close to the chosen surface as possible so that you see only this surface in your viewfinder. You don’t want anything else in the photograph.
– Take a photograph at the reading given by your camera. That is set the exposure that your camera, or your light meter if you use a hand-held meter, says is “correct”.
-Take a photograph underexposed by one stop, two stops, three stops, four stops and five stops. If you are not familiar with how to do this look in your camera manual .
– Take a photograph overexposed by one stop, two stops, three stops, four stops and five stops. Again, if you are not familiar about how to do this consult your camera manual.
– If you use film get your film developed normally by your lab. Do not ask for any compensation of any kind during film development. Do not scan the film.
– If you use digital capture import your raw files in your raw converter and do not adjust the exposure compensation whatsoever. Make no adjustments in the raw converter. Simply convert the images and open them in your image editing software.
– Look at your film (transparencies or negatives) on a light table and look at your raw-converted files on a closely-calibrated monitor. You should have 11 images in front of you. One exposed “correctly”, 5 overexposed and 5 underexposed.
– What you are looking for are images that are either so light or so dark that they do not show any detail – any texture – either on the film or on the monitor.
– Once you have determined the images that have detail in them count them. Count only those that are underexposed or overexposed. Do not count the one which shows the exposure given by your meter.
– If you have 6 images showing details (not counting the “correctly exposed” image) it means your film or digital sensor is able to record a 6-stops range. If you have 5 images with details you can record a 5 stops range and so on. Your results will vary from film to film and sensor to sensor as I said previously.
For example, I use almost exclusively Fuji Provia 100F. I know, from conducting the test I just described, that I can safely record a range of 5 stops: 3 under and 2 over. Your own tests will show the exact contrast range your film or digital camera can record.
Knowing this gets you a lot closer to finding the optimal exposure for a specific scene. To calculate this optimal exposure you need to do the following:
– First, measure, either with your camera or a hand-held meter, the darkest and lightest area of the scene in front of you. Using a spot meter will make this process much easier.
– Second calculate how many stops are between the darkest and lightest area of the scene. For example, if the shadows measure at f/2.8 at 1/60th of a second, and the highlights at f/16 at 1/60th of a second, you have a 5 stops contrast range in the scene in front of you. Keeping either the f-stop or the film speed constant will make this calculation a lot easier. In this example I kept the speed constant, using 1/60th of a second, and changed the f-stops.
– You will need to memorize the f-stop and shutter speed scales. Here they are:
F -stops
f1 – f1.4 – f2 – f2.8 – f4 – f5.6 – f8 – f11 – f16 – f22 – f32 – f45 – f64Shutter Speeds
1/500th–1/250th–1/125th–1/60th–1/30th–1/15th–1/8th–1/4th–1/2–1sec–2sec–4sec–8sec–16sec-etc.
Each of the settings on either scale are one stop apart. Going up or down from one setting to the next means either overexposing or underexposing by one stop.
On the f-stop scale changing to a higher number means underexposing and changing to a smaller number means overexposing (provided you do not change the shutter speed).
On the shutter speed scale a smaller number means overexposing and a larger number means underexposing (provided you do not change the f-stop).
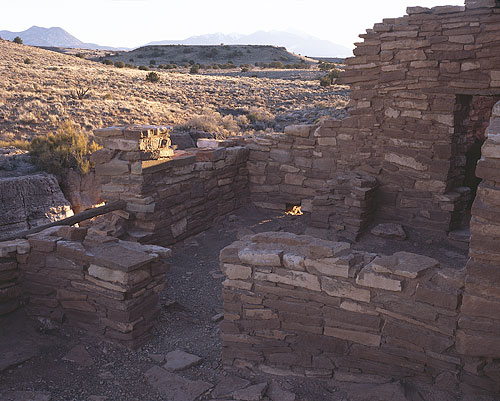
Lomaki Ruin, Wutpaki National Monument
Linhof Master Teknica 4×5, Rodenstock 150mm, Fuji Provia 100F
This photograph shows an extreme range of contrast from the shaded part of the ruin to the Mountains and the sky. To get details in the ruin I had to almost overexpose the mountains. I could not have calculated the exposure correctly had I not known precisely the contrast range of the film I was using.
5 – The Power of the Histogram
Digital capture introduced a new tool in the quest for the perfect exposure: the histogram. With a histogram available on the camera we have much more than just the proper exposure settings. We also have the result of setting the camera at a specific exposure. What the histogram shows and tells us is:
– what will happen to the range of contrast when the scene is recorded digitally
– where the different exposure value areas will fall
– if all the elements of the photograph will be recorded with details
In this respect the histogram is best thing that happened to photographers since the invention of the light meter. A histogram does not replace a light meter. We still need a meter to calculate the exposure. But the histogram gives us what we previously could only see in the darkroom, or after scanning, and that is a map of where each area falls.
Histograms come in two flavors: monochrome and tri-color. Monochrome histograms show where the brightness values are located on the photograph. Tri-color histograms show how the brightness values of the three primary colors – red, green and blue – are recorded. Tri-color histograms allow the photographer one additional level of control since we now can tell what the blue, red and green channels of a digital image will look like and thus monitor each of the three channels prior to taking the photograph. Since the light level of red, green and blue objects is often different this control is very important.
6 – Bracket, Bracket, Bracket
For years photographers have used a simple remedy to the difficulty of determining the perfect exposure: bracketing. Bracketing refers to the widely-used practice of taking several photographs of the same scene, each with a slightly different exposure, in the near-certain hope that one of these exposures will turn out to be right on.
Bracketing shows first that empiricism is still a valid approach. It also shows that despite our constant improvements in equipment, technique and methodology a certain amount of guesswork remains.
Bracketing also offers a universal remedy to exposure difficulties. All you have to do is “get in the ballpark” to use one of the many baseball metaphors found in the American language.
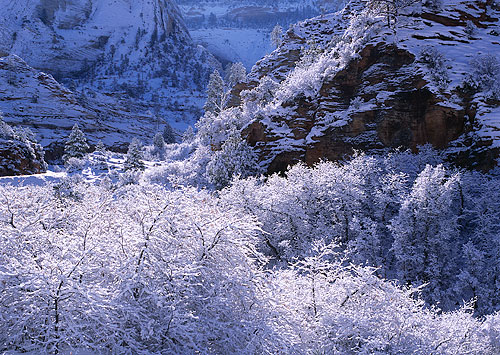
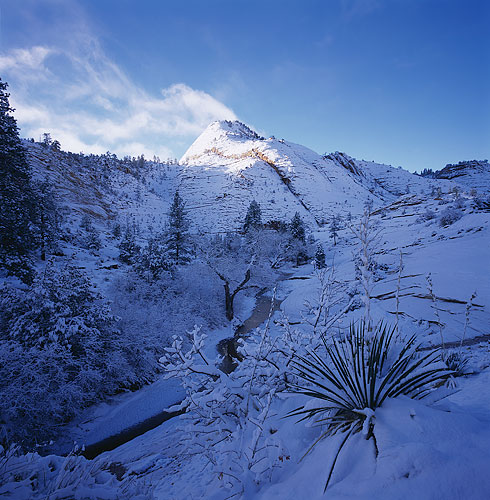
Winter Sunrise, Zion National Park, Utah
Hasselblad 503CW, Zeiss 150mm, Fuji Provia 100F
Such a scene can be a real challenge to meter properly. I actually took only one exposure and got it right because I knew that I wanted the shaded snow area medium grey. I therefore took a spot meter reading of the shaded snow area at the top left of the photograph. As a result the cliff in the top right of the image is darker and the snow covered trees in direct sunlight nearly white, just the way I wanted it. This scene is a perfect candidate for bracketing if you are not 100% sure what the proper exposure may be. It is better to be safe than sorry.
Personally I bracket with both film and digital capture. With film the cost of the extra film is worth the peace of mind I get. With digital cost is no longer an issue and bracketing should become second nature in situations where finding the correct exposure is either challenging or overly time-consuming.
In practice I normally bracket one stop over and one stop under my calculated exposure. I may bracket in full stops or in half stops. For example, if my calculated exposure is f/22 at 1/4th of a second, I will make an exposure at this setting, one exposure at f/22 and 1/2th and one exposure at f/22 and 1/8h. This way I have a two stops bracketing range which, in nearly all situations, assures me that I will have at least one properly exposed image.
With digital capture it is recommended that you “expose to the right” as Michael Reichmann says. This approach stems from digital cameras being able to record more information in the high values than in the low values. Exposing to the right means overexposing your image. How much? As much as it takes to place the highest value all the way to the right of the histogram without going out of this histogram. It also means bringing the exposure level down in the raw conversion software to bring the image back to a normal exposure. The gain is better image quality, especially in the midtones and shadows, where additional information was recorded through overexposure.
When exposing to the right it is important to keep in mind that each image is composed of three channels (red, green and blue) and that brightness levels are different in each individual channel. If your camera only has a single channel histogram you need to be very careful when exposing to the right since you may accidentally overexpose one or two of the individual channels. Ideally you want to use a camera which has a three-channels histogram, since only a three-channels histogram will show you what is happening in each of the red, green and blue channels. Unfortunately, as of April 2004, only a few cameras offer three channel histograms.
When I expose to the right with a single channel histogram camera I also take a photograph underexposed by one stop and sometimes one underexposed by two stops. Why? First, because this insures me that I will not accidentally clip one of the individual channels and that I will have an image in which all the information is recorded. Second, because there is no extra cost, third because it takes hardly any additional time to do so and fourth because this allows me to see a properly exposed image on the camera’s LCD screen instead of an overexposed image. Seeing this image is important to me in terms of estimating how each color and brightness value will look on the final print.
Zion Snow Sunrise, Zion National Park, Utah
Hasselblad SWCM-CF, dedicated Zeiss Biogon 38mm, Fuji Provia 100F
Another challenging scene exposure-wise. First, the light level was changing very fast as the sun was rising requiring constant monitoring with my light meter. Second, the contrast was very high due to the presence of sunlit snow and relatively deep shadows. Third, I had to make a decision about how dark I wanted to shaded snow. I did not have time to bracket since the clouds disappeared shortly after I made this exposure. The scene holds details throughout fortunately. Shaded snow turns blue on film because shadows are lit mostly by blue light from the open sky.
7- Study the Scene you are Photographing
Not all photographic subjects are created equal. And not all photographic subjects can be exposed in the same manner hence the importance of studying the scene you are photographing carefully. There are three basic situations to watch out for:
A – Very bright objects
Very bright objects will nearly always “throw your meter off” and result in underexposed photographs. The reason being that your meter wants to turn all objects in the scene into an 18%, medium grey value. If the object is white, and you want it white on film, you will have to overexpose in order to counter balance the meter’s desire to make all objects grey.
A typical situation in landscape photography is snow. Snow is by definition white, highly reflective and the cause of many underexposed photographs. With most light meters, either hand held or built in, it is necessary to overexpose snow by one to two stops. Of course, you have to take into account whether the snow is in the sunlight or in the shade. Snow in the shade does not need to be overexposed very much unless you want to show it brighter than it really is.
Shiny and reflective surfaces are another potential subject which may result in underexposed photographs. The sun reflecting off a pool of water, or a metallic object lit by direct sunlight, or even a very bright canyon wall for example also need to be overexposed from what the light meter is saying by one stop or more. Again, the meter is reading the brightness of these objects correctly but wants to render them 18% grey while they are actually much closer to pure white or actually pure white.
B – Very dark objects
Very dark objects will also confuse your meter, this time causing it to overexpose in order to turn into medium grey what is actually a black or nearly black object. A typical situation is a backlit scene at sunrise with the outline of cliffs, mountains, monuments or trees. It is best to let these elements be pure black on the final photograph because getting details in both the monuments and the sky is very difficult if at all feasible. However, your meter will want to average the scene to 18% grey resulting in greyish blacks which are less than pleasing in my estimate. In this situation you need to underexpose by one to two stops in order to get the proper exposure.
Similarly, other dark objects, such as a very dark tree, coal, black sand, etc. will end up being underexposed if you do not adjust -ie underexpose- the reading your meter gives you.
C – Rapidly changing light levels
I cannot stress enough the importance of constantly monitoring the light level of a scene at critical times such as sunrise, sunset and active weather. Constantly increasing light levels, at sunrise for example, and constantly diminishing light levels, at sunset for example, are very difficult to monitor with the naked eye. The presence of clouds, alternatively hiding and revealing the sun, offer the same challenge. When the light is changing fast our eyes adapt accordingly and we are not always able to see the change in brightness levels precisely.
In such situations it is necessary to constantly monitor the light level. This is particularly true if you use a manual camera and a hand-held light meter, my situation when I work with 4×5. However, this also applies to automatic cameras. What was a dark object at dawn may have become a very bright object after sunrise and this bright object may be confusing your camera’s built in meter. Same thing at dusk where the camera may be overexposing what it, after all, a dark landscape.
8 – High Contrast Remedies
What happens if you do not succeed in exposing a photograph properly in the field or if the range of values is to high to record details both in the highlights and in the shadows?
Well, first, rest assured you are not the only one in this situation. This is a problem that has plagued photographers since the very beginning of photography. Fortunately, there are a number of solutions available. Let’s take a look at them.
A – Split neutral density filters
A split neutral density filter is a filter which is divided in two parts: a clear area at the bottom and a neutral grey area at the top. The clear area of the filter is larger than the neutral density part, the ratio being usually 2 to 1 or 3 to 1. The transition between the clear and neutral grey area is gradual.
Split neutral density filters are available in either one stop, two stops, three stops or more. I personally recommend either a one or two stops split neutral density filter. More than that and the effect becomes obvious and unnatural. I also recommend a soft transition between the graduated and the clear areas of the filter so that this transition is not visible on film.
Using a split neutral density filter is easy. Just place it in a holder in front of the lens and move it up and down until the transition is where you want it. A typical use for this filter is to compensate for the brightness of the sky at sunrise or sunset. In this case you place the neutral density area over the sky and the transition along the horizon. Other uses are possible, the limit being your own imagination.

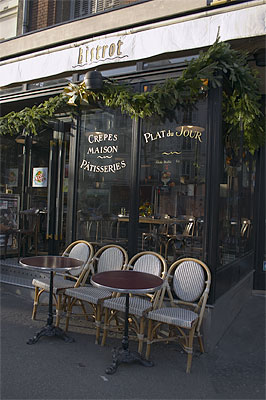
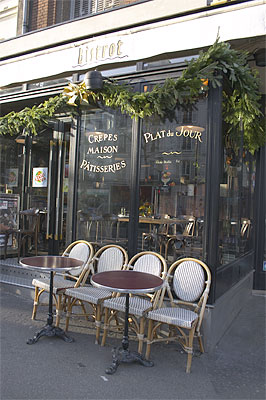
Paris Bistro
Canon 300D with dedicated 18-55 lensThese 3 photographs show a perfect example of digital sandwiching. I took a single photograph of this scene in Paris. When I converted the image from Raw I realized I could not get details in both highlights and shadows on a single converted image. I therefore decided to do two raw conversions, one for highlights and one for shadows. I then combined these two files in Photoshop. This technique takes only a few minutes and works extremely well. Furthermore, it is virtually invisible since you can adjust the brush size and the areas removed at will. The third photograph, on the far right, shows the final result.
B – Raw conversion for highlights and for shadows
There isn’t much more you can do in the field besides optimizing the exposure and compensating for a large contrast range with split neutral density filters. You can certainly look for scenes which contrast range does not exceed that of your film or digital sensor, but doing so will severely limit what you can photograph.
If you capture a scene which contrast range exceed that of your film or digital camera the next step is to compensate for this excessive contrast range in the darkroom.
One very effective technique for digital images is to make a separate raw conversion for highlights and for shadows. This technique is perfect when you have all the information you want in the raw file but cannot successfully display all this information in a single raw conversion.
To apply this technique start first with the highlights and adjust the exposure control in the raw conversion software so that highlight areas look just the way you want it on your monitor. Typically you will have to lower the exposure of your photograph. Convert this image. Then, going back to the original raw file, make adjustments to the shadows so they too look just the way you want them. Typically you will have to increase exposure in the shadows. Make a second conversion for the same image.
Open both images in your image processing software and drag one of the images on top of the other in a separate channel making sure they are in perfect registration. Add a layer mask to this channel and, using the eraser brush and a soft, wide brush, remove the parts of the top image which you do not want to see. For example, if you placed the image with the proper highlights on top erase the shadow part of this image to reveal the properly converted shadows on the layer underneath it.
C – Scanning for highlights and for shadows
A similar technique can be used with film this time by scanning the same transparency or negative two times, one time with the scan settings optimized for the highlights and the second time with the scan settings optimized for the shadows. Import both images in your image processing software and proceed as described above. Make sure you do not move your film in the scanner between the two scans otherwise your two image will not register perfectly.
You may ask “why not scan or convert from raw only once and then use image adjustments — such as curves, dodging and burning or the new highlight-shadow filter in Photoshop CS?” You certainly can use this approach for many images which require only a minor amount of contrast correction. But for images which require significant contrast correction you will get better quality results using the technique I just described. This is because you will work with images that have the information you need from the start instead of images that have little or no data either in the highlight or shadow areas.
D – Sandwiching
In some extreme situations the above technique will not work because nothing was recorded in the shadow or highlight areas on a single photograph, either film or digital. However, you did take several photographs and you have one exposed for the highlights and one exposed for the shadows. Shadow details are present on the first photograph and highlight details are present in the second photograph.
In this instance your only resource is to sandwich the two images and use the areas with details from each of them. Doing this successfully takes more time than the previous technique. Furthermore, sandwiching works better with digital since digital images are always in perfect registration if the camera was placed on a tripod, if the camera wasn’t moved between exposures and if the same lens or zoom setting were used for both images. With film things are more problematic since films are almost never exactly in the same place in the camera in successive frames, no matter what format you use.
At any rate open both images and bring them together in one file on two different layers. Then use the same approach I described previously to erase the areas you do not want to keep and show the areas you want to keep. Use a very soft brush and a relatively wide transition zone. You may also want to play with the opacity setting of the top layer and choose a setting lower than 100% to show part of both images in areas where the transition from one to the other may be noticeable.
As you practice these techniques or ponder if you should use them keep in mind that because you can combine images doesn’t mean you should. Nobody says you must have details in both highlight and shadows in each and every image you create. In fact, with some photographs having details in both highlights and shadows does not result in the strongest image possible. Furthermore, in some instances, having details everywhere seems unnatural or fake. Eventually, the final call is yours and you need to make this call not on whether or not you can get details everywhere in the image but, rather, on whether or not you want to show details everywhere in the image.
Given several originals and enough time, patience and skill, it is most likely that you will succeed in most instances in producing an image with details throughout the scene. However, once this is done, you may decide it is not what you want. We are talking here more about your personal style than your technical skills, a subject we will revisit at length later on in this series of articles.
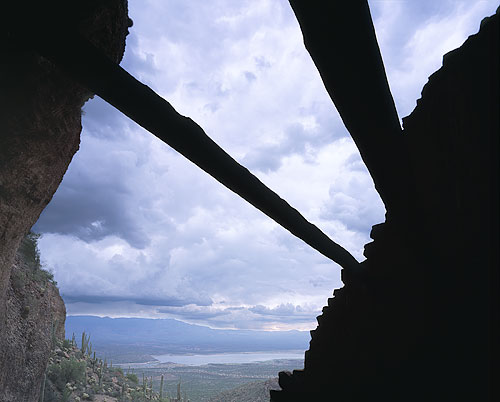
Lower Ruin, Tonto National Monument, Arizona
Linhof Master Teknica 4×5, Schneider 75mm, Fuji Provia 100F
This photograph combines two different scans from two different transparencies. Aware of the extreme contrast range of this scene I decided to make 2 exposures to capture details in the sky and in the cliffs. I combined the two scans in Photoshop with layers using a layer mask to erase areas of the image I did not want to keep. The wall to the right has slight details in it but, just like in Tear Drop Arch Moonrise, I prefer it pure black than dark grey.
9 – Familiarize yourself with hand held light meters
A hand held light meter, especially a spot meter, is a great asset if you want to meter a scene carefully. Such a meter can be useful whether you use a camera with a built in meter or not. I use a hand held spotmeter, actually two of them at this time, whenever I photograph a scene which is challenging exposure-wise. Below are several examples of hand held light meters and spotmeters.
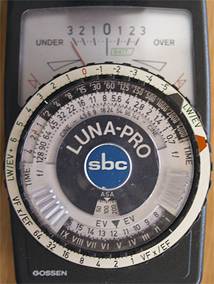
A – Gossen Luna Pro analog light meter with spot attachment
I have used this meter since 1980. The spot attachment gives it a measurement angle of 7.5 or 14 degrees. I use the 7.5 degree angle setting nearly all the time. The needle gives you the measurement value by zeroing it in the center of the top dial. Measuring a highlight area, placing it on “2” on the right side of the top dial, and then measuring shadow areas immediately tells you if the film can handle the contrast range in the scene, +2 stops being what most transparency films can handle without burning the highlights. The circular dial below gives you all the f-stop and speed combinations for the measurement as well as zone system placement.
B- Gossen LunaStar digital Light Meter
I consider this meter to be the digital version of the Luna Pro. It has the advantage of offering a one degree and 5 degrees measuring angle, flash metering, ambient light metering and more. You can measure several areas of the scene and the meter will calculate the average exposure value. It is very accurate but, in my estimate, it does not offer the immediate visual comparative feedback that the analog meter offers. Digital light meters with similar functions are offered by several other manufacturers such as Seikonic, Minolta, etc.
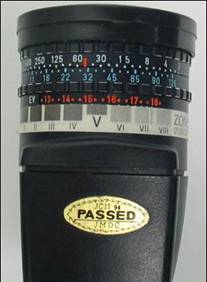
C – Pentax 1-degree Spotmeter
Introduced over 20 years ago and recently discontinued by Pentax, this meter has become the archetype for spotmeters as well as a favorite of many photographers. Its success is due to its reliability, accuracy, simplicity and ease of use. This meter has a fixed one degree angle of view and gives an EV value in the viewfinder for the measured area. This EV value is dialed on the front settings area (see photo at right above) and the corresponding f-stop/speed combination are immediately available together with zone system placement if one adds a zone system strip to the meter as was done on the photograph above. Providing accurate measurements is only the first step in meter functionality. The second, and very important step is to allow easy contrast evaluation. A good meter allows one to easily calculate where the highlights and shadows will fall.
D- Spotmeter meets PDA
As I discussed earlier in this article digital cameras not only have a built in light meter they also have a built in histogram display. To my knowledge this function is not available, as of April 2004, on any handheld meter.
I do understand that a histogram is calculated from all the values present in a scene and not from meter readings of specific areas of the scene. In other words, a histogram is created from a photograph, not from meter readings. To get a histogram one needs a photograph and to get a photograph one needs a lens. So far light meters have not been designed to capture photographs.
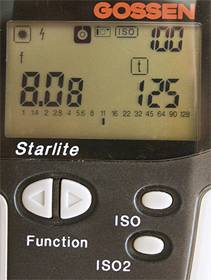
Certainly you can say that all I need to do to get a histogram is use a low cost digital camera to meter the scene. I do, with the Canon 300D, which I use regularly as a light meter that can also take photographs. But I also carry a light meter because I need the spotmeter function and the comparative metering capalilities provided by a hand held meter such as the different models described above.
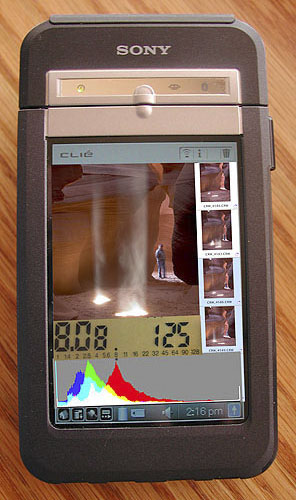
A number of PDA’s, such as the Sony Clie NZ 90, are equipped with a photographic lens and can capture low-resolution photographs. If such a PDA was able to display a histogram for the photographs they take, and was fitted with a one degree spot meter, we would have a measuring instrument the like of which we have not seen before.
Above is a photograph of the lens on the Sony Clie NZ90.
Merging a digital spotmeter with a PDA fitted with a miniature zoom lens would produce a spotmeter that can take a photograph, zoom in and out to give different compositions and croppings, meter the entire scene just like a digital camera, take spot meter readings of specific areas of this scene and display the resulting histogram on a PDA-like screen. The histogram displayed on this PDA-Spotmeter would be a tri-color histogram to provide reliable information about all three channels of the photograph. The display area would be about 2”x3”, much larger than the LCD screen of any currently-available digital camera. Spotmeter readings of specific areas in the scene would be indicated on the photograph and would provide EV and f-stop/speed combination for each area measured. Overexposed and underexposed areas would blink as they do on most digital camera.
The processing and storage capabilities of a PDA would also make it possible to store photographs and their related histograms and spot measurements for later reference. This data could be opened in a separate “Histogram and Light Measurements” software, independent of the browsers, RAW converters or image processing software we currently use. This program would also be able to output a print of the histogram and spot meter readings. We could even combine this with a GPS system and record the GPS coordinate of each photograph at the same time as their exposure information.
Here is a composite image of what such a meter may look like. It would be the size of a PDA, hence much smaller than a digital camera such as the Canon 300D and not much bigger than currently available spot meters.
10 – Photographic Skill Enhancement Exercises
None of the articles in this series would be complete without specific Photographic Skill Exercises targeted to help you develop your skills in the area covered by each article. I know that many readers conduct these exercises carefully and I therefore designed a set of exercises specifically for this article.
A – Determine the overall contrast range of a specific scene.
This is a simple exercise in which you take a meter reading of the brightest and the darkest area of the scene.
The easiest way to do this is to use a spotmeter. However, if you do not have one you can conduct this exercise using the light meter built in your camera or a hand-held light meter.
If you use your camera you will have to get close to the area you are measuring to make sure you only measure this area. You can also use a long lens to narrow the camera’s field of view to just this area. Getting close will work for nearby objects but not for distant ones or for the sky. For these areas you will have to use a long lens. Of course, if your camera has a built in spotmeter function make sure you use it.
Once you have measured the highlight and shadow areas count how many stops there are between these two areas. This is the contrast range of the scene in front of you.
B – Measure the important values of a scene and write each exposure value on a sketch of this scene.
When I started working with my first view camera, in 1983, I made sketches of each scene I photographed using tracing paper placed against the ground glass of the view camera. I made a drawing of each photograph by tracing the outlines of my composition. Then, using a Pentax 1 degree spotmeter, I took readings of all the important value areas in the scene and wrote these values on each drawing. Comparing each print to the corresponding sketch taught me volumes about how light is captured on film and how light is translated into light and dark values onto the final print.
This exercise aims at providing you with the same knowledge. If you use a 35mm camera, or a medium format camera, you will have to do a hand-held sketch as you won’t be able to sketch directly on the ground glass. However, the quality of your sketch is not important. What is important is that it shows the rough outlines of the objects in the scene and that you write the exposure information for each of area.
Below you can see one of the sketches I made in 1983 next to the corresponding photograph. The photograph was taken on Polaroid 4×5 Black and White film type 52. The use of Polaroid film enabled me to visually compare the scene in front of me to the photograph of this scene in the field and see how my meter readings were translated into shades of black, white and grey on the print.
The outlines of the shapes in the photograph were traced on the ground glass of my Arca Swiss 4×5 monorail view camera. The exposure values were recorded as EV values because these are the values provided by the Pentax 1 degree spotmeter I was using at the time. EV values are not directly related to a specific speed and f.stop setting. Rather, they are absolute values which express a specific brightness. To use them however, you need a light meter which can give you the f.stop and shutter speed settings for a specific film speed. EV values are used by some camera manufacturers. For example they are provided by Hasselblad light meters and present on each Hasselblad lens.
You do not have to use EV values. You can instead write the f-stop and shutter speed combination on your drawing. Just make sure you keep either the f-stop or the shutter speed constant. Doing so will make it much easier for you to calculate the overall contrast range.
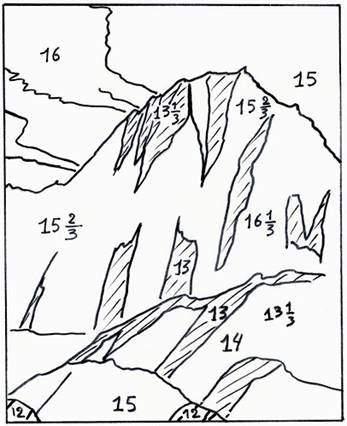
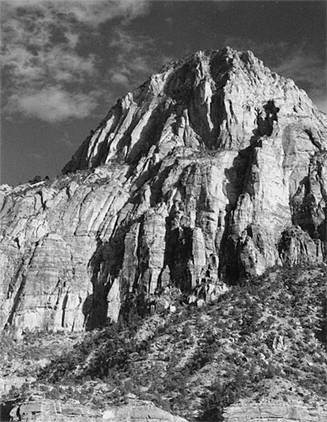
Bridge Mountain, Zion National Park, Utah
Arca Swiss 4×5 monorail view camera, Rodenstock 210mm, Polaroid Type 52 B&W filmThis is one of the sketches I made in 1983 by using tracing paper pressed onto the ground glass of my Arca Swiss 4×5 monorail view camera. Next to it is the correspoding photograph. I drew the outlines of the main shapes in the photograph, took meter readings of the scene with my Pentax 1 degree spotmeter and wrote the corresponding EV values on the drawing. EV values are practical because only one number is needed to find the corresponding f.stop and speed ratio. Plus, they take less space on the drawing. I did similar drawings for over 100 4×5 photographs during my 1983 six-month journey throughout the southwest.
C – Photograph a specific subject and bracket your exposure widely
– Bracket 5 stops under and over the “normal” exposure
– The goal of this exercise is to create purposefully overexposed and underexposed photographs
– You will have photographs that are much lighter and much darker than normalD – Memorize f-stop and shutter-speed scales
– This will help you greatly when time is of the essence such at sunrise and sunset
– Refer to the f-stop and speed scales provided in this articleE – Find the available contrast range of your film(s) and/or digital camera
– See section 4 above
– Follow my detailed description of this process
– This is a very useful and informational exercise which will enable you to know exactly the contrast range of your film or digital sensor.
11 – Conclusion

The Hoodoos at Sunset, Lake Powell Area, Arizona
Linhof 4×5 Master Teknica, Rodenstock 150mm, Fuji Provia 100F
As with many landscape photograph which show both skies and shadow areas, contrast is a problem in this image. The original transparency hold details everywhere but several contrast masks were needed in order to convey a sense of light and brilliance on the final print. I used multiple curve layers in Photoshop to both open the shadows on the hoodoos and reduce the brightness of the sky behind them. The final print conveys how I felt when I photographed this scene.
The goal of learning how to expose is not only being able to determine the “correct” exposure. Most cameras do this automatically and in many instances we can trust what they tell us. Plus, with the histogram function we can visualize how the final image will be exposed. Finally the LCD monitor of digital cameras show us the photograph we just captured.
The goal of learning more about exposure is to gain control over how our photographs are exposed. Our goal is not only to find the proper exposure but rather to find the exposure which will give us the effect we are looking for.
For this we must learn first to calculate the range of contrast present in the scene in front of us. So far, as of April 2004, no camera does this automatically. We also need to determine if objects will be rendered the way we want them to be rendered. As we have seen, very bright and very dark objects, or scenes, will often result in incorrect exposures. Since these are ultimately artistic calls we cannot depend on our cameras alone. Cameras are devices that, at best, can only capture the world the way they were programmed to capture it.
A properly exposed photograph is one we will eventually consider for printing. In this sense such a photograph is what is often referred to as a keeper. But being properly exposed is not enough to make a photograph a keeper. Other things come into play when making this selection. What are those other things? This is what we will look at in my next article in this series: How to decide which photographs are “keepers” and which ones are not.
As with the previous installments, and to use a little bit of French, this series isa suivre. . .
© 2004 Alain Briot
Sonoran Desert, Arizona
March 2004
Photography Workshops:
One of the most effective ways to improve your photographic skills is to attend a workshop. Each of my workshops includes photographic skill exercises designed to strengthen your skills in specific areas. Find out which workshops are currently open by visiting my web site athttp://www.beautiful-landscape.comor e-mailing me atalain@beautiful-landscape.com.
Lorem ipsum dolor sit amet, consectetur adipiscing elit, sed do eiusmod tempor incididunt ut labore et dolore magna aliqua. Ut enim ad minim veniam, quis nostrud exercitation ullamco laboris nisi ut aliquip ex ea commodo consequat. Duis aute irure dolor in reprehenderit in voluptate velit esse cillum dolore eu fugiat nulla pariatur. Excepteur sint occaecat cupidatat non proident, sunt in culpa qui officia deserunt mollit anim id est laborum.
Lorem ipsum dolor sit amet, consectetur adipiscing elit, sed do eiusmod tempor incididunt ut labore et dolore magna aliqua. Ut enim ad minim veniam, quis nostrud exercitation ullamco laboris nisi ut aliquip ex ea commodo consequat. Duis aute irure dolor in reprehenderit in voluptate velit esse cillum dolore eu fugiat nulla pariatur. Excepteur sint occaecat cupidatat non proident, sunt in culpa qui officia deserunt mollit anim id est laborum.
Alain Briot creates fine art photographs, teaches workshops and offers DVD tutorials on composition, raw conversion, optimization, printing and marketing. Alain is the author of Mastering Landscape Photography, Mastering Photographic Composition and Marketing Fine Art Photography. All 3 books are available from Alain’s website as well as from most bookstores. You can find more information about Alain's work, writings and tutorials as well as subscribe to Alain’s Free Monthly Newsletter on his website. You will receive over 40 essays in PDF format, including chapters from Alain’s books, when you subscribe.
You May Also Enjoy...
Order Problems
Ordering Problems? Types of Problems Though 95% of all credit card orders go through without a hitch, sometimes there can be a problem. The two
VJ Disk Art
Video Journalviewers will be aware that DVDs are shipped in clamshell cases, known as C-Shells. This makes them inexpensive and rugged to mail. But unlike
