There comes a day when every DSLR owner looks at a 100% magnification of one of their images in Photoshop and gasps, “Where did that dust come from?” Nasty out of focus blobs. Squiggly little dust motes. Hairs. Uggh.
As scary as it may seem there is nothing for it but to clean the camera’s sensor. It really isn’t that tough to do, but you do need the right tools and approach. Here is the method and the supplies that I use. Work slowly. Work carefully. Use the right supplies and you should have no problem.

Monteverde Sunset. Costa Rica — February, 2003
Canon EOS 1Ds with 100-400mm f/5.6L IS lens @ 400mm.
ISO 320 1/80sec @ f/9
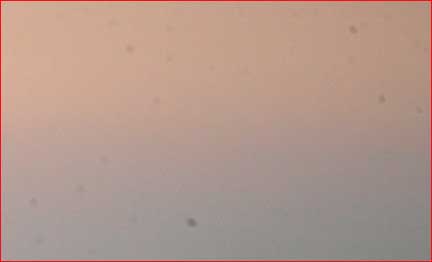
This is a 100% enlargement of part of the sky in the above photograph.
The Right Materials
Contrary to the urban myths that propagate like viruses on computer discussion boards, no digital camera with interchangeable lenses has a exposed imaging sensor. All either have a glass anti-aliasing filter or an optical glass cover. With the right tools cleaning this piece of glass is no more dangerous than cleaning your lens’ front element. But, the sensor is awkwardly located, and if you use the wrong tools you can scratch the surface of this filter or glass plate, which can lead to a costly repair. If you’re fumble fingered you can also scratch the mirror or ground glass.
Here are the supplies and tools that as of early 2003 appear to be the best ones on the market for cleaning imaging sensors. They work for me, and are widely used by others. I have no information or experience with any other similar products at this time and am therefore not in a position to comment on them. I will update this report though as new products come to market.
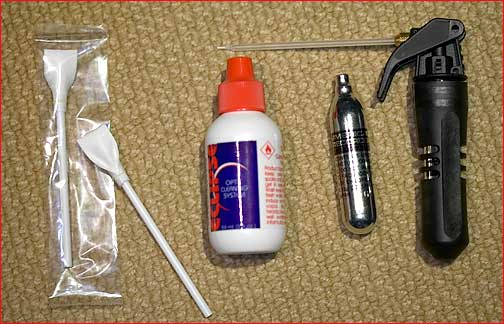
You need a means of blowing loose dust off the sensor and then a fluid and pads to wipe the surface and remove any stubborn particles. You can use either a hand squeezed blower bulb or compressed CO2 gas.Do notuse cans of compressed air such asDust-Off, as they contain liquid propellants that can gunk-up the sensor, which will then require professional cleaning or replacement. Also some of the compressed gas and air blowers are very strong and can blow dirt particles into deep recesses of the camera where they can cause other problems. Also, be very careful of the point of the blower. Don’t let it ever touch the sensor plate surface.
A company calledAmerican Recordermakes a blower that uses compressed CO2 that is safe to use. Their replacement cylinders of gas do not contain any propellant, and the blower has a long plastic wand. Do not use CO2 cartridges intended for use with air guns, for example, as these contain a lubricant that can gunk up your sensor plate.
Update:There are some reports from several readers that even the American Recorder CO2 capsules can occasionally emit an oily residue. I haven’t seen it myself, even after several cartridges, but there are enough anecdotal reports to this effect that caution is advised.
A company calledPhotographic Solutions Incmake the other two products that you need. The first isEclipsefluid and the second isSensor Swabcleaning wands. The fluid is ultra-refined methanol, which evaporates almost instantly, and leaves no residue, while the swabs are manufactured to medical clean-room standards. All of these products are available directly from their manufacturers, from online retailers and from better local photographic retailers.
Technique
Situate yourself at a table with a bright overhead light or gooseneck desk lamp. Set your camera so that it is insensor cleaning modewith the sensor exposed. (Some cameras require that they be plugged into AC power for this). Using either a hand blower bulb or a CO2 blower gently blow away any lose visible dust. If you have a jewler’s eye loup this can be helpful in seeing what you’re doing. Don’t over do it with blowing, and don’t let anything touch the sensor.Neverblow into the camera with your mouth.
Next, remove a swab from its sealed pouch and place a couple of drops ofEclipsefluid on the pad. Starting at one side of the sensor glass gently but firmly wipe across the glass from one side to the other. Only lift the pad once you reach the far side. If you have a full-frame sensor camera and the pad isn’t wide enough to cover in one pass, turn it over, wet it again with a couple of drops of Eclipse, and do a pass over the other half of the sensor, overlapping the first part slightly.
Use the blower to clean off any stray particles that may have floated in during cleaning, and close the shutter.
Testing
The only way to tell if your cleaning efforts have been effective is to take a test shot. Place a lens on the camera, turn off autofocus, and set the aperture to f/11 or f/16. Take a shot of a white card (the back of a print will do) with the exposure set to 2 stops over the camera’s reading.
Plug the card into your computer and load the file into Photoshop. Working in JPG mode makes this a faster process than working in RAW mode. Go to 100% magnification (actual pixels) and examine the image. You will likely see a scary amount of dust. Don’t be discouraged. The chances are that you’ll rarely see these in real-world images. Only be concerned about the really big stuff. If that’s still there, try the process over again.
Try not to get too neurotic about this. My suggestion is that that you only clean the sensor when it gets really dirty. Cloning away minor dust blobs when they are visible only takes a few seconds in Photoshop. If your sensor gets really nasty consider sending it to the manufactruer’s repair center for professional cleaning.Don’t scrub!
The Problem of Travel
Guess when you’ll experience the most dust problems? When traveling of course. But, here’s the rub. (Pardon the pun).You can’t fly with either of the necessary sensor cleaning products. Eclipse fluid is flammable and therefore can’t be brought onboard an airplane, and neither can compressed CO2 capsules. This means that the only cleaning tool that you can fly with is a bulb blower bulb. Combine this with the need to now carry all camera gear onboard, because checked baggage can’t be locked any more, and flying with camera gear has become a royal pain. Just about the only good news for digital photographers is that unlike film, X-Rays have no effect on memory cards.
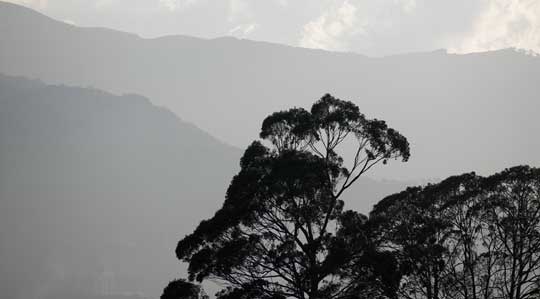
San Jose Mountains. Costa Rica — February, 2003
Canon EOS 1Ds with 100-400mm f/5.6L IS lens @ 400mm.
ISO 125 1/500sec @ f/8
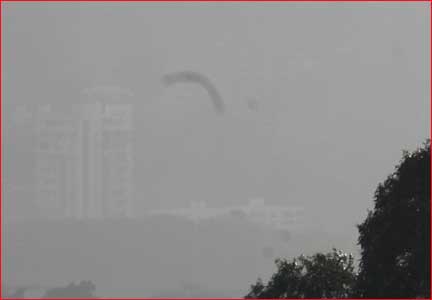
This is an 80% enlargement of the lower left portion in the above photograph.
What Causes Dust Bunnies?
Sensor dust is a curious thing. Some cameras are much more prone to it than others. My Canon D30 and D60 hardly show dust at all. My Canon 1Ds shows it badly. The urban myth used to be that CMOS sensors were much less prone to attracting dust than were CCD sensors, but the 1Ds puts the lie to that.
There are a lot of theories floating around, but I have yet to hear from anyone that has good authoritative information. One of my conjectures is that it’s better to change lenses with the camera’s power turned off. This is because with the power off the imaging chip is not in a charged state, and any dust entering the mirror housing has less chance of being attracted to the chip by a static charge. Is this true? I have no idea, and no real way of testing it. But I also say “Bless you,” when someone sneezes, to ward off evil spirits, so, so much for rationality.
I have also noticed that there appears to be a greater amount of dust visible when I have been shooting rapidly when doing wildlife work. Does taking shots in rapid succession charge up the sensor plate with static electricity? I don’t know. Maybe it’s the mirror flying up and down rapidly that causes dust in the mirror housing to blow around. In any event, sensor dust is a fact of life and we have to learn to live with it.
Least anyone think that things were better in “the good old days” — they shouldn’t. In the chemical darkroom printers spend hours with brushes and inks spotting each individual print. People who scan their film know full well that no matter how carefully one works, dust is a fact of life, and learning how to properly use the cloning tool is a must. At least with digital one only has to do the clean-up once, rather than on each print.
Michael
Michael Reichmann is the founder of the Luminous Landscape. Michael passed away in May 2016. Since its inception in 1999 LuLa has become the world's largest site devoted to the art, craft, and technology of photography. Each month more than one million people from every country on the globe visit LuLa.
You May Also Enjoy...
Light,Land,Life&Magic
by Miles Hecker Publishers Note: This is an old article by Miles. Many or all the links most likely don't work. Miles passed away a
