Reviewed by: Chris Daniels

A RIP for The Rest of Us
The following review and brief workflow tutorial is for the new printer softwareImagePrint 4.0 Desktop EditionfromColorbytesoftware.ImagePrint 4.0 Desktop Edition, is a stand- alone third party software driver created to maximize the output quality of the digital printers it supports. Typical in the large format market are software programs to control the layout and performance of a given printer. This RIP software affords the operator maximum control over page layout, ink limits, color management, print quality, and other settings. The advantages are many, including better use of media, simplified color managed workflow, ability to optimize printing parameters for third party media, and usually more possible printing resolution combinations than the standard driver software offers. This version of ImagePrint is based uponthe full large-format edition that I reviewedlast year, running on anEpson 10000CF, but the Desktop Edition of this software combines features and a price that appeal to the wider market of professionals that need to drive desktop printers at maximum quality. Currently ImagePrint Desktop Edition supports many Epson printers including the models 1270, 1280, 1290, 2000P, 3000, Stylus Pro 5000, and the Stylus Pro 5500. MSRP for ImagePrint Desktop Edition is $495 for the base version.
ImagePrint was designed from the ground up for the fine art and photographic market. It is a completely stand-alone program that operates much like a page layout application. ImagePrint uses proprietary drivers to control the printer, the standard drivers that the manufacturer ships with a given printer are not used except on a system level to communicate with the printer, for example the Epson Stylus 2000P driver is loaded and is resident on our system because that is how Windows communicates with the printer via USB. ImagePrint uses the USB port to communicate with our printer, but the standard driver and its settings are not used by ImagePrint itself.
ImagePrint Desktop Version is really designed to be an �RGB RIP�, you need not and should not convert files to CMYK for printing through this RIP software. Most RIP software from third party vendors are made to process CMYK files, and quite often RIP software is used to emulate a 4 color printing press, or to print postscript files. ImagePrint gives the end-user these powerful production tools to achieve the best results possible with RGB files. Many users in the Fine Art and Photographic industry are simply looking for a way to output an RGB file in a way that provides the best image fidelity, color accuracy, screening patterns, and productivity features.
Workflow
ImagePrint operation is simple. The demonstration of this RGB color managed workflow is the best way to illustrate how ImagePrint, Photoshop, and color management work together to form a complete printing system.
The first component is this workflow is monitor calibration. The ability to calibrate and profile the monitor is important so that we have the ability to edit images and have an accurate on screen representation on the file. In this case we are usingColorvision Opticaland theMonitor Spyder. ImagePrint and Photoshop can use the ICC profiles generated by Optical (or any other ICC complaint profile generation software) to provide accurate display in each of these applications. In the color management dialog box, we choose the appropriate monitor profile in the �System� profile menu. This monitor profile is used to accurately display images within the ImagePrint application. Realize that the monitor profile has no bearing on print quality or the color fidelity of the prints themselves, so the setting is for on-screen purpose only. In this dialog box, we also specify the ICC output profile we are using, this of course is dependant on the media choice. In this case my settings are for the Epson Stylus Photo 2000P with premium Semigloss paper. There are no �media type� settings as in the standard Epson driver, the ink densities are all handled by ImagePrint and the ICC profile, so changing media in the printer only requires that this setting be changed to the appropriate ICC profile (I.e. Epson Premium Luster paper or Watercolor paper).
Settings

Our Photoshop RGB workspace settings are usually AdobeRGB 1998. We usually edit our images in this colorspace as generally speaking, it is well matched to the overall gamut of the Epson Stylus printers. Photoshop also uses the ICC monitor profile that was generated in Optical. When we are finished with any image manipulation or edits and have an image we want to print, at this point we will save a copy of the image if it contains layers or masks. Next we will duplicate the image and flatten the copy, ImagePrint works best with TIFF images (8 or 16 bit) and we will save a flattened TIFF with the AdobeRGB 1998 color space tagged in the file (in the file save dialog box in Photoshop).
ImagePrint handles all color management within the same dialog box, this simple workflow makes it easy to verify that all color settings are correct. The color management dialog box has a few important settings that must be properly enabled. In the �Bitmap� tab, we specify which settings are used to correctly process the images within ImagePrint. First, we choose the RGB source space, in our case AdobeRGB 1998. Because we typically work in AdobeRGB 1998 within Photoshop, this setting is simply an extension of our Photoshop workflow. In this box is where we choose the most suitable rendering intent for our file, typically perceptual or relative colormetric. When you toggle through the rendering intent options, you see the current chosen image with current ICC output profile �applied� and can judge as to which rending intent will result in the most accurate or pleasing printed output. In the CMYK space, we typically choosenoneas our documents are all coming in as RGB files. In the �Embedded� space, we choose the color management policy applied to incoming files just as we would with Photoshop. Our choices are to ignore, apply, or prompt upon opening a file that has an embedded ICC profile. This simply gives us an opportunity to resume our color managed workflow, and because we tag files AdobeRGB1998 when saving TIFF files out of Photoshop, we know the source space of our files and can leave the setting to apply or prompt and maintain the same RGB workspace in ImagePrint. In the �Vector� tab, we specify color settings for images that were created in programs like Corel Draw, Adobe Illustrator, or Macromedia Freehand as these programs will output vector RGB files.
Page Setup
At this point we can specify our page size, print resolution settings, and page layout from within the main application.
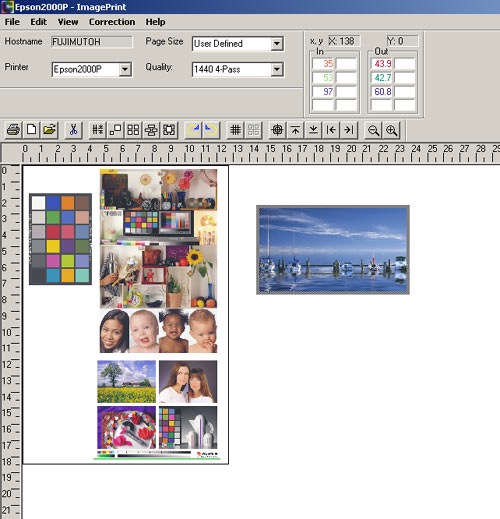
The first thing you notice is the page layout box. The paper size that the user specifies determines the actual layout area, in this case we are printing on SuperA3 paper (13�x19�) and we have specified an actual printable area of 12.8� by 18.5�. This area is now displayed on the screen and we can simply open files and drop them within that area specified as the paper boundaries. As you can see we have an image outside the printable area, this image will not print but can be left on the �workspace� so that you can generate multiple layouts without having to open and close files continuously, simply drag them off the page and leave the file open for later use if needed. Above the rulers are the settings for the paper size and print resolution, we basically get 7 different print resolutions in both uni-directional and bi-directional print modes. This is somewhat dependant on the actual printer model that you are using so that number may vary from model to model. Once we have set up the image(s) the page, specified the ICC output profile and other settings in the color management dialog box, we are ready to print. This leads into the most powerful part of printing with ImagePrint.
Spooler
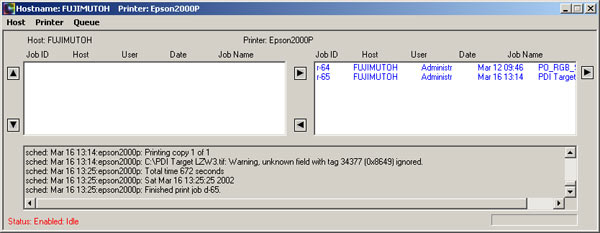
The ImagePrint spooler is where all of the print jobs are controlled once the print button is clicked in the main application. On the left windowpane you will see the current print jobs that are in the process of printing. In the right side, you see the print jobs that have already printed. The beauty of the ImagePrint application is that we can build many different page layouts in the application, click print, and they will be added to the list of pending print jobs in the spooler. This is a much more powerful feature than simply printing many copies of the same file, as soon as we click the print button in the application we can build a completely new layout and click the print button again to send our new print job stacking many different print jobs in order. Once these print jobs are printed they will of course move over to the right pane. If we choose to repeat a print job a day after making the original print, we can highlight the job in the right pane, load the appropriate paper, and click the left arrow button which will re-send the print job to the printer using the same parameters as the original print job as the spooler is simply sending the already processed file back for printing once again. You can do this at any time with or without ImagePrint running, until you permanently delete the print job.
Print Quality
It has been our experience that the print quality of ImagePrint is better than using the standard Epson driver in every way. The standard Epson driver is in some ways a series of compromises in that most printers are expected to do everything well and fast, text, internet graphics, and photos. The standard drivers are also designed to be used by people who may or may not be literate in color management, hence the options that are essentially automated such as PhotoEnhance4. Lastly, the standard drivers can behave unreliably in some installations. ImagePrint is robustly designed, and allows users to achieve the highest print quality possible, while enhancing areas such as shadow detail. Some of the print modes are slower than the Epson driver and some are faster, usually the highest print modes require a loupe to see a visual difference between them. We have also noticed a large reduction in metamerism, especially with the Stylus Pro 5500 using ImagePrint. Everyone that has seen some of our test prints has agreed that the difference is quite dramatic as we move the prints between light sources. Remember that we are not using the Epson driver, and the fact that there is less color shift in almost every print we have made from ImagePrint shows just how different ImagePrint lays down ink than the Epson driver.
Profiles
ImagePrint ships with many pre-built ICC output profiles for the printers that it supports. These profiles will work well in the vast majority of cases, but be aware that if your specific printer deviates greatly from the norm, custom profiles may have to be generated to achieve suitable color accuracy. Creating profiles is very simple in ImagePrint, you print the RGB targets with the color management turned off in ImagePrint, and generate the profiles with your third party software package. After you load the profiles into the appropriate color folder, they are available for use in the application. For what it�s worth, all of the Epson printers have been easier to profile versus profiling with the standard driver.
ImagePrint is targeted towards the professional who wants the utmost control of their printing capabilities. This software is built to handle many high resolution images with ease, and the increased productivity that this kind of software provide can easily make large printing projects very easy. The best way to see if ImagePrint is a solution for you is to order thefree demo CDdirectly from Colorbyte and test it out. Colorbyte also has optional upgrades that allow postscript compatibility for desktop publishing applications, and an image template system which is especially useful for portrait photographers.
Chris Danielsis a Florida-based photographer who also works with other photographers in migrating to digital imaging.Chrisis anAdobe Certified ExpertinPhotoshop.
Copyright 2002 Chris Daniels
You May Also Enjoy...
Pentax67ii
Pentax 67II 30+ Years in The Making Very few cameras have the model longevity of the Pentax 67. First introduced in 1969, the camera was
