A Little Bit of History First
I started being involved in photography somewhat differently from most photographers. I started in the darkroom helping one of my uncles when I was 9 years old. I will never forget the awe inspiring feelings I had the first time I saw an image begin to appear on the paper.
I did darkroom work for over 2 years before I had a chance to get my hands on a camera and start taking pictures. My first camera was a Kodak Brownie that I borrowed from my sister, and from day one I started developing the film and making my own contact prints. I made contact prints because I did not have an enlarger, and since I did not have a darkroom either, I used to lock myself in a closet near the garage to do my work. For me, printing has always been an integral part of photography.
Over the years I tried most of the traditional printing methods, but none of them satisfied my quest for quality in a print. This is why I ended up gravitating towards more exotic and more difficult processes such as Dye Transfer and Carbon Pigment printing.
While Dye Transfer prints have a beautiful look, they are inherently unsharp and they are not nearly as long lasting as advertised. They also have a somewhat restricted color palette.
Multi-layer Carbon Pigment prints on the other hand, are incredibly sharp if the separations are made in the digital domain. They are also highly archival (claimed by many to be THE most permanent photographic images), and absolutely glorious in terms of color and tonality. The problem with these prints is that one has to make the emulsions from scratch, coat the emulsions, make the separations and then go through a brutal process that takes about 4 days of hard work per print. If this is not bad enough to scare most people, the materials for a single 16×20 inch print cost hundreds of dollars and are almost impossible to procure today unless one purchases them in huge quantities. Add to this the fact that the failure rate is very high and the first print is never good enough without additional tweaking, and you are facing a cost of well over a thousand dollars and weeks of work to produce a single 16×20 print. There are also serious limitations in the maximum size of a print that can be produced. I do not know of anyone who has attempted anything bigger than a 24×30 inch print, which is in itself a registration and handling major league nightmare.
You can see why I decided to move on to inkjet prints.
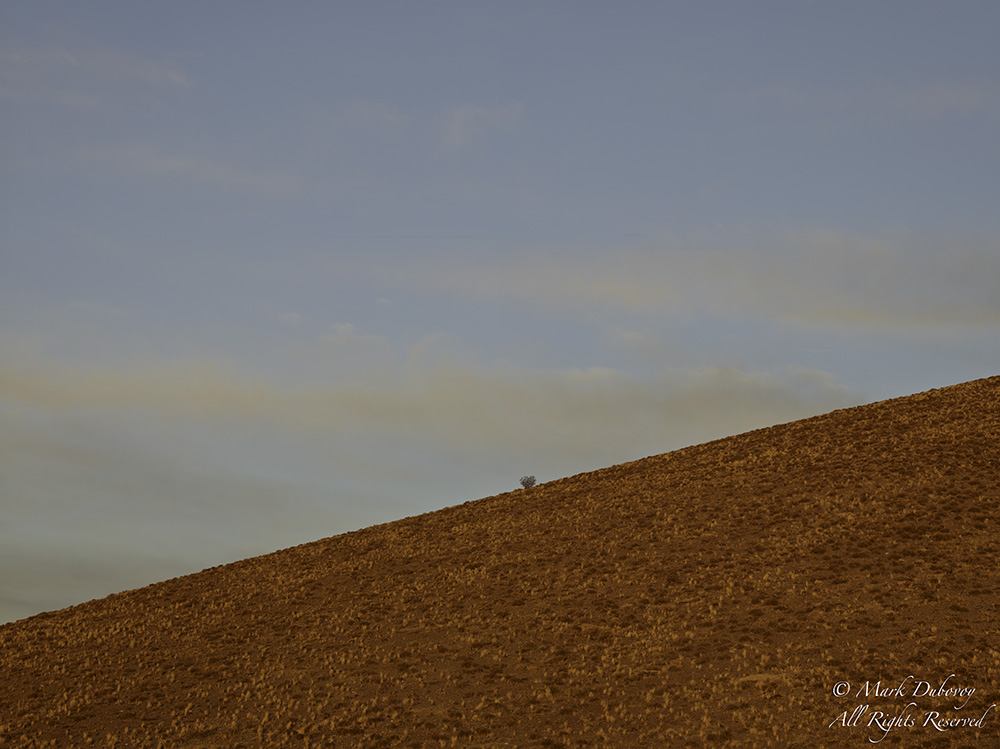
Lonely Tree, Death Valley
Phase One DF camera with P65+ back and 75-150 mm lens
Inkjet Prints
The quality and the longevity of modern inkjet prints is excellent. Also, the availability of literally hundreds of different papers, canvasses and other materials to print on is very exciting. There is something good for every purpose and for every taste.
I find that for my particular style of photography and for my taste, Baryta type semi-gloss papers work best. Although most of my conclusions in this article are based on using an Epson 9900 printer and these types of papers, similar conclusions should apply to other papers and to other printers.
Printer Settings
When I first started using inkjet printers, I faithfully followed the printer and paper manufacturers’ instructions. However, it immediately dawned on me that if Ansel Adams had followed the manufacturers’ instructions for film and paper to the letter, he never would have been able to produce the quality of images that he is famous for, and his prints would not be nearly as archival either.
For starters, he almost always used an ISO setting that was lower than the manufacturer’s recommended setting (depending on how each batch of film tested), different development times to alter and control contrast, and he also used printing methodologies that were very different from the manufacturer’s recommendations.
I also clearly remembered that when I took my first workshop with him he was emphatic that the best way to produce high quality work is to settle on one or two combinations of materials and get to know the materials intimately.
Jumping around between many different types of materials (film and paper in those days) and different chemicals is a very bad idea. I believe this holds true today as much as it held true back then. Getting to know your digital sensor, your printer and a couple of papers extremely well is likely to produce much better results versus jumping around between all kinds of cameras, printers and papers or other materials. It takes many months of practice to really start to know your tools and materials.
Therefore, I typically tend to settle on two similar papers that are my favorites . I strive to get to know them as well as possible and to set up my printer to extract the maximum quality out of these two papers. My current favorites are Ilford Gold Fibre Silk and Canson Infinity Baryta Photographique.
The next obvious question is : Can I produce better prints by changing things as opposed to following the manufacturers’ recommendations? The answer is a resounding yes. Of all the papers and canvases I have tested to date, I have yet to find one that does not benefit from more ink delivery versus what the printer and paper manufacturers recommend. I am not saying that this is a universal truth, there may be materials or printers out there that I have never tested that benefit from different settings. What I am saying is that of the many dozens of papers I have tested to date, using mostly Epson printers, every one of them has benefited from more ink delivery than the standard recommended settings.
The important thing to remember, is that if you want to obtain the highest possible quality inkjet prints, you need to experiment beyond just setting the printer to the standard settings.
In the Epson 9900 (and other Stylus Pro printers) there are two ways to increase the ink density:
– The first is to choose a different Media, for example, when printing on a semi-gloss paper you can choose Ultrasmooth Fine Art as the media setting. This automatically delivers more ink to the paper.
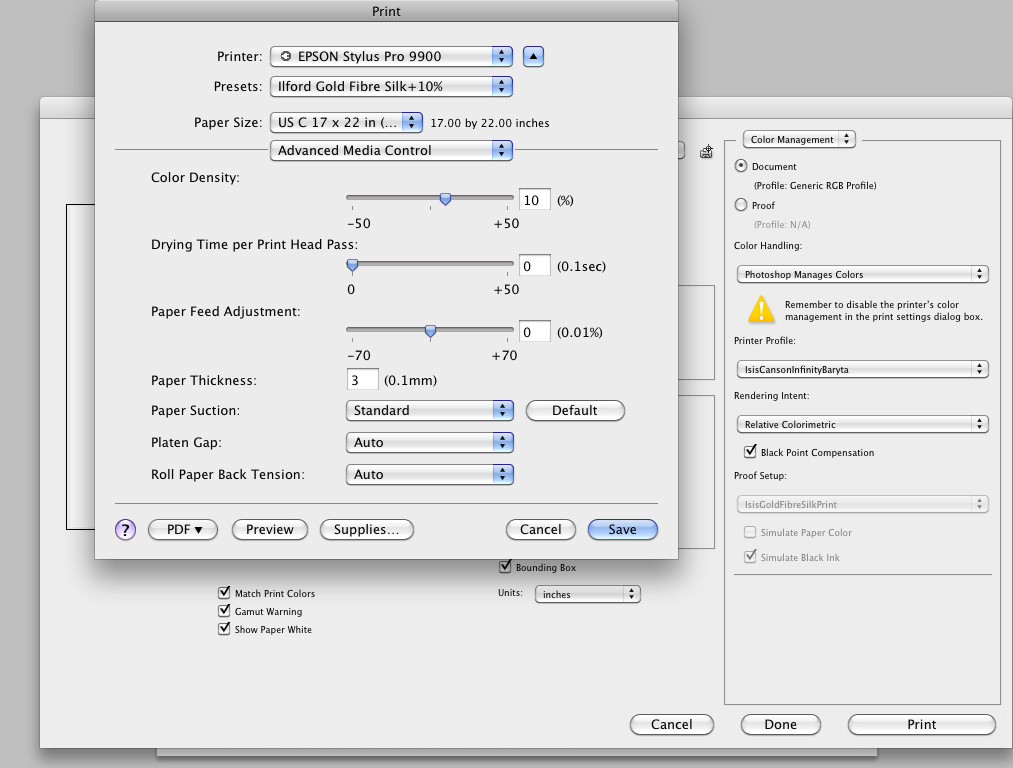
– Second, in the Epson driver under the Advanced Media Control Tab (see image below) you can increase the ink density by moving the color density slider to the right, in this case 10% to the right.
It is also possible to increase the drying time per head pass by using the next slider down. With some papers, I have found that pumping quite a bit more ink and allowing it to dry longer on each pass produces better prints. The only disadvantage of increasing the drying time is that it obviously slows down the printer.
What are the advantages of changing the printer settings?
The advantages for me are that I have consistently been able to get better DMax, better saturation, better color, better separation of subtle tones and in general a much more “alive” print.
In terms of longevity, I do not know what the effect might be, although basic logic would lead one to believe that more ink, which means more pigments, will also increase the longevity of the print. I wish someone like Henry Wilhelm would run a longevity comparison test using different ink densities.
How much does one need to increase ink delivery?
This can only be determined by trial and error. The way that I do it is to take a test image (it is important to have a test print that includes dark patches and a black patch) and print it with ever increasing amounts of ink. At some point, the print becomes sticky or the ink starts to drip. At this point, I have obviously gone too far, so I reduce the ink delivery slightly and make another print. After this last print has dried for 24 hours, I carefully check for any potential loss of sharpness. In general, a loss of sharpness is quite rare, but it can occur sometimes with large increases in ink delivery. Like everything else in life, moderation is good, excess is not good. If there is a loss of sharpness, I reduce the ink delivery slightly again. I continue to do this until the print is as sharp as using the standard settings.
Just to give the reader a general feeling for my settings, I have found a number of semi-gloss papers that produce better prints using Ultrasmooth Fine Art for the Media setting plus adding +5 % or even +10% to the color density at the same time. For some papers, this will also require a small increase in the drying time per pass.
For my current two favorite papers, I use the Ultra Premium Semigloss media setting and I add +10% to the color density. Luckily, no extra drying time is needed.
What are the disadvantages of doing this?
There are three main disadvantages:
The first one is that each print will be more expensive, because it consumes more ink. I am sure the printer manufacturers love this. Unfortunately, the users, including myself, obviously do not.
The second disadvantage is that for some papers (a small minority of the materials I have tested), additional drying time is needed, so it will obviously take longer to make a print.
The third “disadvantage” has to do with profiles. Notice that I have put the word “disadvantage” between quotes. Here is why: The second that you start using non-standard settings, the standard profiles are no good. You need your own custom profiles. The reason I put the word between quotes, is that I do not find most canned profiles to be particularly good to begin with. I decided a long time ago to spend the money and the effort to have a good spectrophotometer and profiling software, and to learn how to make and edit profiles as a necessary evil to obtain top quality prints. That hardware and that knowledge has served me well for at least a decade.
To summarize the situation, the standard profile for a specific paper and printer will not work when you change the printer settings. Whether you do it yourself, or you contract someone else to do it for you, you must have a custom profile.
In terms of personal advice, in my experience, you can always do better than the free profiles with a well made custom profile regardless of whether you change your printer settings or use the standard recommended settings, so if you are interested in quality printing you should use custom profiles anyway.
Enter Imageprint 8
I was happily making prints this way, until someone suggested that I try to evaluate one of the Raster Image Processors (RIPs) on the market. As luck would have it, one of the companies that makes a RIP contacted me and asked if I would be willing to test their product. Unfortunately, they behaved like complete flakes (they shall remain unnamed out of mercy). They scheduled a number of conference calls with me and they stood me up every time. I tried the product and it always stopped before printing the entire image. I gave them every opportunity to fix the problem and to stop standing me up, but it was all to no avail. I finally gave up and forgot about RIPs.
Last month I told the story to a good friend, and again, as luck would have it, he was successfully using a product calledImageprint 8made byColorByte Software www.colorbytesoftware.com. As soon as he made an introduction to the company, they literally jumped on it. Not only did they allow me to test the product, but their support in terms of teaching me how to use the product and answering questions has been thoroughly professional, about as good as it gets.
You Can Read Marcus Zuber’s Review
of Imageprint 8 Here – (April, 2010)
ColorByte incorporated in 1992. Their first product was a photographic RIP for Iris printers that ran on Silicon Graphic computers. The products that followed were software for drum scanners. The creation of these products necessitated the development of a proprietary color engine and a full color management system. Therefore, it is important to note that when using their product, one is using their proprietary system and completely bypassing the computer’s and the photo editing software’s color engine and color management systems.
When using the ColorByte RIP, the printer is driven by their own technology in their own unique way. The Epson Driver is not used at all. The RIP takes total control of the printer. In ImagePrint the media setting does nothing more than set the platen gap, suction and stepper motor based on the thickness of the paper.
The amount and the way that ink is laid out on the paper is controlled by Imageprint’s own recipe. The ink recipes are very complex 10-dimensional lookup tables. Ink is delivered to the paper according to a specific recipe with variable droplet sizes and in the case of the Epson 9900 printer (with twice the nozzle density of previous generations) the vertical droplets are placed closer together and the microweave is increased without any loss of speed.
The Imageprint profiles are made by deciding which recipe is best for a specific paper and embedding the recipe in a private tag inside the icc profile. Imageprint has a large number of profiles available for many printer/paper combinations. They also have a policy that they will make a profile for free for any customer that uses a new media that is not yet in the database. Interestingly, they not only have profiles for a specific type of light, such as daylight or flourescent, but they also have profiles for mixed lighting conditions, such as displaying a print in a home environment with a mix of daylight and incandescent.
For those that insist in creating their own profiles, the company will assist with the choice of the best recipe before printing profiling targets.
The imageprint interface is not nearly as elegant or as nice as the interfaces most of us are used to these days. The great improvements in the UIs of Lightroom, Aperture and Photoshop have spoiled us. I would describe the interface as “utilitarian” and maybe even somewhat funky, but it is effective and very easy to use. The company has clearly emphasized features and image quality over the UI.
For folks that are constantly doing complex layouts with multiple images, text and graphics and need to use other kinds of printers (not just inkjet), this type of product is almost a “no brainer” in terms of its capabilities. I would guess that it pays for itself very quickly.
For those interested in inkjet prints only, the layout capabilities are obviously excellent, although some folks might argue that the value of the product in this regard has diminished with the new Print module in Lightroom 3.
Therefore, the key question on the table (for me anyway) is how the print quality of Imageprint compares to using the Epson driver with the best possible settings and custom profiles.
Image Quality
I made a variety of prints in different sizes using my two current favorite papers. I used the Imageprint daylight profiles and my own custom daylight profiles and printer settings. The prints were evaluated using a calibrated GTI Print Viewing Station installed in my old darkroom, so there is absolutely no extraneous light entering the viewing station. I shuffled the prints around so that I did not know which prints were made using Imageprint 8 versus my personal settings on the Epson 9900. To add validity to the test, I re-shuffled the prints a couple more times and asked two other people to evaluate each image. When it was all said and done, my choices for the best prints and the other two people’s choices were identical. We agreed 100% of the time, which almost shocked me because this hardly ever happens. I am putting no value judgement on this point, I am simply reporting what happened.
So, what did we learn?
When I began to make prints, I frankly did not know what to expect. State of the art inkjet printers have gotten so good, that I very much doubted anyone could exceed the quality of something like the Epson 9900 with my custom settings and my custom profiles. I was wrong. The prints made using Imageprint 8 are better.
As to how much better they are, really depends on the particular image. In some images, the difference is quite subtle and it may take a couple of minutes of observing the prints side by side to really see it. Interestingly, once you see it, it somehow gets imbedded in your brain. If you re-shuffle the prints and look at them again, you can now pick the better prints instantly.
There are other images where the difference is not so subtle and it jumps out the second you compare the prints side by side. Here are two typical examples:
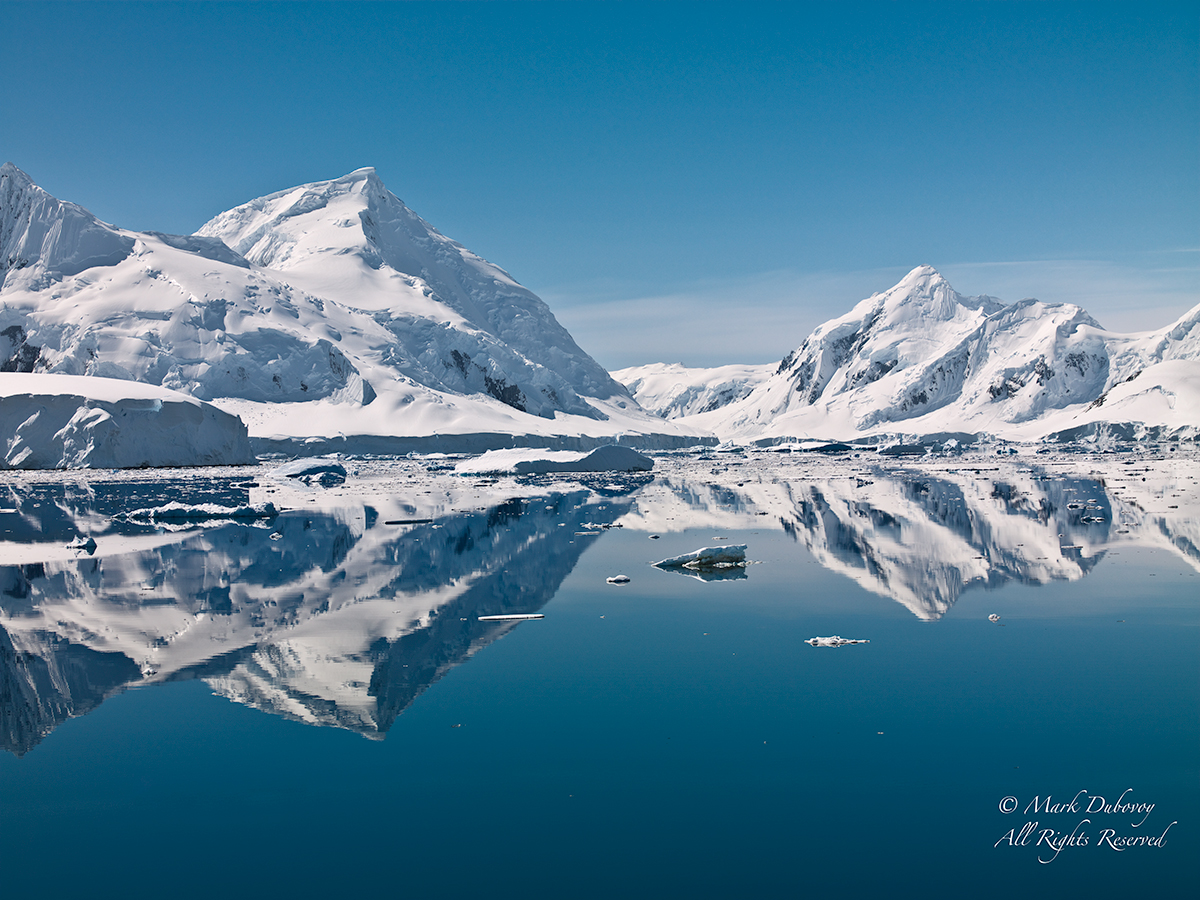
In this image, the difference is at first very subtle, but after more careful observation, the print using Imageprint 8 shows slightly more accurate blue tones, slightly better micro contrasts in the snow and slightly purer whites. Looking at the print from a distance, the snow has the appearance of being “fresher” and “cleaner”, for lack of better words. The print has more impact than the print using the Epson driver.
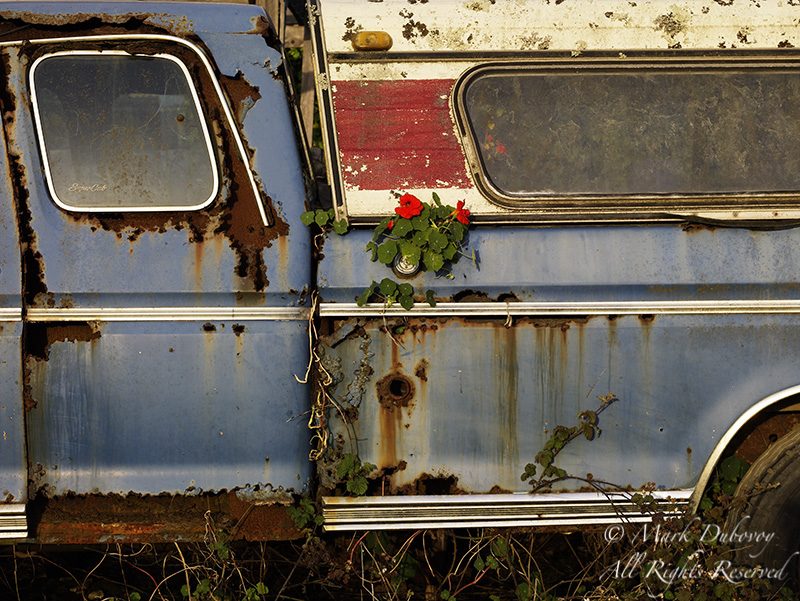
In this image, the difference in the prints is immediate and very noticeable in some areas. As you can see, the red flowers are extremely saturated and the edges border on green and white objects. No matter how much I tweak in Photoshop, using soft proofing extensively, it is almost impossible to obtain really good detail in the flower petals using the standard Epson driver. The edges of the flower petals also have a tendency to get a little soft and somewhat noisy. The print using Imageprint 8 on the other hand, produces glorious detail in the flowers and super sharp clean edges. It also renders the chrome in the vehicle much better.
I present these two examples, because they tell a lot about the Imageprint 8 story: Using Imageprint 8 you can expect a very noticeable improvement in deeply saturated areas and difficult color transitions. You can expect slightly better neutral tones and slightly more accurate colors. You can also expect a slightly more realistic rendition of micro and macro contrasts. Finally, in terms of color saturation, you can expect much better color saturation than using the standard factory recommended settings, but in my experience, no better than the saturation using my own custom settings and profiles I have described above.
I know that many photographers make B&W inkjet prints. I do not print in B&W. My world is in color and I have not made any black and white prints in decades. Therefore, I have no personal comments about Imageprint in this regard. I have heard from other users of the product that the B&W tools and the final results are better than using the standard Epson driver, but I have not tried to verify whether this is true or not.
Pricing
Imageprint 8 is priced according to the maximum width of the printer. Prices (in US Dollars) are as follows:
– 13 inch printer $695.00
– 17 inch printer $895.00
– 24 inch printer $1,495.00
– 44 inch printer $2,495.00
– Printers larger than 44 inches $2,995.00
Conclusion
Based on my tests, I highly recommend Imageprint 8. The product is not inexpensive, but obviously a lot of work and many years of technical development have gone into it.
I believe the product is particularly suited to professional print shops and to fine art photographers that fit into the following categories:
1. Photographers that strive for the highest print quality as a top priority – With Imageprint 8, they can increase the quality of their prints versus using the standard drivers. The icing on the cake is that Imageprint does a terrific job “out of the box” and saves the photographer from having to print profiling targets, make profiles, experiment with different printer settings and all that. The photographer can spend more time shooting and editing (or drinking coffee and eating cookies, or spending time with his/her family, or whatever else the choice might be) and less time worrying about printing.
2. Photographers that do not yet own a spectrophotometer or profiling software – The cost of Imageprint is less than the cost of a top quality spectrophotometer plus profiling software, not to mention the value of time saved. It will give you better results and save you the time to learn how to calculate and edit profiles, make your own profiles and experiment with printer settings.
For the folks that do not feel this is a product for them, but are interested in improving their prints, I would strongly recommend that they experiment with the printer settings and use custom profiles.
November, 2010
Mark Dubovoy
Luminous Landscape partner and contributor Mark Dubovoy is a known expert in printing technologies, with extensive experience in many traditional (now historical) methods including silver-gelatin, platinum, Type R, Type C, Ilfochrome, Dye Transfer, Carbro and multi-layer Carbon Pigment printing. Having made the transition to using digital printing technologies about twelve years ago, he has also become an expert in inkjet printing. In this essay he explains his most recent findings in terms of producing the highest possible quality inkjet prints.
Mark Dubovoy is a well-known photographer, educator, writer and businessman. His images are a unique combination of impeccable aesthetics, a deep love for nature and flawless technique. His unique background, starting in the darkroom as a child, combined with a long-term career in science and technology, are clearly evident in his work. He is a master printer in many traditional and digital methods and considers printing an integral part of the creative process. Mark’s love of the technical aspects of photography is only exceeded by his passion to reveal and document the natural landscape, the hidden beauty in objects and the personalities of wild animals. While his main area of focus is landscape photography, he has also completed a number of projects photographing the animals of Africa, rare automobiles and images of flowers. His photographs are included in a number of private collections, as well as the permanent collections of major Museums, including the San Francisco Museum of Modern Art, the Monterey Art Museum, the Berkeley Art Museum, the Museum of Modern Art in Nanao Japan and the Museum of Contemporary Art in Mexico City. His images have also been published in a number of magazines and books, including the Best of Photography Annual, International Edition. Mark is a highly regarded technical expert in many aspects of photography. As such, he has been and continues to be an advisor, consultant and early tester for a number of manufacturers of high quality photographic products. Mark has also been a major contributor to a number of print and online publications. He has been an instructor and a leader of photographic expeditions and workshops around the world, including places like Antarctica, Iceland, Africa, Mexico and others. Prior to founding Photo Aesthetics, Mark was a regular contributor to PHOTO Technique magazine and Editor-at-Large of The Luminous Landscape. Mark holds a BS degree in Physics from the National University of Mexico, and MA and Ph.D degrees in Physics from the University of California at Berkeley. In addition to his involvement in photography, he has had a long and successful career in science, technology and early stage companies in Silicon Valley
You May Also Enjoy...
Swimming With the Sharks
There are as many ways of doing landscape and nature photography as there are photographers. For some, such photography is an activity akin to fly
