

Mother Defending Baby Elephant From Hyena Attack
Leica S2 with 180 mm lens
Introduction
I just returned from a Safari in Botswana organized by my dear photographer friend Andy Biggs. As I reported in my last article on this site, I decided to try a somewhat different approach to wildlife photography on this trip.
This article consists of two basic sections: The first section talks about the equipment I decided to take on this trip, and how the equipment performed. The second section addresses a number of tips and recommendations to all photographers for improved wild life photography. Those that are not interested in the equipment I took on this Safari can jump directly into the second section, which universally applies to all photographers interested in wildlife.
Chosen Tools
First, let’s give credit where credit belongs: In terms of low light capabilities, long lenses, zoom lenses and fast motor drives, Pro level 35 mm DSLR’s are unmatched. This is why most serious photographers on Safari carry Pro level Canon or Nikon DSLR’s with massively heavy zoom and long lenses.
In spite of these capabilities, I make no secret of the fact that in general I do not like these cameras. In my humble opinion, they are too big, too heavy, suffer from horrible ergonomics, suffer from “feature creep” with too many buttons and also suffer from ridiculously convoluted menus. I also find that the auto features in these cameras, such as auto focus and auto exposure fail for me the vast majority of the time (more on this in the next section).
Furthermore, most of my photography is landscape photography, and for landscape 35 mm DSLR’s deliver neither the functionality nor the image quality that my work demands. This is why I use Medium Format Technical cameras for most of my work. Luckily, these cameras not only deliver the functionality I need as well as far better image quality, but they are also much nicer to use, smaller and lighter to carry.
Therefore, I decided to try an experiment on this Safari and take two totally different cameras from the norm for this kind of shooting: A Leica S2 and a Panasonic GH2.
The Leica S2 on Safari
The longest lens made for the Leica S2 is the 180 mm (approximately 130 mm equivalent in a 35 mm DSLR). This lens is obviously much shorter than the norm for wildlife shooting on Safari. The shorter focal length forced me to do one of two things: Either get a lot closer to the wildlife, or pay a lot more attention to the landscape surrounding the wildlife in order to make successful images that included a lot of elements.
In the end, I found this style of shooting to be a smashing success. I believe that the S2 allowed me to produce excellent images that not only transmit a powerful conservation and aesthetic message, but they also look quite different from most of the Safari photography we usually see. And the quality of the files is far superior to anything a 35 mm DSLR can deliver.
In fact, after shooting with the 180 mm lens for a few days, I found myself wanting to go even shorter and to shoot more landscape related images. I actually ended up making a number of very successful exposures with the 70 mm lens.
On the other side of the scale, I obviously did find some images where I wish I had longer focal lengths. In my opinion, the S2 lens line sorely needs longer lenses: At the very least a 350 mm and a 500+ mm. Had I been able to also shoot longer with the S2, I would have been in hog heaven and probably never used the Panasonic GH2.
So, did I miss any shots versus having a 35 mm DSLR? The answer is yes, particularly in low light. On the other hand, I gained some shots that I do not think I would have taken with a 35 mm DSLR. All in all, I believe that the scale tilts in favor of the S2. I cannot prove it scientifically, but I believe I gained more images than I lost, and again, the quality of the files from the larger sensor without an anti-aliasing filter and the better Leica lenses is a huge bonus. I also have a sense of personal satisfaction from capturing split moment action without relying on auto-everything or super-fast motor drives. I have a lot more to say about this in the section on tips and recommendations below.
Did anything go wrong?
Unfortunately yes.
I have been using Leica gear without a single reliability problem for the better part of 40 years. This is a stellar record, but even the best quality equipment can fail, and my S2 system had a failure very early in the game.
The first 3 images I shot with the S2 and the 180 mm lens were perfect. However, when I looked at my 4th shot on the rear screen, my heart sank. The image was grossly overexposed, and the only colors present were magenta and white. I tested the camera with all the other lenses and it was fine. It was only doing this with the 180. After fiddling with the camera and the lens for a few minutes, I discovered that shooting one frame in mirror-up mode fixed the color problem, but the camera still grossly overexposed. Even in manual mode, the meter was off by about 1.5 F/stops. Adding minus 1.5 F/stops exposure compensation to my normal settings allowed me to shoot just fine, but I had to watch my histograms like a hawk (I always do this anyway!). One of the reasons I had to watch my histograms so carefully is that the problem was intermittent. The lens would go back to normal and then fail again without warning. Also, when the lens failed, sometimes the overexposure was as much as 2.5 F/stops.
I operated in this “crippled mode” until the Safari was over.
Upon arrival in Johannesburg, back from the bush, I sent an email to Leica describing the issue. I sent this email around midnight on Thursday night. On Friday morning at 8:01 AM (Johannesburg and Germany time) a response from Leica in Germany was sent to me stating that they would immediately replace my 180. I told them that I was flying back home via Frankfurt, and they informed me that they had considered replacing my lens while I was in transit in Frankfurt, but that it would be better to do it in the US to avoid any problems with customs.
Later the same day, I received an email from Leica USA informing me that the replacement lens had already been shipped and a shipping label to return the old lens was included in the box. I arrived back home on Saturday night and on Monday at 8:30 AM my brand new replacement lens was delivered. It works perfectly.
Now, this is what I call service! Leica deserves a big hurrah for taking such good care of their customers.
The Panasonic GH2 on Safari
A few words about the camera first. I had not used a smaller consumer camera in a while. I was surprised by how well thought out this camera is. Far superior to anything Canon or Nikon or Sony or Fuji have to offer. As complicated and feature laden as the camera is, the locations of the controls and the ergonomics (other than the traditional film type shape of the camera which is all wrong, but no manufacturer seems to want to deviate from) are excellent. Much better than any other Japanese camera I have tested to date.
On the other hand, the user manual establishes a new low point in my experience. It is the absolute worst manual I have ever seen. Shame on you Panasonic. If I had hired a crew with the sole purpose of writing the worst manual ever, I do not think it would have been half as bad as this one is.
Once I ditched the manual, which is totally useless, I quickly developed a love/hate relationship with this camera. The image quality is surprisingly good for such a small sensor, and the 14-140mm and 100-300mm lenses deliver extremely high quality images. Note: These lenses are 28-280 mm and 200-600 mm equivalent in 35 mm.
Unfortunately, the camera has this awful plastic low quality feel to it. The lenses are “sticky” and “jump” when you try to zoom in and out instead of turning smoothly. Just a little finger pressure affects the zooming and focusing rings, and so on. The whole camera body also exudes cheapness and cutting corners. It is almost a paradox that it can deliver such good results. I believe that if Panasonic took the time and care to make this camera and lenses of higher quality materials, with smoother and more durable mechanical components, it would have a much better camera and potentially a bigger commercial success (even if the price was slightly higher).
The other thing that drove me crazy was the viewfinder. I thoroughly understand the advantages of a mirror-less camera. However, out in the bush I felt like I was watching a bad movie, or living in the world of a Robot peering through the LCD finder. Optical finders are much more pleasant to use. To make matters worse, when shooting in continuous mode, or when shooting fast action I could not see the action. The screen either blanked out or showed previews of the previous images being recorded. Enough said about the viewfinder.
The biggest advantage of the camera is that it is so light and small and the autofocus is very fast (it seems to work better than most). Supplementing it with a few manual focus tweaks I was able to shoot fairly effectively. Image stabilization is also excellent and seems to be much better than the 35 mm crowd.
The camera worked flawlessly and it became my long-lens camera, versus the Leica S2 which obviously was my short lens camera.
Compared to 35mm rigs…..
I have used 35 mm rigs in Africa before, and frankly, I did not miss them. As I mentioned above, the pro level bodies and lenses have gotten so big and so heavy that they have become quite a chore to use. I keep seeing (and this trip was no exception) what I call “Frankenpods”. These are contraptions to help hold and stabilize these big rigs on a typical Safari Land Rover. They include clamps, monopods, tripods, bean bags, gimball heads, you name it. Invariably, people eventually give up on these things and revert to handheld shooting. These devices are just too constraining when things are happening and moving so quickly, so in all the trips I have made to Africa, these devices have ended up being a complete waste of time and money for this application.
The problem then becomes the fatigue of handling big heavy rigs all day long, combined with the care that needs to be taken not to bang them against the vehicle or other people, or other people’s equally large contraptions. Trust me, it gets pretty tiring and uncomfortable after a while.
By comparison, the G2 was an absolute joy to hold as a long lens camera. So was the Leica S2, which in spite of the larger sensor looked almost like a miniature compared to, say a Nikon D3X with the 200-400 Nikon zoom.
Tips and Suggestions to Improve Your Wildlife Images
The tips and suggestions in this section are based on my experience, and as such they constitute my personal and thus highly biased opinions. Some people will disagree, and that is just fine. This is what makes the horse races!
Also, please bear in mind that there are no absolutes in this world. For those of you who take things literally, I would suggest that you add the words “in general” at the beginning of the subtitles. There are obviously exceptions to every rule.
So, without further ado, here we go:
Avoid the Encyclopedia Syndrome
I have noticed that the vast majority of people who shoot wildlife suffer from a disease I call the Encyclopedia Syndrome. What I mean by this is that they shoot the same pictures of animals we have seen in books for many decades over and over again. I think you know what I mean: An individual mammal standing and looking at the camera, a bird on a branch, a lion or a hippo yawning, etc. They usually have no compelling message and mediocre lighting. They are the perfect pictures for an encyclopedia in order to show what a specific animal looks like, but from an artistic photographic perspective the images are boring and have little value.
I have often observed people on Safari shooting gazillions of these kinds of pictures. If the intent is to publish an encyclopedia, a zoology treatise or to impress your friends about all you saw, knock yourself out. On the other hand, if your intent is to produce good photographs, I can think of few things that are more boring or more overdone that these kinds of images.
My first suggestion is to resist and avoid the Encyclopedia Syndrome. Think, look and figure out what you are trying to express before you shoot.
Take Control
Most of the trackers, drivers and guides in Africa are wonderful people. They mean well and always want to please, but fine art photographers they are not. They are also jaded by their constant contact with typical tourists that shoot mediocre “post card” type images. Therefore, their view on how to find, or how to position the vehicle to make a fine image is usually deeply flawed.
Think of it this way, if they let you or I be in charge of the tracking and driving, we would probably never find anything interesting. Likewise, if you let them guide the photography part of things, chances are you will fail to make compelling images.
Try to repeat to yourself: When it comes toyour images,youare the only expert. You need to be in control. You are also the person paying for the service, so it is imperative not to be shy and to tell these folks what you want and where to move to get the shot. As long as things are within appropriate safety limits, they will comply and you will at that point develop a good synergistic working relationship. I have found that even if you are sharing a vehicle or a tracker with other people, everyone tends to be extremely accomodating of a photographer’s request.
The following image is a classic example of what taking control means.
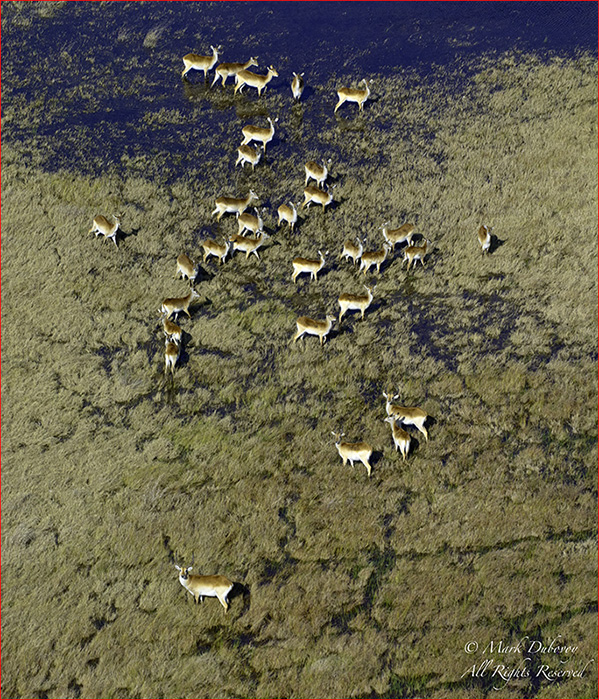
Lechwe
Leica S2 with 180 mm lens
This image was shot from a helicopter. In this case, the helicopter pilot was not particularly receptive to input, and was adamant about going lower and photographing a male closer up. He was also adamant that the best light would be shooting with the sun behind the helicopter. He was stubborn as a mule.
I had to become quite forceful until it finally sunk in that I was the client and he had to accomodate my wishes, not his. He was basically clueless about how to approach the image I wanted, so it took 7 passes until he got it right. I did not let go. I know I pissed him off royally, but I do not care: I got the shot!
What I wanted was the sun on the side of the helicopter, higher altitude and a different grouping of animals. This image works for me for several reasons:
– First, because it is taken from a different vantage point, i.e. from above at higher altitude than usual.
– Second, because it is a vertical image. The vast majority of images that do not involve tall animals like a giraffe are horizontals. Even more so when shot from the air; practically every image I have seen shot from a helicopter is a horizontal. In this case, however, the vertical composition is massively better.
-Third, because I think the aesthetics of the composition, and the animals themselves have a really powerful message about beauty and survival. Even the colors of the background work to enhance the message.
Had I let the pilot take me where he wanted me to shoot, I would have ended up with the typical postcard horizontal image of a male looking straight at us with totally boring light and a bland background. In other words: Ready for the trash.
Don’t just shoot a picture: Tell a story
I believe the image of the mother defending the baby elephant at the top of this article does just that: It tells a story.
It clearly shows the fury and the desperation of the mother. It also shows another adult elephant coming to help. At the same time, if you look behind the mother, you can see a large group of hyenas going after the baby in a massive and relentless attack. This image also depicts how the Hyenas in the front attack, taunt, and distract the adults in order to try to isolate the baby and allow the rest of the pack to attack it. In my mind, this single image tells the story and also transmits the feeling of the inevitability of the final outcome.
If you approach your wildlife photography from the point of view of telling a story rather than just capturing a picture, your images are likely to improve significantly.
Persevere, do not give up
Case in point: The image of the elephants and hyenas we just discussed. It took several hours to achieve this image. This included brilliant tracking, extremely difficult driving through thick bush and woodlands, getting through massive amounts of dust produced by the elephants as a defensive mechanism, as well as certain amount of danger by being “up close and personal” with a large number of attacking hyenas and furious charging elephants. A miscalculation with these animals could have led to disaster. One simply has to persevere, not give up, and trust experienced trackers. I can tell you that the adrenaline rush was extreme and prolonged, but in spite of the obvious danger, a certain sense of peaceful calm prevailed.
One of the key defense mechanisms of elephants is to look for the thickest brush and woodlands in the area. This made following the action and shooting good images almost impossible, as there were tons of visual and physical obstructions present the entire time, not to mention the fact that we could not stop the vehicle and we were bouncing up and down with a vengeance. It took well over 2 hours before there was a clearing where I was able to shoot better. The action in the clearing was very brief, but long enough to allow me to shoot this as well as several other compelling images.
Do not overzoom
Human beings are curious individuals. Combine this with the power of a long zoom lens, and there is a tendency to try to immediately zoom in so one can see all the minute details that may not be clear to the naked eye. This tendency to zoom in all the way is not always good for photography. In the case of the image of the elephants and hyenas, I felt that it was necessary to step back a little in order to tell the story. Shooting with a longer lens would not have been as good. Even if I had captured the same framing with a longer lens from farther away, I feel that the image would not have been as good, because of the flattening of the perspective that comes with long lenses. In other words, the image would have lost some of its intimacy and some of its 3D feel. Personally, I still prefer the perspective with a shorter lens.
The following image of a female leopard in a tree could have easily suffered from the Encyclopedia Syndrome as well as overzooming. There are several factors that make the image different. First and foremost, I think the lighting is terrific. Even the spots of lighting in the tree can be interpreted as a whimsical paradigm for the spots on the leopard. Second, there is enough context in the tree and the sky, that overzooming did not ruin the image, in other words, the environmental and the three dimensional quality of the portrait are preserved. Third, the body position and the facial expression give an immediate feeling of tension, discomfort and thought.
Again, positioning was crucial for the right composition and lighting, and in order to preserve the proper framing I used the lens at its shortest focal length.
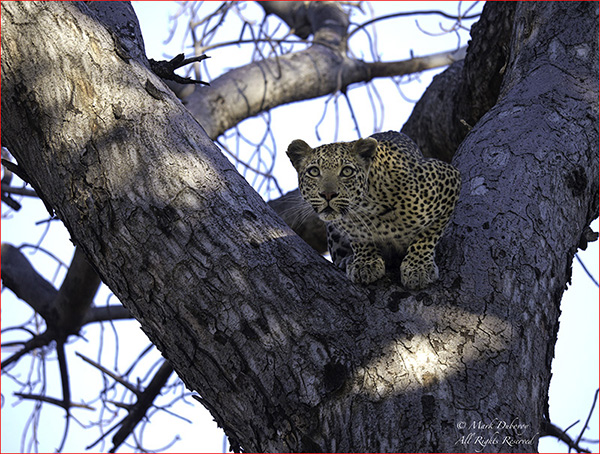
Female Leopard In Tree
Panasonic GH2 with 100-300 mm lens
The story behind this image is that we found this leopard hungry and in full stalking mode. After stalking on the ground for a while, it went up the tree. A few minutes later, a couple of warthogs came near the tree, completely unaware of the presence of the leopard. It was a “meal ready to eat”, however, there was a group of baboons in a nearby tree, and baboons are a mortal danger to leopards. This is why the leopard was so tense. It was in the middle of a typical Darwinian dilemma: It needed to eat, but hunting one of the warthogs could cost her her life. This is what caused the tension in the body, as well as the facial expression. In the end, she decided not to take the risk, and at the proper moment, she escaped at high speed before the baboons could get to her.
Search for interesting shapes and patterns
After a few days in the bush, some animals are often neglected by photographers. Particularly plentiful animals that are not predators. Case in point, the zebra. However, these kinds of animals can offer some exciting photographic opportunities if one searches the right light, the right positioning and the appropriate lens.

Zebra
Panasonic GH2 with 100-300 mm lens
As you would imagine, the driver/tracker wanted to position us in front of the zebra in order to shoot the usual boring image of zebra looking at us. Instead, I directed him to get away from the animals and go farther away and to the side. My rationale was that by using the GH2 with the longest lens I had (600 mm equivalent at full zoom), I could flatten the perspective and look for a side image with some interesting graphic content. The light, although quite bright, was also much better on the side. These decisions paid off with the image above. Note that I never restrict myself to the standard rectangle shape of the sensor. Some images want to be more rectangular, some images want to be more square. The exact aspect ratio should be carefully chosen for each image.
Avoid Tonality Suckout!
Folks, I hate to inform you, but there is a severe epidemic in Digital Photography. It is a deadly disease that kills images right before your eyes. It literally sucks the life out of them, so I have coined a term for this disease: Tonality Suckout.
So, what is this disease, and what is likely to cause it?
The most likely cause is the use of cameras in auto exposure as they come from the manufacturer. I just do not get it. Camera manufacturers continue to use 19th century exposure determination methods that were designed for film. These methods simply do not work with 21st century technology. This is probably the dumbest design flaw of practically every digital camera on the market today.
Let me explain:
For those of you who do not understand the reason for always “exposing to the right“, with the histogram as far to the right as possible without clipping, please do yourselves a favor and read the now classic old article on the subject by Michael Reichmannon this site.
The bottom line is that the vast majority of the tonal information that a sensor can capture lies on the far right side. In fact, usually 75% of the total tonal information a sensor can capture lies in the small right hand area of the two top F/stops just below pure white. And yet, almost all cameras leave the factory calibrated to center the histogram instead of moving it as far to the right as possible. To make matters worse, the screens in the backs of cameras are also calibrated to show a good exposure with the histogram centered. This is nonsense!
What this means, is that many of the photographs taken using auto exposure or built-in meters are grossly underexposed in terms of capturing the bulk of the tonal information a sensor can capture.
There are many instances where if your images look good on the camera screen, or on the computer screen, it is very bad news! You are highly likely to have lost most of the tonal information. With the exception of high contrast images, or images with very bright top end highlights that are critical, most images should look overexposed on the screen. What you need to do is expose with the histogram as far to the right as possible without clipping, and then work on the proper look when you edit. You will be mapping the tones downwards; the important thing is that no information is lost in this process.
So what are the consequences of Tonal Suckout? As the name implies, it is as if someone grabbed your image and sucked the tonality out of it, If there are millions of shades of green in a landscape, you may end up with a few dozen. If there is a terrific richness of tonalities in a face, you will end up with a small sub-set that makes the face look bland.
I cannot tell you how many digital photographs suffer from this problem. It is a huge majority of the images taken and shown today. I get really tired of looking at these things.
I do not care how many Megapixels your sensor has, or how great your lenses are. If you suffer from Tonality Suckout, your images will look anemic and no amount of post processing wizardry can fix that.
Visually, Tonality Suckout is clearly noticeable, even to untrained observers. I constantly hear people looking at prints from good photographers (who avoid Tonality Suckout) marvel at the richness of color, the richness of tone and at the amazing reproduction of the most subtle tonal changes. There is no reason why your images cannot be part of this elite crowd. All you have to do is always expose to the right and watch your histograms very carefully.
Each camera and each situation is different, but I have found that a good starting point is to set exposure compensation in your camera to + 2/3 of an F/stop and adjust from there.
Do not rely on Autofocus
Autofocus can be great, except the camera does not know whether you want to focus on the left eye, the right eye, the nose, the horns or the whiskers. In fact, you may want to focus on the ear and the camera will focus on the twig in front of the scene, instead of the animal. I find it much better to use autofocus as a quick way to get the focusing ring in the general region of proper focus, but in the end I always use manual focus before I shoot.
If you are curious about it:I did not shoot one single image using autofocus this whole trip. Every image I shot used manual focus before the shutter was released.
For cameras that allow this, it is highly advisable to set one of the rear buttons (like the AF/AEL) lock button to perform autofocus, while the lens is left ready for manual focus adjustments and the shutter release is completely decoupled from autofocus.
Do not rely on Motor Drives
As fast as motor drives are today, they are still not fast enough to capture the true magic moments. The likelihood of missing the key shot is very high. I believe that one gets a much higher rate of success by fast reflexes on the trigger finger. If one is going to use a fast motor drive, I recommend using short bursts and relying mostly on your own reflexes with the trigger finger, as opposed to keeping the button pressed and letting the motor run.
Look for subtlety and surprises
Not every image has to be lit the same way. Not every animal has to be shown in its entirety or clearly with no other objects in front. I find that often times a subtle image or an image that surprises with an unexpected element is better.
The Kudu through some tall grasses is an example of subtlety to create an interesting image:
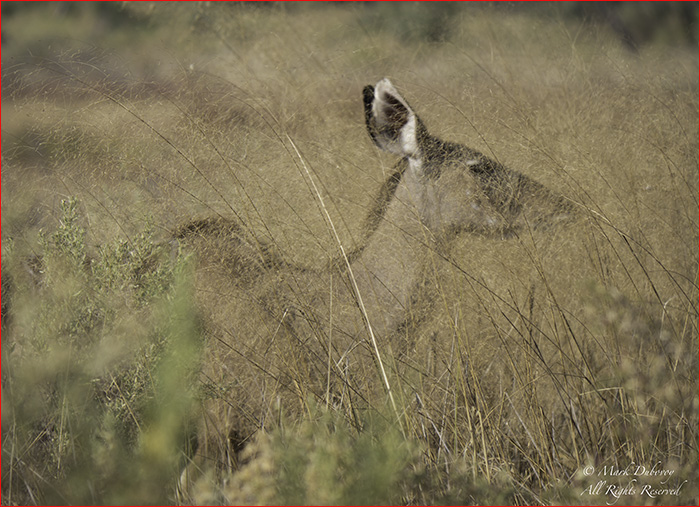
Kudu
Panasonic GH2 with 100-300 mm lens
The unexpected appearance of a giraffe near a tree represents a visual surprise that gives the image a totally different level of interest:
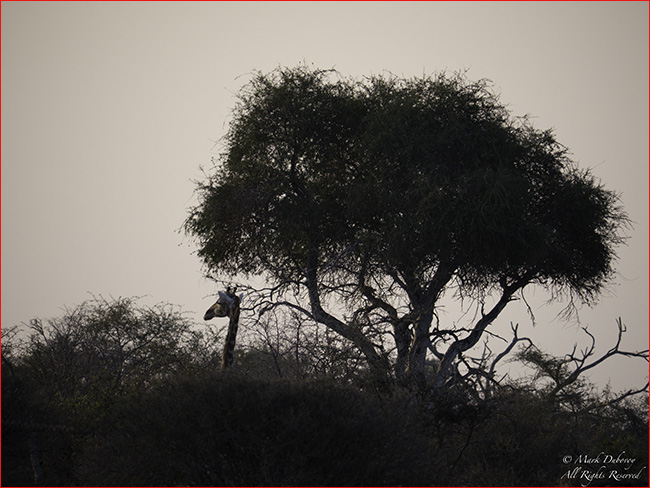
Tree and Giraffe At Sunrise
Panasonic GH2 with 14-140 mm lens
Therefore, it is always a good idea to think and try to create these subtle images, and also to look and try to exploit visual elements of surprise.
Look everywhere, up, down and all around you
You never know what you might find. There is beauty and there are interesting things in every direction. Just because something on the right side caught your attention, does not mean that there isn’t something much better on the left side, or behind you, or looking down, or looking up. You might just happen to find a beautiful landscape, or an unexpected macro image.
I found a lot of beautiful landscapes on this trip, particularly in areas near the water. However, even a simple landscape on the way back to camp in the evening can be stunningly beautiful:

Trees at Sunset
Leica S2 with 70 mm lens
Also, do not underestimate the sky. Sometimes, just looking up can surprise you.
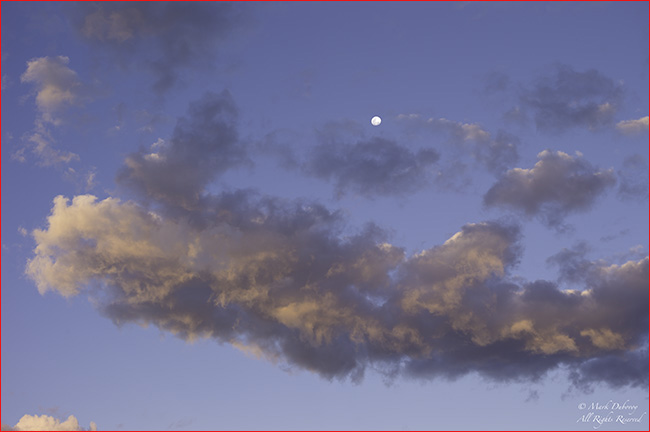
Sky
Leica S2 with 70 mm lens
Even if you are not interested in shooting these kinds of images, you should observe them, absorb them and enjoy them.
Do not edit using a laptop display
I am dismayed by how many people use laptops with their built in displays to edit their images. Laptop displays are overly bright, and they are usually way too blue. These displays are not meant for photography, period. Even if you were able to properly calibrate and profile one of these displays (which is in almost all cases impossible to do), the results are still unacceptable, because their color gamut, resolution and brightness range are a small fraction of what a camera or a printer can deliver.
Graphics grade displays are the only way to go if you want to do high quality work. The good news is that the prices for these displays have dropped significantly over the years, and there is a wide variety of choices from companies such as Eizo, LaCie and NEC. Note however, that even with these displays it becomes necessary to make some test prints. This is because modern printers now exceed the color gamut of even the best displays. In fact, many modern printers exceed the Adobe RGB space.
This brings me to another issue, which is that many people set Adobe RGB as their working space. Please be aware that if you do this, you will be clipping massive amounts of information that most Pro level cameras can capture, and you will be working in a color space that is smaller than what printers deliver. In other words, you will be degrading the quality of your work. I strongly suggest that you use ProPhoto RGB as your working space.
Do not edit too soon
I never edit my work until 3-4 months after I shoot the images. This is a lesson I learned a long time ago in the days of film: I had been shooting in a field of flowers in Mexico. Because of the vegetation, it was hard to see the ground. After making my first exposure I moved over to the side to re-position my tripod. I made a second exposure and immediately after making the exposure I felt my left foot sink into something soft. The “soft ground” turned out to be a soft and moist piece of bull excrement. Unfortunately, it went inside my shoes, all over my socks and also on my pants.
After I returned home and cleaned myself up, I edited my pictures and chose the first exposure as the hands down favorite. I almost threw the second exposure into the trash, but for some reason I cannot explain, I kept both pieces of film. Several years later I looked at these two images and my conclusion was that the first shot was mediocre and worthless, but the second shot was outstanding. The second shot ended up in a major private collection, the first shot ended up in the trash.
The lesson here is that I was influenced by the bull excrement incident not to like that second image, even though from a purely photographic point of view it was excellent.
While this may be an extreme example, I firmly believe that we are all influenced by the events that take place when we are shooting, and if we try to pick the best images while these events are still fresh, we will undoubtedly make some bad choices. Also, in terms of making adjustments to the images in editing software such as Lightroom or Photoshop, I find that letting some time go by between capturing the image and editing the image also yields better results.
The images in this article were all taken during this very recent trip, so based on the above you now know that they are not necessarily my picks for the best images of the trip. What I did is pick a few images more or less at random that I thought would illustrate some of the points I am trying to make. Editing my images from this trip will most likely take place in the November/December time frame.
Some final thoughts
The most important and the most enjoyable Safari moments for me were those moments when I decided to step back, put the camera away and experience with all my senses the beauty of the bush and the wild animals within it. In other words, the quiet moments when I was not photographing.
If there is one piece of advice I can give you that I hope you will follow, it is that you make it a point not to see the entire Safari through a camera viewfinder with one eye closed. It is extremely important to experience Africa in a complete holistic view, without machines in front of your eyes and without worries about F/stops in your brain.
Taking the time to do this will definitely improve your photography; but much more importantly, it is likely to change you as a person, which is something that is truly priceless.
July, 2011
Updated on: March 7, 2015
Lorem ipsum dolor sit amet, consectetur adipiscing elit, sed do eiusmod tempor incididunt ut labore et dolore magna aliqua. Ut enim ad minim veniam, quis nostrud exercitation ullamco laboris nisi ut aliquip ex ea commodo consequat. Duis aute irure dolor in reprehenderit in voluptate velit esse cillum dolore eu fugiat nulla pariatur. Excepteur sint occaecat cupidatat non proident, sunt in culpa qui officia deserunt mollit anim id est laborum.
Lorem ipsum dolor sit amet, consectetur adipiscing elit, sed do eiusmod tempor incididunt ut labore et dolore magna aliqua. Ut enim ad minim veniam, quis nostrud exercitation ullamco laboris nisi ut aliquip ex ea commodo consequat. Duis aute irure dolor in reprehenderit in voluptate velit esse cillum dolore eu fugiat nulla pariatur. Excepteur sint occaecat cupidatat non proident, sunt in culpa qui officia deserunt mollit anim id est laborum.
Lorem ipsum dolor sit amet, consectetur adipiscing elit, sed do eiusmod tempor incididunt ut labore et dolore magna aliqua. Ut enim ad minim veniam, quis nostrud exercitation ullamco laboris nisi ut aliquip ex ea commodo consequat. Duis aute irure dolor in reprehenderit in voluptate velit esse cillum dolore eu fugiat nulla pariatur. Excepteur sint occaecat cupidatat non proident, sunt in culpa qui officia deserunt mollit anim id est laborum.
Lorem ipsum dolor sit amet, consectetur adipiscing elit, sed do eiusmod tempor incididunt ut labore et dolore magna aliqua. Ut enim ad minim veniam, quis nostrud exercitation ullamco laboris nisi ut aliquip ex ea commodo consequat. Duis aute irure dolor in reprehenderit in voluptate velit esse cillum dolore eu fugiat nulla pariatur. Excepteur sint occaecat cupidatat non proident, sunt in culpa qui officia deserunt mollit anim id est laborum.
Mark Dubovoy is a well-known photographer, educator, writer and businessman. His images are a unique combination of impeccable aesthetics, a deep love for nature and flawless technique. His unique background, starting in the darkroom as a child, combined with a long-term career in science and technology, are clearly evident in his work. He is a master printer in many traditional and digital methods and considers printing an integral part of the creative process. Mark’s love of the technical aspects of photography is only exceeded by his passion to reveal and document the natural landscape, the hidden beauty in objects and the personalities of wild animals. While his main area of focus is landscape photography, he has also completed a number of projects photographing the animals of Africa, rare automobiles and images of flowers. His photographs are included in a number of private collections, as well as the permanent collections of major Museums, including the San Francisco Museum of Modern Art, the Monterey Art Museum, the Berkeley Art Museum, the Museum of Modern Art in Nanao Japan and the Museum of Contemporary Art in Mexico City. His images have also been published in a number of magazines and books, including the Best of Photography Annual, International Edition. Mark is a highly regarded technical expert in many aspects of photography. As such, he has been and continues to be an advisor, consultant and early tester for a number of manufacturers of high quality photographic products. Mark has also been a major contributor to a number of print and online publications. He has been an instructor and a leader of photographic expeditions and workshops around the world, including places like Antarctica, Iceland, Africa, Mexico and others. Prior to founding Photo Aesthetics, Mark was a regular contributor to PHOTO Technique magazine and Editor-at-Large of The Luminous Landscape. Mark holds a BS degree in Physics from the National University of Mexico, and MA and Ph.D degrees in Physics from the University of California at Berkeley. In addition to his involvement in photography, he has had a long and successful career in science, technology and early stage companies in Silicon Valley
You May Also Enjoy...
vj-5-d60-play
Subscribe to The Video Journal Please use your browser'sBACKbutton to return to the page that brought you here.
