Introduction
Pixel Genius, http://www.pixelgenius.com, has just released Version 2 of its well known Photoshop Plug-in for sharpening. If you are a current PhotoKit (Version 1) user, by the time you read this, you should have received a coupon for a 70% (approximate) discount. So, the price of the upgrade from PhotoKit Sharpener to PhotoKit Sharpener 2 is a modest $30 bucks. The price of PhotoKit Sharpener 2 (PKS 2) is $99 dollars.
I have been working with Photokit Sharpener 2 for several months, starting with the Alpha version and then through a number of Beta versions, as well as the final product before it was released.
I can say without hesitation that this is the best sharpening product I have ever used. If this sounds like a very strong endorsement, it is.
What’s New in Version 2?
The most important feature in Photokit Sharpening 2 is something that I am not used to seeing anymore: A really good User Manual. What a concept!
Huge Kudos the the Pixel Genius team for writing a User Manual that puts to shame just about any other User Manual I have seen in years. The manual thoroughly explains what is sharpening, what are the problems that need to be solved, what the best workflow is, how the different tools in the product work, etc. Reading the manual, plus a little bit of practice leads you to master the product rather quickly.
Other key features of the product are as follows:
– Non-Destructive Sharpening
All sharpening effects are implemented as Layers or Layer Sets leaving the source image untouched, whether it’s a flat file or a complex layered construction. Sharpening effects remain non-destructive and adjustable until the user flattens the layered image or merges the sharpening effects into a normal pixel layer.
– Automation
PKS 2’s default settings are designed with automation in mind. You can utilize its built in Batch Mode to apply multiple effects without worrying whether or not it will wreck your images.
– Control
Most sharpening tools offer a take-it-or-leave-it result. PKS 2 produces layers at default opacities that allow you to increase or decrease the amount of sharpeningafter you have run the effect. For even more control, the Capture and Output Sharpener effects return separate layers for the light and dark sharpening contours. Additionally, those Capture Sharpeners that apply Smoothing do so on a third separate layer. Finally, for even more control, all PKS 2 modes are configured to be allowed to create a layer mask with each effect, allowing further fine-tuning by editing the layer mask with brushes or other tools.
New Interface and new features
With this new version, Pixel Genius has introduced a new “Toolbox ” dialog window that shows an image preview as well as functions. When you have an image open in Photoshop and you click on File>Automate>PKS 2, the Toolbox dialog window appears. The following screen shot from the users manual is self explanatory:
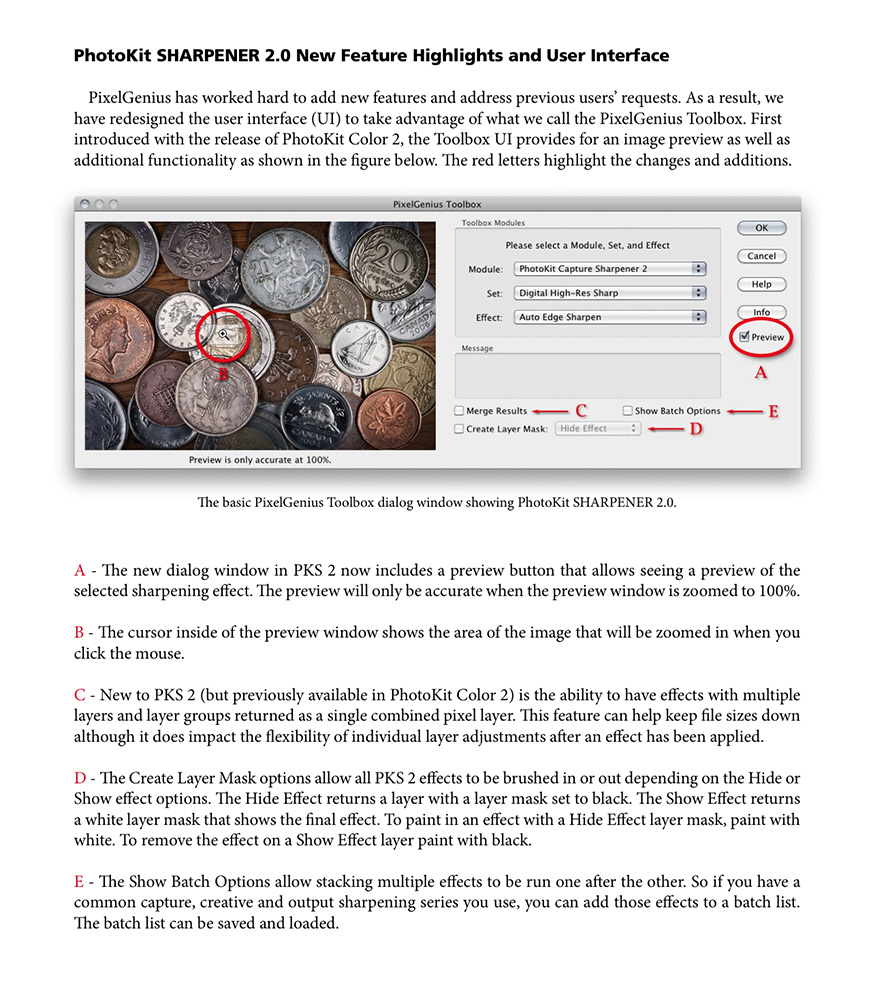
It is important to note that the toolbox provides for a preview of a final result, but only when the image is zoomed in to 100%.
New to version 2 is the ability to select the “Merge Results” option which condenses all the layers that PKS 2 produces into a single layer. This is useful if you do not want your files to be very large and you have no need for tweaking beyond what the product does automatically.
Speaking of automation, for Capture Sharpening in the past you had to choose whether to use Super Fine, Narrow, Medium or Wide edge sharpen. The new version adds Auto Edge sharpen, where the software automatically analyzes the edges in the image and applies the proper sharpening. I must say that I have never been a particular fan of total automation, but in this case the software does such a superb job in this mode that I hardly ever use anything else.
Similarly, for inkjet printing, once you select a type of paper, the product automatically knows your image resolution and final size, and takes care of the whole process automatically (as long as your original resolution and sizes are not ridiculous).
Basic Workflow
PKS 2 consists of several modules: Capture Sharpeners, Output Sharpeners, and Creative Sharpeners, which include Sharpening Effects, Special Effects and Smoothing effects.
The best way to use PKS 2 (in my opinion) is to start in Camera RAW or Lightroom and perform all other basic edits first, making sure that all sharpening is disabled and clarity is set to zero (read on). Then, select further editing with Photoshop and apply the appropriate Capture Sharpener, Capture Smoothing (if needed) and any other Creative Sharpening or Special Effects. Finish up by performing any other needed fine editing steps in Photoshop. Then, save the image as your edited master. Do not perform output sharpening until you know whether you need to sharpen for the web, for inkjet prints, continuous tone, etc. Output sharpening should be performed at the end of the process and just before you are actually ready to output the image (s).
I would like to highlight two tools that I particularly like: The DOF and the Midtone Contrast tools. The DOF tool allows you to sharpen areas that are out of focus (within limits, of course!) to fool the eye and make them appear in focus. Maybe I should sayalmost in focus. Careful use of this tool can improve images quite significantly, but it requires finesse. The Midtone Contrast tools are similar to the Clarity tools in Lightroom and Photoshop, but I think the PKS 2 tools produce better results and are extremely useful for a very high percentage of images. This is why I suggest setting Clarity to zero.
The Bottom Line
Is sharpening using PKS 2 better than using PKS 1? I sure think so, and by a considerable margin. As I mentioned right at the beginning of the introduction, PKS 2 gives me the best sharpening of any product I have used to date. And in case you are wondering, it is not an exercise in technical virtuosity per se: You can see the difference in the prints and in the images on the screen.
The interface is also vastly improved, and the product is easier and more convenient to use.
There are too many features to explain and describe in a short article: The software allows you to compare effects, stack effects, do batch processing, pick different characteristics for the layer masks, do post-effect editing such as changing layer opacity, and many more.
Rather than go into all kinds of gory detail on each and every feature, I would suggest to the reader that they download a trial copy of the product, read the manual and do a thorough test drive.
I highly recommend the product to anyone using Photoshop, and if you are already a PKS 1 user, the upgrade is an absolute no-brainer.
January, 2011
Mark Dubovoy is a well-known photographer, educator, writer and businessman. His images are a unique combination of impeccable aesthetics, a deep love for nature and flawless technique. His unique background, starting in the darkroom as a child, combined with a long-term career in science and technology, are clearly evident in his work. He is a master printer in many traditional and digital methods and considers printing an integral part of the creative process. Mark’s love of the technical aspects of photography is only exceeded by his passion to reveal and document the natural landscape, the hidden beauty in objects and the personalities of wild animals. While his main area of focus is landscape photography, he has also completed a number of projects photographing the animals of Africa, rare automobiles and images of flowers. His photographs are included in a number of private collections, as well as the permanent collections of major Museums, including the San Francisco Museum of Modern Art, the Monterey Art Museum, the Berkeley Art Museum, the Museum of Modern Art in Nanao Japan and the Museum of Contemporary Art in Mexico City. His images have also been published in a number of magazines and books, including the Best of Photography Annual, International Edition. Mark is a highly regarded technical expert in many aspects of photography. As such, he has been and continues to be an advisor, consultant and early tester for a number of manufacturers of high quality photographic products. Mark has also been a major contributor to a number of print and online publications. He has been an instructor and a leader of photographic expeditions and workshops around the world, including places like Antarctica, Iceland, Africa, Mexico and others. Prior to founding Photo Aesthetics, Mark was a regular contributor to PHOTO Technique magazine and Editor-at-Large of The Luminous Landscape. Mark holds a BS degree in Physics from the National University of Mexico, and MA and Ph.D degrees in Physics from the University of California at Berkeley. In addition to his involvement in photography, he has had a long and successful career in science, technology and early stage companies in Silicon Valley
You May Also Enjoy...
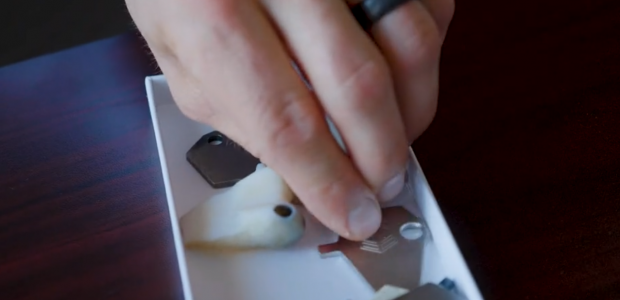
Jeremiah Barber follow-up: Inventor
FacebookTweet In this second follow-up to our video piece with Southern Utah photographer Jeremiah Barber, we look at one of Jeremiah’s own inventions: the thinguma!
