I have a problem. Just 1 week prior to beginning this review (August, 2003) I published a review of a terrific new sharpening program calledFocalBlade. I called it "…the most powerful and flexible tool yet produced for image sharpening". Well, that was then and this is now.
It has been about 3 years since the very popularnik Sharpening Prowas published and first reviewed on this site. Now, in the space of a month, two superior products have appeared that redefine the state of the art in image sharpening. So be it. We live in a age of rapid technological development, and with the web we have a marvelous tool for the instantaneous dissemination of product announcements and reviews. Now we havePhotoKit Sharpener. (I know that someone will say, "Ya, Reichmann always calls the latest product "the best ever".) I can only say that I receive some 10-15 new imaging related programs and plug-ins for review each month, and I usually end up reviewing just 1 or 2 that make the grade. The rest either don’t meet my needs — and so I work on the assumption that they won’t meet yours either, or that there are better solutions to be found elsewhere. The ones that I do review are generally the best of breed (or the very worst). Which brings us toPhotoKit Sharpener.
______________________________________________________

A Photoshop Automation Plug-In
for Windows and Macintosh
Pixel Genius
The first thing that you might want to know about this product is that it has been produced by some of the leading imaging geniuses in the industry, working together under the company bannerPixel Genius. This group includesMartin Evening,Bruce Fraser,Seth Resnick,Andrew Rodney,Jeff ScheweandMike Skurski. Never heard of them? That’s OK, they’ve probably never heard of you either. But trust me! These guys are the real deal. If you were inviting speakers to a world-class conference on digital image processing and needed a dozen speakers, these six names would be among the twelve.
In late 2002 I provided a preview ofPhotoKit, this group’s first product. I was impressed, and particularly found useful a set of included image sharpening tools. Clearly this group of wizards and programmers have been busy for the past year, because withPK Sharpenerthey have raised the sharpening bar to a whole new level. Let’s see how.
______________________________________________________
The Basics
PK Sharpeneris a Photoshop plug-in, but a bit different than most in how it’s accessed. When the installation program is run you point it to the appropriatePhotoshopdirectory. Once installed it is accessed from theAutomatecommand underFilemenu, rather than via the usualFiltermenu.
PK Sharpeneris available for both Windows 98 / XP for Photoshop 6 and 7, and Mac system 8.6 (Photoshop 6), Mac system 9.x and up (Photoshop 6 & 7) and OS X 10.1.3 and above (Photoshop 7.x). No mention of Photoshop 8, but there is no question that it will operate in the new version when released. And, whilePK Sharpeneroperates only in 8 bit mode in Photoshop 6 & 7,ifPhotoshop 8 supports 16 bit mode for more operations, (please note the "if"), I wouldn’t be surprised to seePK Sharpenerwork in 16 bit mode in this new version. (How’s that for mealy-mouthed equivocation?)
The manual is a 31 page PDF file, and given the depth and potential complexity of the application is a model of clarity and conciseness.
PK Sharpeneris priced at $99.95 for either platform and may be downloaded from thePixel Genius web site.
______________________________________________________
A Word of Caution
A word of caution, or at least advise. ThoughPK Sharpenercan be used by unsophisticated users, it really is most appropriate as a tool for the power-users; the type of photographer who sweats the details and who cares about extracting the nth degree of perfection from their images, usually ones intended for exhibition. If you’re in this category — read on. If you’re somewhat less demanding of image quality, or unwilling to put that extra bit of time and effort into your prints then this may not be the product for you. It also may not be the right choice if you’re working with large files and don’t havea lotof RAM anda lotof disk space. More on this in a while.
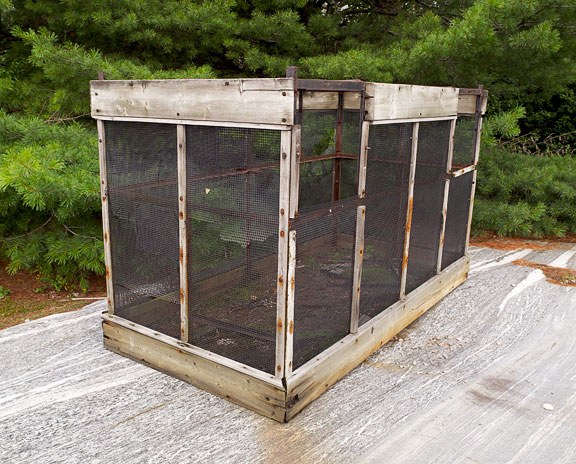
FIG. 1
Cage and Bedrock. Muskoka, Ontario — August, 2003
Contax 645 with 35mm f/3.5 Distagon and
16 Megapixel Kodak DCS Pro 645 digital back. ISO 100
A Sharpening Workflow
PK Sharpenerisn’t just a program for doing what you’ve likely been doing until now with the USM tool in Photoshop. Even if you’ve graduated to the use of masks,High Passsharpening, or other products likenik Sharpener ProorFocalBlade, you’ve never seen anything like this. In fact, the subtitle of the product name isA Complete Sharpening Workflow, and this isn’t just marketing hype. Let’s see what it means.
Many photographers and image processing professionals have found that sharpening is best done inat leasttwo steps — as part of or just after RAW conversion or scanning — and again prior to output, whether to screen or print. There are several reasons for this, and the best summary is given ina write-upby one ofPK Sharpener‘s designers,Bruce Fraser. Take a few minutes, read the article, and then return here.
WhatPK Sharpenerdoes, and it is unique in this respect, is that it breaks sharpening down intothreeseparate steps during image processing workflow…
1 — Capture Sharpening:
This is applied right after the image is imported from the RAW converter or scanner. It is intended to restore any sharpness lost during the image capture process. All sharpening should be turned off in the RAW conversion program (or the scanner software).
2 — Creative Sharpening:
This is comparable to the sharpening process that is usually applied to an image, and is the area where the most effort and "creativity" will be applied.
3 — Output Sharpening:
This is applied to an already sharpened image, and settings are based on the size and type of output.
Now you can see why this is called asharpening workflow, and also why this product isn’t for the casual user.
______________________________________________________
Everything on its own Layer
One of the cornerstones ofPK Sharpener‘s design brief is that everything done is nondestructive, and takes place on its own layer. This means that the user has total freedom to delete and redo any aspect of the sharpening at any time. It also adds great flexibility to the sharpening process because each sharpening action’s individual layer can have its opacity changed, thus increasing or decreasing its individual effect.
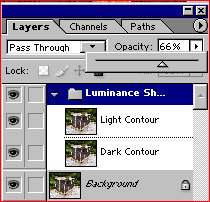
FIG. 2
InFigure 2above you see the layers palette for a simpleLuminance Sharpenaction. ALayer Sethas been created and the opacity defaults to 66%, allowing you to alter the intensity both upward and downward. Also, each of theLight ContourandDark Contoursub-layers similarly can have its opacity adjusted, allowing for a very high level of control over any undesirable black or white halo effects that might occur.
But this is getting ahead of ourselves. Now that we understand that the program breaks sharpening down into three separate steps, undertaken at three different times during image processing, and that everything takes place on a revisable layer, let’s look at a complete sharpening workflow from start to finish.
______________________________________________________
Capture Sharpening
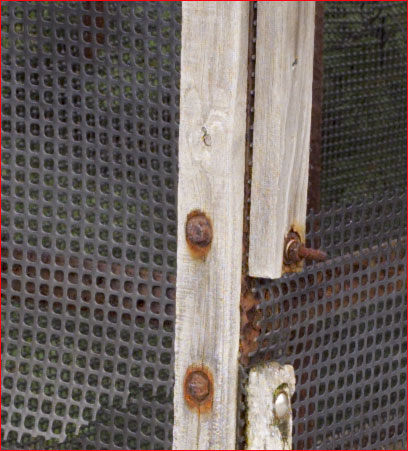
FIG. 3
InFigure 3above you see a 100% view of a small section from the center of the example image. It is straight from the RAW converter (Adobe Camera Raw), andSharpnessandSmoothnessinACRwere both set to "0", as recommended byPK Sharpener‘s instructions.
 |
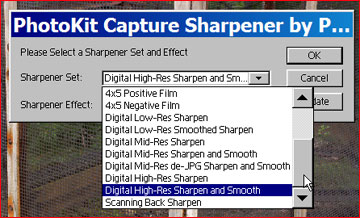 |
Fig. 4
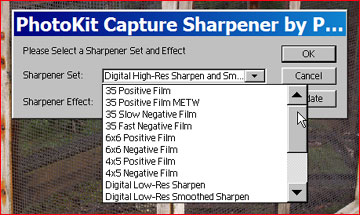
InFigure 4above we see the first menu choices — the selection of origin of the digital image. Since this is a scrolling window I have used two screen shots to show you the range of choices available.
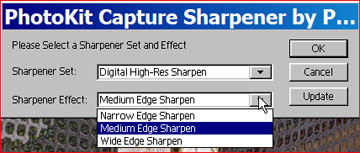
FIG. 5
InFigure 5you see the second choice to be made, withNarrow Edge,Medium EdgeandWide Edgebeing offered. These settings are basically to accommodate images with a lot of very fine detail (Narrow), normal images (Medium), and images lacking very fine detail, such as portraits (Wide).
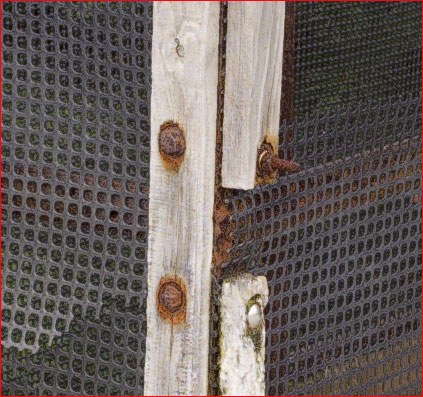
FIG. 6
InFigure 6above you will see the sharpening that has been applied choosingDigital Hi-Res SharpenandMedium Edge Sharpen, appropriate for this example frame shot with a 16 MPKodak DCS Proback. The sharpening is subtle, but definitely visible.
At this point in the workflow you would continue with basic image processing tasks, including cropping, colour correction, and so forth.
______________________________________________________
Creative Sharpening
This is the "meat" of the program, and where some of its more sophisticated capabilities can be seen and explored. There are three initial choices, as seen inFigure 7below —SharpeningandSmoothing BrushesandSharpening Effects. Let’s deal withSharpening Effectsfirst.
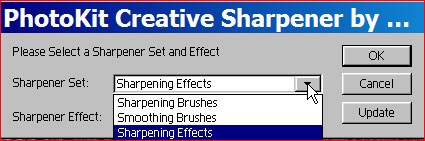
FIG. 7
If you own or have ever tried the originalPhotokitthe choices that you see inFigure 8below will be familiar. But, there are more of them and they work in layer sets, so that the individual masks can be adjusted to taste. In addition toEdge Sharpening,High Pass SharpeningandLuminance Sharpening, each in 4 levels of strength, there are two special modes,Super SharpenerandSuper Grain. You’ll have to read the manual for more details on these, but their presence shows the depth and versatility of this package.

FIG. 8
For this example I have usedEdge Sharpen #2, and the result is seen below inFigure 9.
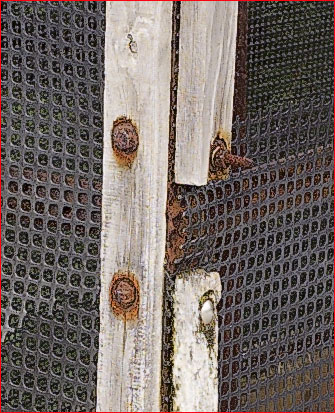
FIG. 8
Brush up on your Sharpening
Now comes the fun stuff. You’ll recall fromFigure 7above that there are alsoSharpening BrushesandSmoothing Brushes.Once you’ve appliedan overall sharpening to the image you are now free to use theSharpening BrushesandDiffusion Brushes.
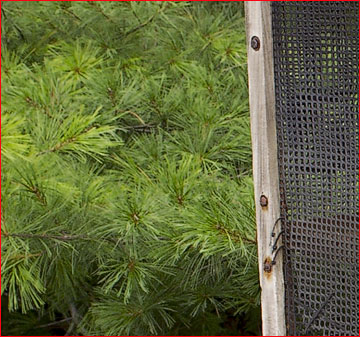
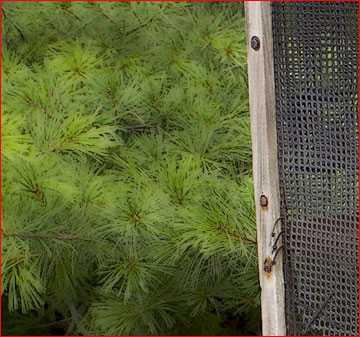
FIG. 9
These powerful tools allow you to paint on a separate image layer, using any available brush, or brush size, to sharpen or soften a particular area of the image. In the example above inFigure 9I have usedDiffusion Brush 3to soften the pine needles to the left of the box. You might, for example, use a sharpening brush to enhance on the eyes in a portrait, and a softening brush to smooth the person’s skin. The possibilities are endless.
______________________________________________________
Output Sharpening
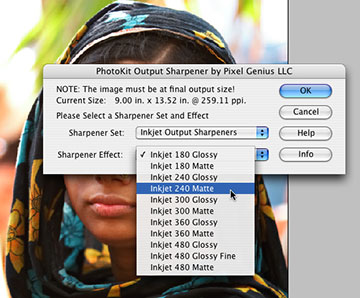
This is another area wherePK Sharpeneris simply in another league from any other image sharpening solution yet available. InFigure 9below you’ll see that there are selections for all of the major output devices, and also that it is vital that the specific output resolution and size be configured properly.
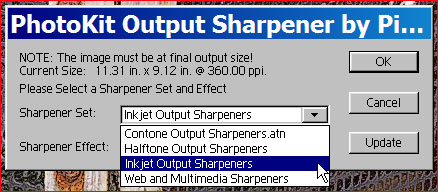
FIG 10
Below inFigure 10is shown the second set of choices — the resolution and type of paper being used. (I told you that this program wasn’t for the casual user).
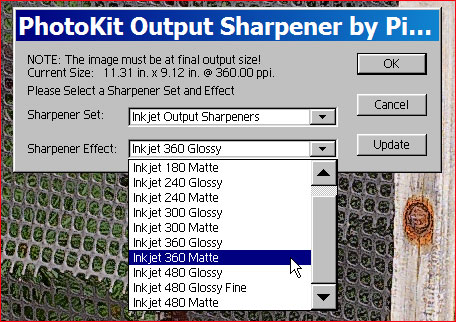
FIG 11
Before showing you what the output for a 360 ppi print on matter paper looks like, read whatBruce Fraser, one of the program’s designers has to say aboutOutput Sharpening.
In the capture and creative sharpening phases, it’s usually desirable to avoid obvious sharpening haloes. With output sharpening, though, that’s not the case. The rule of thumb I use (one that has held up well under a good deal of empirical testing) is to aim for a sharpening halo that’s somewhere between 1/50th and 1/100th of an inch in width—the thinking being that at normal viewing distances it’s too small to see as an actual halo.To accomplish this, you need to know the output size and resolution, and the way in which the output device converts the pixels into marks on paper. For example, if you’re printing to an inkjet printer at 300 ppi, you want to create a sharpening halo that’s about 3 pixels wide. If you’re printing to a halftone printer such as a press, using a 266-ppi file and a 133-line screen, you need a halo that’s at least 4 pixels wide, because each halftone dot is made up of four pixels, and you may well be rewarded if you make the halo 5 or 6 pixels wide. Needless to say (but I’ll say it anyway), the result will look pretty ugly on screen when viewed at an Actual Pixels zoom level. For years I’ve advised people to make the file look “crunchy” on screen when sharpening for offset: my research suggests that I was understating the case. You can make better judgments about output sharpening by viewing at 50% or even 25% (avoid the “odd” percentages like 66.6% because Photoshop applies heavy antialiasing to those views), but the only truly reliable way to make the judgment is to view the printed result. If you follow the above-mentioned formula, keeping the haloes to between 1/50th and 1/100th of an inch on the final output, the results will look good.
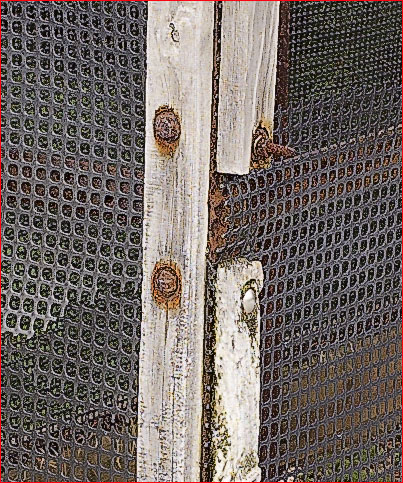
FIG 12
Now you know why I wanted you to read what Bruce had to say before showing you this image.Figure 12shows a center section at 100% withOutput Sharpening. Over the top, right? But not on a print! On a print made with anEpson 2200the output just sings!
What I do next is, once I’ve made my first print and am satisfied with it, is to turn this layer off so that I’m not confused by its apparent "oversharpened" state. I can also continue to refine the image with it off. I also save the file in this configuration. The next time I load the file to print, if the size and paper type are the same I simply turn the layer on. But, for example, if I need to prepare the file for web presentation I discard the printingOutput Sharpeninglayer and create a new one specifically for the type of output I have planned.
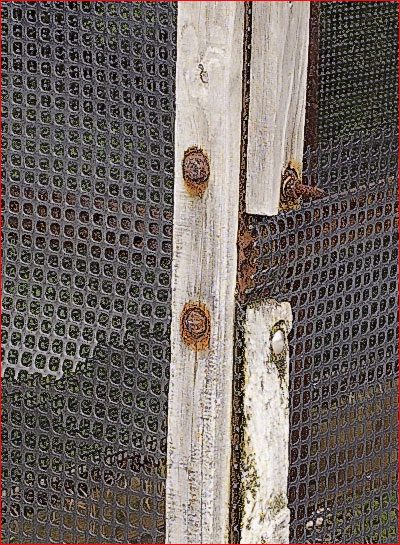
FIG. 12
Figure 12above has been tasked for web output at a 400 pixel width for an image with fine detail. It’s hard to imagine more flexibility than this, or higher sharpening quality.
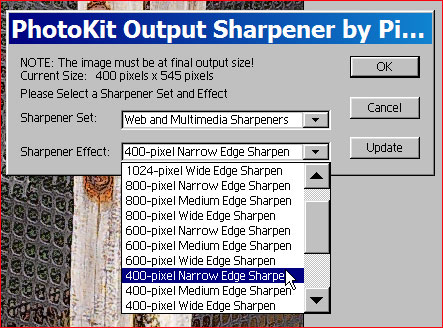
FIG. 13
Figure 13above shows a few of the output choices available for web presentation.
______________________________________________________
The Bad News
The good news withPK Sharpeneris that everything happens on Layers. The bad news is that everything happens on Layers. What do I mean by this? Because every effect is done on its own separate layer, many of which have sub-layers, each of which is individually tunable, the amount of control available and ability to refine every effect is almost unlimited. But, this comes with a price.
The sample file used for this review started as a 38 Megabyte 8 bit file (cropped from the original 50MB original). After applyingCapture Sharpeningthe size had increased to 140MB. AfterCreative Sharpeningthe size was 216MB, and afterOutput Sharpeningit was almost 300MB. This is an increase in size of about 8X.
Now imagine that I had started with a 100MB 16 bit file and am working in a future version of Photoshop that is able to handle 16 bit adjustment layers. Gigabyte files anyone? That Mac G5 with dual 2 Ghz processors and 4 GB of RAM is starting to look really attractive!
Of course once one is satisfied with theInputandCreative Sharpeningresults these layers can be flattened and merged. This way only theOutput Sharpeningremains, and even this is easy to replicate when needed. So the size issue isn’t really any greater than one wants it to be. But it’s there, and can bite you if you aren’t paying attention.
My workflow is to flatten theInputSharpeninglayer once it’s done. The chance of my wanting to change it down the road are slim. I leave theCreative Sharpeningin place and save it with the file. TheOutput Sharpeninglayer only exists each time that I print or prepare a file for the Web, because I don’t bother saving it to disk with the file. This way, thoughPK Sharpeneris capable of increasing file size by a factor of 8X, in reality it is no more onerous to use than any other sharpening process or program that’s done on a layer (which it always should be).
____________________________________________
The Bottom Line
Now you see my problem. What if I say that this is unquestionable the finest image sharpening product ever produced? Maybe next week someone will come out with something better. Or next month. But, maybe not. Probably not. So, I’ll say it.This is unquestionable the finest image sharpening product ever produced.
Download it. Try it for 7 days at no cost. You don’t have to spend your $100 until you’re sure thatPhotoKit Sharpeneris right for you. It won’t be for everyone. Some people will find thatFocalBladeis all they need, or evennik Sharpening Pro. Maybe Photoshop’sUnsharp Maskfloats your boat. As for me, until something better comes along they’ll have to pullPhotoKit Sharpenerfrom my cold dead hand.
______________________________________________________
PhotoKit Sharpener Vs. FocalBlade
The obvious question is — which one is better,PK SharpenerofFocalBlade? It isn’t a cop-out for me to say that neither one is better than the other. They are both at the head of the class, though they are quite different in how they are used and what they demand from the user.
My take is as follows: If you are want the most intensive hands-on control over every possible sharpening parameter, thenFocalBladeis your preferred choice. If you’d rather have a somewhat simpler approach (though not at allsimple), with equally impressive final results, thenPK Sharpeneris the way to go. For 90% of usersPK Sharpenerwill provide the preferred workflowandis easier to use.
I’d also like to add an observation about comments that I’ve seen on some discussion boards to the effect that programs like this are "something of a waste of money, and a competent person can achieve the same thing with USM in Photoshop". I don’t think so. Frankly, people who make such comments fall into one of two categories. Either they have more time than money, and therefore don’t mind spending hours creating layer masks so as to sharpen their images optimally. Or, they lack the experience to understand what proper sharpening is all about.
______________________________________________________
If you are new to digital image processing, or not completely familiar with the concept of sharpening and the use of theUnsharp Masktool, here are a few links on this site that will get you started and also give background to the tools that have been available prior toPhotoKit Sharpener.Understanding Sharpness—Understanding Digital USM—Instant Photoshop—Smart Sharpening—High Pass Sharpening—nik Sharpening Pro—PhotoKit Review—Local Contrast Enhancement—FocalBlade.
______________________________________________________
Update — November, 2003
Photokit Sharpenerhas been upgraded to work in 16 bit mode underPhotoshop CS. A free upgrade for exisiting owners is now availablehere.
______________________________________________________
Michael Reichmann is the founder of the Luminous Landscape. Michael passed away in May 2016. Since its inception in 1999 LuLa has become the world's largest site devoted to the art, craft, and technology of photography. Each month more than one million people from every country on the globe visit LuLa.
