This review of theL-608 Super Zoom Masteris based on my earlier review of theL-508, long regarded as one of the finest meters ever made. I felt that anyone wanting a sophisticated high-end light meter would want to read a complete review rather than one which just indicated the features of the new model while referring back to the previous one.
For those who are already familiar with the L-508 I have addeda brief listof the new meter’s improvements at the bottom of the review. The L-608 replaces the L-508.
This page also contains a brieftutorial on incident light meteringand a primer on theadvantages of spotmetering.
When I was in my late teens in the mid-60’s, I bought the first production camera with a behind-the-lens metering system, thePentax Spotmatic. Prior to that time everyone used hand-held meters. (Notwithstanding its name, it did not have spotmetering‚ that was only in the prototype).
Today, except for photographers using large format equipment or those doing extensive studio flash work, hand-held meters are almost a thing of the past. This is a pity because if nothing else photographers who reply on built-in meters are missing the advantages of using an incident meter. (For anyone unfamiliar with incident light metering techniquea short tutorialis found further down this page).
But as worthwhile as incident metering is, the L-608’s multi-spot metering and 10 point averaging, flash metering and more contribute to making it a must-have tool for the serious photographer. Let’s see why.
Perfection?
It isn’t often that a product achieves a perfect "10". A few years ago I gave theL508a 10. That being the case I guess I need to give the L-608 an 11 or even a 12. I find it almost impossible to find fault with this product. And, while there are a number of fine hand-held light meters on the market, the L608 offers so much, and is so brilliantly designed that it’s hard to look beyond it for an alternative.
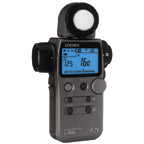
The L608 is three meters in one. It is aspotmeter, anincident meterand aflash meter.
Spotmetering
This is a true 1 degree reflective spot meter. The angle of view can also be widened continuously to 4 degrees, adding to the versatility. A description of theuse and benefits of spotmeteringis found further down this page.
Incident Metering
The flip of a lever changes the L608 to an incident meter. If you are not familiar with the advantages of incident metering you might find it informative to read thetutorialfound elsewhere on this page.
A unique capability of the L608 is a switch that lowers the incident hemisphere into a protective surround. Not only does this offer travel protection to the large surface of the ball but in this position eliminates the need for a separate flat incident diffuser. When positioned this way it can be used for directional measurements and comparison of shadow and highlight areas for determining lighting ratio. It also can be used for measurement on flat surfaces when doing copy work.
Flash Metering
The L608 has three flash metering modes; wired, wireless and radio controlled. You can flash-meter in either spot reflective or incident modes, and take cumulative measurements of up to 10 flash readings.
A thoughtful touch for studio users is that the unit auto-resets in flash mode, alleviating the need to constantly walk over to the meter whenever a new reading is taken. Alternatively, cumulative flashes can be measured via a custom function setting.
With the new optional built-in radio transmitter the meter can be used to set off one or more distant flash units without the need for sync cords.
Mixed Ratio Metering
If you’re mixing flash with ambient light the L-608 will read both simultaneously, and will displays on the LCD the percentage ratio that the flash exposure represents. Is that cool, or what?
Features
Displays
The meter has a very large LCD display that auto-illuminates when the light level drops below a certain point. This is a much appreciated feature when working in the darkness of a pre-dawn morning trying to meter the sky before sunrise.
This display features prominent digital f/stop and shutter speeds as well as an analog f/stop scale, reading from f/1 to f/128. Shutter speeds are displayed digitally from 30 minutes(!) to an 1/8000 second. For cinematographers there are frame speeds from 2 to 360 fps. (There is also a version of the meter called the L6-8 Cine especially designed for cinematographers).

The L-608 has an illuminated display of shutter speed and and aperture combinations in the viewfinder, and the viewfinder has an eyepiece diopter adjustment as well.
Memory
The meter is able to memorize up to 9 separate exposure readings. Each is displayed as a marker against the analog scale on the LCD, making comparisons between highlight and shadow areas simple. There is anaveragebutton which displays the average of up to nine readings. The LCD display shows the number of readings taken and when averaged this new integrated reading is displayed as well in the viewfinder.
Exposure Compensation Settings
The L-608 allows the user to dial in exposure compensation in 1/10th stop increments. This is very convenient, for example, when shooting in snow.
This compensation is separately settable for both reflective and incident readings, and when set is prominently displayed on both the LCD screen as well as in the spot metering viewfinder.
ISO 2
Film speed can be set from ISO 3 to 8000 and the speed set is displayed at all times. A very useful additional capability is a button markedISO 2which allows you to set a second film speed. Take a reading and then press this button if you are using Polaroid tests or using two cameras or backs each with different film speeds at the same time. The LCD display shows the adjusted reading for as long as the button is held down.
Filter Settings
A second use for theISO 2button is a custom setting that allows you to dial in a filter factor. Once done when you press theISO 2button, instead of an alternate film speed the display changes to show an altered exposure reading for any predetermined filter factor. Very useful when switching to the use of a polarizing filter, for example.
Together with theExposure Compensationsetting described above this provides tremendous convenience and flexibility. Imagine a situation where you’re shooting in snow and also using a polarizing filter for some shots. You can dial in a +1.3 stop factor to compensate for the snow conditions and a -1.3 stop filter setting for when the polarizer is used. (Of course you could always just leave things as they are and have the two compensations cancel each other out, but that wouldn’t be as much fun).
Battery
The L608 uses one CR-123A lithium battery.
Weather Resistance
While not exactly waterproof, the L608 is described as having"an all-weather design". This is not a delicate studio instrument, but a tool to be used in the field. No babying necessary.
Sensativity
The meter has a low light sensitivity of EV -2 in incident mode.
Price
The Sekonic L-608 is expensive‚ possibly costing more than your camera! The suggested list price for the L-608 is over a thousand dollars. Most U.S. retailers advertise them for about $750. On-line dealerHarry’s Pro Shop, where I purchased mine, sells it for under U.S. $500, as doesRobert Whitein the U.K.
Conclusion
Most of my cameras have built-in behind-the-lens metering systems. They are highly accurate, reliable and versatile. I wouldn’t want to do without them. But several of my camera systems, including theFuji 617andHasselblad ArcBodyrequire a separate handheld meter. Over the years I’ve owned several but none has been as powerful a light measuring tool as the new Sekonic L608.
If you need a separate handheld meter, spotmeter, flashmeter, or would like to explore the advantages of incident metering (see the tutorialbelow), I can recommend the Sekonic L608 most highly. There simply is not a finer and more versatile meter on the market.
Do you need one? If all of your cameras have behind-the-lens metering, probably not. But, if you have a camera that lacks built-in metering, such as some medium format and almost all large format systems, then you’re going to have to have a separate handheld meter. A meter such as the Sekonic L608 which offers spot, reflective and incident metering will provide you the greatest versatility.
After a while you may even find that in many instances you use it in preference to your camera’s built-in meter, as I frequently do.
Improvements& Changes Over the L-508
Other than a grey plastic finish instead of the black plastic of the L-508, the L-608 looks very much like its predecessor. But function is more than skin deep. The L-608 takes the best features of the L-508 and adds a number of requested enhancements as well as a few that no one could have anticipated.
Assuming that you’re already familiar with the L-508, and if not you can read my earlier reviewhere, these are the major difference to be found in this new model.
Zoom viewfinder display of shutter speeds and aperture along with exposure compensation information
Eyepiece diopter adjustment
Separate incident and reflected mode exposure compensation settings
Filter Factor compensation setting using the ISO2 function
Up to 9 separate readings can now be averaged, vs. 3 for the L-508. The LCD display the number of readings taken.
The averaged reading is displayed both on the LCD and in the viewfinder.
Settable 1/2 or 1/3rd stop readings to match a specific camera’s adaptabilities
Flash triggering via optional built-in radio transmitter
CR-123A lithium battery replaces AA cell of L-508.
The Advantages of 1 Degree Spotmetering
Most high-end cameras these days have so-called built-in spotmetering. I write"so-called"because while the center area of the camera’s viewfinder that is being read is much tighter than the usual center-weighted averaging or matrix metering, when using a normal lens, for example, a camera’s center spot reading is about 15 degrees. Having a variable 1 degree spotmeter available, regardless of the lens that’s currently mounted therefore makes a huge difference in ones ability to do precise metering.
Most photographers are either somewhat familiar with or at least have heard about the venerableZone Systemof exposure, systematized and popularized byAnsel Adams.
In a nutshell, theZone System’score concept is that you measure various points in a scene to be photographed and determine the range of brightness levels to be handled. This is made much more convenient through the use of a spotmeter.
An exposure setting can then be determined that places the darkest and lightest points within the capabilities of the film. When working in B&W, in particular with sheet film where each piece of film can be developed individually, development can be altered to expand or contract the film’s contrast handling capability to match the needs of an individual exposure.
But for the vast majority of photographers today who work with 35mm and medium format roll film, and particularly those who work with color transparency material, exposure demands are much more critical than they are for B&W, and no contrast control can be exercised at the film development stage.
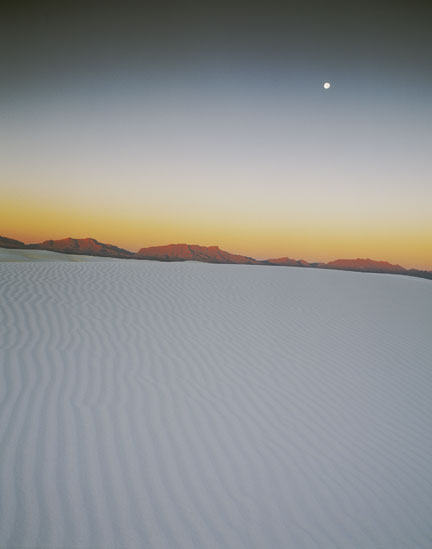 Dawn‚ White Sands
Pentax 67II and 55~100mm f/4.5 zoom. Provia 100F. 3 stop split ND filter.
This is why use the of split neutral density filters (grads) is so popular among landscape photographers, and this is where the use of a spot meter really comes into play.
Typical color transparency film has roughly a 5 stop dynamic range. That means that if a subject is brighter than about 2.5 stops more than 18% gray it will burn out, and darker than about 2.5 stops below the average metered reading subject detail will be lost in shadow.
The way that photographers deal with this is to measure the brightness range of a particular subject and then use a split ND to bring that range down to something that the film can handle. In the example photograph above I knew that I had to avoid having the moon overexposed and blown-out. Landscape photographs showing a full moon are dramatically superior if detail can be seen in the moon, because that’s the way we see it with our eyes. Reducing the moon to a bright blob would have ruined this photograph.
The technique that I used was to spot meter the moon at 1 degree. This fills the metering circle with the full moon. Normally I would set the camera to an exposure 2 stops wider then the reading, thus making the moon as bright as possible while still retaining detail. Knowing that this would have made the pre-dawn foreground far too dark, loosing all detail, I used a 3 stop split neutral density filter to compensate. This brought the dynamic range of the exposure to within the recording range of color transparency film and produced the beautiful image above. How this was done is explored inIssue #4ofThe Video Journal.
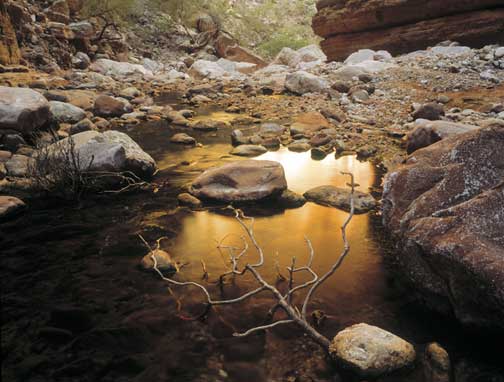 Branch Glow, Grand Canyon‚ Matcatamiba Canyon, 2002
Photographed with a Hasselblad ArcBody and 45mm Rodenstock lens on Provia 100F
In this next example the dynamic range of the subject again exceeded that which film could capture, and because of the irregular subject matter the use of a split ND filter wasn’t feasible. I therefore took a series of spot readings; the bright reflection in the center, the rocks, and the shadowed area to the bottom left.
It was obvious that the 7-8 stop range couldn’t be handled, so I set the exposure so that the bright water reflection was just below being burned out, and then let the shadow area fall into complete darkness.
Without a spotmeter both of these shots, as well as at least half of the landscape work that I regularly do, would be difficult to expose accurately. Sure I could have done a 3 frame bracket and gotten lucky with one of the exposures, but getting it right the first time is both gratifying and less expensive than firing a shotgun blast of exposures and hoping that one of them will be right.
If you’re serious about your photography and find yourself shooting in complex situations like the ones shown above, then a hand-held spotmeter such as the Sekonic L-608 is an invaluable tool.
A Tutorial on Incident Metering
The advent of through-the-lens (TTL) metering on most 35mm and medium format cameras has lead to a sharp decline in the ownership of handheld meters. Consequently there is an entire generation of photographers for whom incident light meters are unfamiliar. This tutorial is intended to explain what an incident light meter is and why you would want to use one.
The meters that are built into almost all cameras today are reflective meters. This means that they are measuring the light being reflected off the subject. This is a convenient way to determine proper exposure but is fraught with problems.
Meters are designed to provide a proper exposure for a subject that reflects a gray tonality with a reflectivity of 18%. Few things in this world, by themselves, meet this criteria other than possibly a Kodak 18% gray card 🙂
Fortunately, most of time the mixture of objects in a scene; grass, sky, trees, rocks and so forth, when averaged together usually are pretty close to an 18% gray. But, because much of the time the things that we photograph are not so conveniently neutral in tonality manufacturers of TTL metering systems on cameras have had to go to great lengths to design multi-zone patterns and sophisticated software algorithms to enable their metering systems to provide pleasing and accurate exposures.
Of Black Cats and Snow Storms
The classic examples of how reflective meters can be lead astray are the examples of a black cat in a coal mine or a white cat in a snow storm. In both cases if you were to trustingly use even the most sophisticated multi-zone matrix metering system you would end up with very badly underexposed and overexposed negatives or transparencies. The reason, of course, is that the meter sees the black cat and coal, or the white cat and snow as being 18% gray. Even the smartest computer algorithms can’t (yet) understand what the subject is, and since there is nothing else in the scene they will provide "correct" but inappropriate exposures.
The smart photographer, knowing this, will compensate by dialing in some exposure compensation. In fact, because most amateurs use colour negative film with its wide exposure latitude even this is seldom necessary and no one is the wiser.
But, the pro and the serious fine-art photographer typically shoots colour transparency material which has a much more limited exposure latitude. If your exposure is more than a half-stop off, particularly in terms of overexposure, you’ve forfeited the shot.
Incident to The Rescue
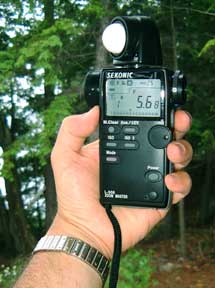 Using the L508 as an incident meter
A meter capable of taking incident light readings (like the Sekonic L608 reviewed on this page) features what looks like a half of a golf-ball-sized hemisphere, usually on a swiveling support. To take an exposure reading, instead of pointing the meteratthe subject, as one does with in-camera and reflected meters, you instead place the meterinthe same light as the subject.
The hemisphere, orlumisphereas some call it, is designed as an 18% gray object and thus provides a reading equivalent to that which you would get if you took a reflected reading off a theoretically perfectly integrated scene, or a Kodak 18% gray card.
The beauty of the incident metering approach is that you needn’t carry a large gray card around with you on location, and you don’t have to worry that your subject matter — whether because of its colour or reflectance characteristics‚ will give an erroneous reading.
The other advantage of an incident meter is the ability to conveniently measure the evenness of lighting, particularly when doing copy work. Either with a flat diffuser in place of the lumisphere, or with a retracting ball design the way the L608 does it, you’re able to move the meter around the area to be photographed, measuring the difference in light levels, irregardless of the colour or reflectivity of the subject matter.
If you enjoyed this article, as well as the hundreds of other tutorials, features,
reviews and essays on this site, you can support its continued growth
and discover an exciting new photographic resource by …
Michael Reichmann is the founder of the Luminous Landscape. Michael passed away in May 2016. Since its inception in 1999 LuLa has become the world's largest site devoted to the art, craft, and technology of photography. Each month more than one million people from every country on the globe visit LuLa.
