Introduction
Although my first serious camera was a Russian Zenit TTL, I consider myself a photographer of the digital era. In the past 10 years, I have been taking pictures exclusively with various types of digital single-lens reflex (mostly Canon) cameras. So starting to take pictures with traditional twin-lens reflex (TLR) cameras was a very interesting experience for me. For people who are unfamiliar with how a TLR camera looks, the picture below shows a studio “portrait” of the Rolleiflex 2.8F, one of the most legendary TLR cameras in the history of photography.
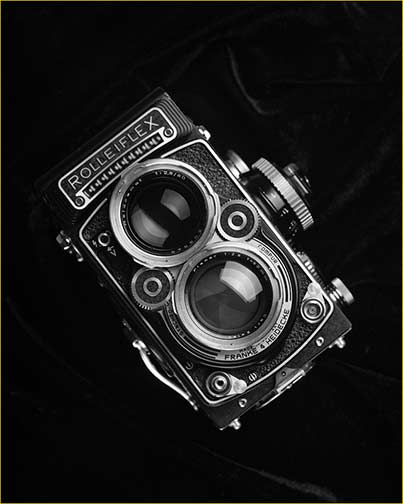
Rolleiflex 2.8F Planar, January 2013
Fuji X-E1 with Fujinon XF 35 mm f/1.4R @ f8, 1/125
The special feature of TLR cameras is that they have two lenses of the same focal length with their focal planes aligned. The lens at the bottom of the camera is the one that takes the picture (often called ‘taking lens’), while the other is used in the viewfinder system.
Twin-lens reflex cameras are certainly an odd species nowadays. However, in my opinion, they provide a photography experience that cannot be matched by any recent digital single-lens reflex (or mirrorless) camera. In this article, I would like to show a glimpse of what the Rolleiflex 2.8F is capable of and share my experiences with this classic old timer camera.
My Acquaintance With the Rolleiflex 2.8F
I remember it happened in a rainy afternoon. While I was browsing Flickr and searching for some inspiration for my next portrait assignment, I came across some beautiful medium format portraits taken by excellent photographers using Hasselblad and Rolleiflex cameras. I was really impressed by the characteristics of those pictures: nicely balanced composition in square format, beautiful black and white (B&W) tones, shallow depth of focus and “mind blowing” micro-contrast details. As a digital shooter and owner of a Canon 5D mark2, it was something new to me that I have not seen before. Needless to say, I fell immediately love with medium format photography and I wanted to have a medium format camera to take pictures with similar characteristics.
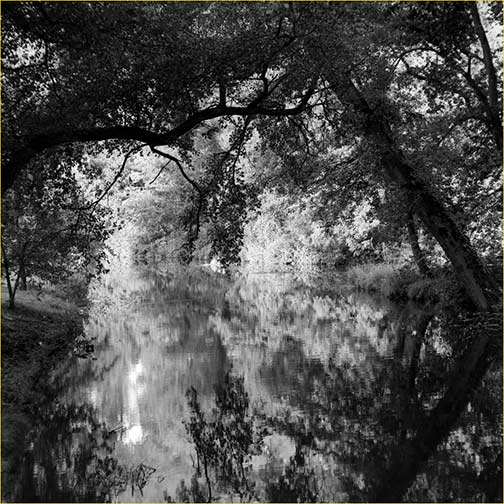
Dommel, Eindhoven, The Netherlands. August 2011
Mamiya C330f with Mamiya Sekor 135mm
As a beginner in the medium format territory, I chose the Mamiya C330f as my first medium format camera for various reasons, such as price, design and build quality. In addition, the Mamiya C330f is a system camera, so it supports a good range of interchange lenses. Since I was not sure whether I could work with medium format cameras at all, I did not want to invest immediately into a Hasselblad system or a Rolleiflex camera. The Mamiya C330f was a very capable camera and I liked it very much. Second hand bodies in good condition are still relatively easy to purchase for a good price on Ebay. Based on my positive experience, I would dare to recommend this camera to everyone who is considering to embark on the medium format journey with a relatively small investment.
After one year use of the Mamiya, I realized that I still loved the pictures taken by this camera. I still liked looking down into the waist-level finder. Today, I am still excited when I see the first scans turning into pictures from the newly developed black and white negatives. All in all, I knew that my relationship with TLR cameras was not a one night stand. I had only one major complaint though: the sheer weight and size of the body (1.7kg incl. the standard kit lens) made this camera and the accompanying lenses a heavy beast. Yes, I am still young but perhaps not so young that I can carry this beefy beast without feeling it in my shoulders at the end of the day. Maybe I should do more workouts too. I also realized that 90% of my pictures were taken with the standard 80mm lens. So I thought it was time for optimization: I was looking for a small, lightweight TLR camera with a fixed, very sharp lens. This is how I and a Rolleiflex 2.8F get acquainted with each other.
The Rolleiflex 2.8F Planar
The particular Rolleiflex 2.8F that I will talk about was made in 1960 and it sports a Carl Zeiss Planar lens with the focal length of 80mm. Although a camera with this age is considered pretty much ancient, we should not forget that this model had 20 years of design evolution by that time. The result of this evolution is very visible when you see and start to use the camera. When you hold a Rolleiflex in your hands, you witness the beauty of camera engineering from another era. You will see a camera with a simple and absolutely classical design. This design is not only aesthetically very appealing but also makes the use of the camera very intuitive and smooth. It is great to see that some camera makers today, like Olympus with the OMD EM5 and Fuji with the X series, are recognizing the value of the ergonomics in early camera designs.
The Rolleiflex 2.8F is a fully mechanical camera with all manual focus and manual exposure, meaning no battery needed. The camera has a classical winder mechanism; turning it forwards carries out three functions simultaneously: frame advance, shutter cock and exposure counter advance. The aperture range goes from f2.8 to f22 and the shutter speed range goes from 1/500 to 1 sec (including B) with 1 stop increments. The minimal focusing distance of the lens is approximately 1m. The aperture and speed selector wheels are placed on the side of the lenses and easy to access. The big focus knob with a distance scale on the side has a pleasant tactile feedback and precise control. You will definitely need those, since focusing is very critical due to the relatively shallow DOF of medium format cameras. The aperture / speed scale, which I missed on the Mamiya very much, is easy to read during the composition of the picture. It may be strange to say but the intuitive and refined “user interface” of this camera gives me the impression of seeing Apple’s design philosophy manifested in a more than 50 years old photographic device.
This late Rolleiflex model is also fitted with a selenium light meter. The meter is built into the focus knob while the Selenium cell is mounted on the name plate under the Rolleiflex logo. What really cool is that the meter is mechanically coupled with the aperture and speed selector wheel by an ingenious design. Turning the aperture and speed selector wheels will adjust the ‘exposure’ pointer of the meter. When exposed to light, the Selenium cell generates a very low current that will move the second, ‘measured light’ pointer of the meter. Basically, to get the correct exposure setting you need to turn the aperture and speed selector wheels in a way that the two pointers get aligned. There is of course a knob to set the light sensitivity of the film and even a knob for filter corrections. Both of them are mechanically coupled with the exposure pointer too.
What else could I say about the technical aspects of this camera? I guess, nothing special except one last important thing: the camera works like a charm and can still take beautiful, sharp pictures.
Viewfinder and Composition
Switching to a full frame (FF) camera from a crop factor camera undoubtedly enhances the viewfinder experience. I remember when I looked through the viewfinder of a FF camera for the first time: suddenly, there was a big scenery in front of my eye without experiencing any tunnel effect. Those who look down at the waist level viewfinder of a TLR (with a good ground glass) may experience something very similar for the first time: a really big (ca. 5.5 x 5.5 cm), bright screen that presents the picture in an almost three dimensional way. It is hard to describe it but definitely worth to see it. If you have never had the pleasure of checking out a waist level viewfinder with a bright screen, try to get hands on one. Note that some TLRs, especially older models, may have screens that are not so bright. This problem can be remedied by cheap third party bright screens (with various types of grid patterns) that are easy to purchase on Ebay nowadays.
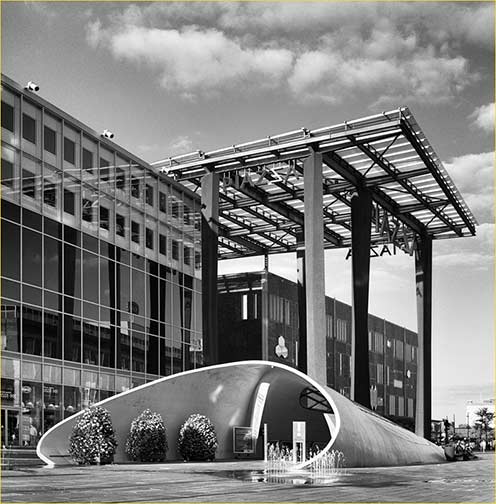
Piazza Center Eindhoven, The Netherlands. August 2012
Rolleiflex 2.8F, Kodak 400TX @ 200, Orange filter
Looking at the waist level viewfinder you will experience a rather strange thing too: the picture is horizontally reversed on the screen. This alone would not be really a big problem; however, when the composition needs to be adjusted, the camera needs to be moved still in the normal direction. Getting used to this requires some patience and practice. At the beginning, it drove me a bit crazy and certainly slowed my working down. However, after a couple of days of intensive use, I started to move the camera unconsciously in the right direction – the new way of working quickly became a second nature. There are at least two tricks to overcome this initial problem. The first one is to look up on your subject while you are adjusting the composition and look back on the screen. In this way, you will avoid moving the camera in the wrong direction. The second is to use a prism finder instead of the waist level finder, which may add some extra weight to the camera.
Like every TLR camera, the Rolleiflex also suffers from parallax error. This happens when the subject is in a close focusing distance: the viewing and taking lenses will frame slightly different pictures since they frame the scene from slightly different angles. As a result, the top or the bottom of the picture would get cropped. Practically, the closer the focus is, the bigger the parallax error is. The good news is that the ground glass of the camera has a built-in automatic parallax compensator. It is a moving frame connected to the focusing system of the camera. This means that the framing you see on the ground glass is also the one that will end up on the film. This mechanism also works perfectly with the standard Rolleiflex close-up lenses (called Rolleinars). In short, parallax compensation is neat and nearly invisible on the Rolleiflex as compared to the simplistic parallax indicator of the Mamiya C330f.
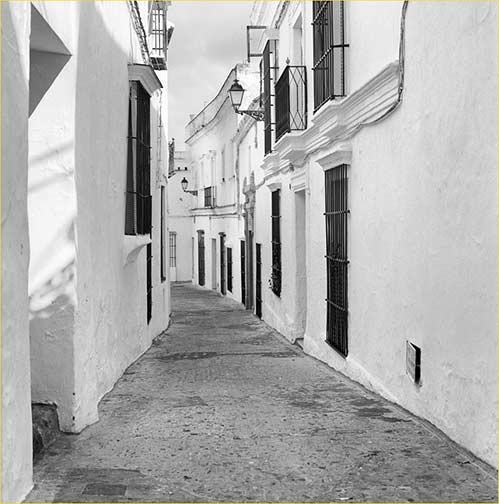
The ground glass and the waist level viewfinder supports the composition of the pictures in a very natural way. With the Rolleiflex, it often happens to me – when I see an interesting, potential subject – that I just look down at the hood of the viewfinder and I see immediately the composition that I was considering to take. The picture below, for example, is an outcome of such an instantaneous ‘aha moment’.
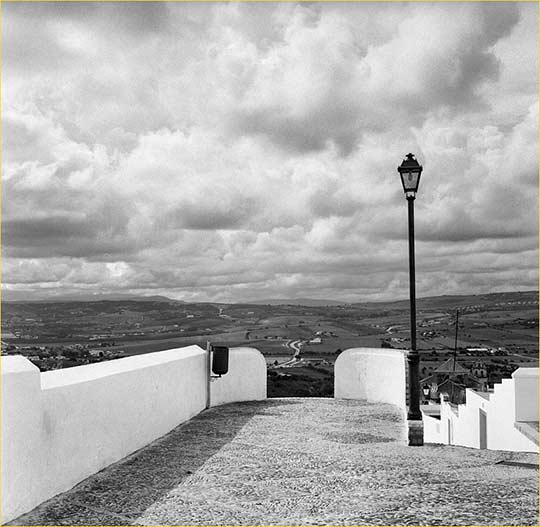
View from Arcos de la Frontera, Spain. November 2012
Rolleiflex 2.8F, Kodak 400TX
Framing portraits feels also more natural on this camera than on other SLR cameras that I have used so far. Placing a portrait nicely into 3:2 aspect ratio, unless I am doing environmental portraits, requires more creativity and thinking than with the square format of this camera. The compositions that I end up with by using the Rolleiflex tend to have – at least, in my eyes – a balanced, minimalist structure.
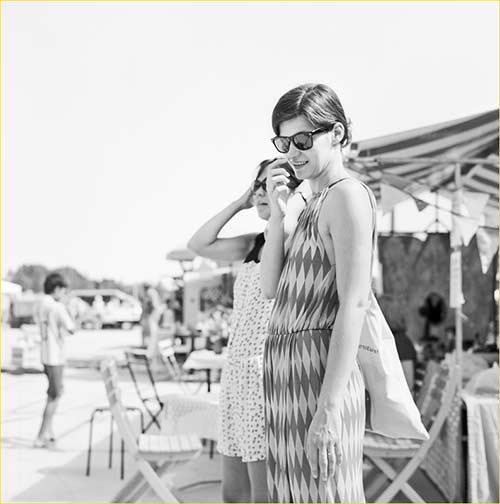
Rolleiflex Meets Street Photography
Let me start with the good news: the Synchro-Compur leaf shutter with its near-silent operation makes the Rolleiflex very stealth in shooting. Looking down, especially from a certain distance, at the hood maintains a more indirect, less confrontational contact with potential subjects than facing a big DSLR behind someone’s face.
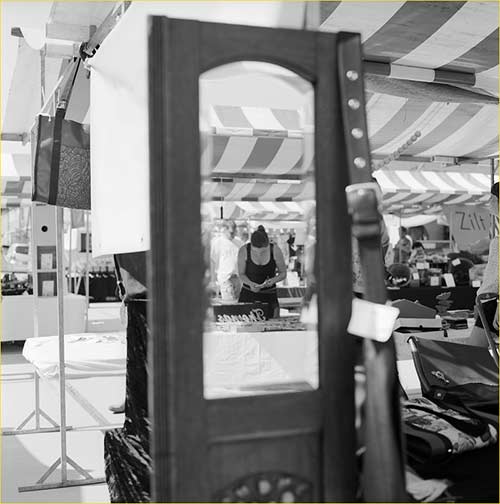
Feel Good Fair, Eindhoven. August 2012
Rolleiflex 2.8F, Fuji Neopan 100 Across, Yellow Filter
I was naturally curious to see myself how the Rolleiflex would perform as a ‘street photography’ camera. So I went to a local fair, called ‘Feel Good Fair’, to put the ‘Rolleiflex’ and my street photography skills to the test. Well, on one hand, I can confirm that the Rolleiflex has indeed raised less eyebrows than the DSLRs I have used before. On the other hand, I have also experienced something interesting and funny which I did not really expect. People, both young and old, often walk up and asked questions about the camera like “Wow…how old is that camera?!”, “Could I look into it?”, “Oh, does it still use film? Can you still buy film into this camera?”, etc. It was very surprising that so many people were interested. So at the end of the day, I needed to conclude that getting unnoticed is ‘mission impossible’ with a vintage TLR camera hanging in my neck.
I see you, Mr. Photographer :-), Eindhoven. August 2012
Rolleiflex 2.8F, Fuji Neopan 100 Across, Yellow Filter
Due to its remarkable vintage outlook, the Rolleiflex might not be the most ideal camera for street photography. However, it has all the ‘stealth’ features (silent leaf shutter, waist level finder, bright screen) that can make a camera perfectly suitable for street photography. Vivian Maier’s work is perhaps the best and greatest example how amazing pictures the Rolleiflex can deliver in the hand of a talented street photographer.
The 80mm Planar Lens
As many stated before, the 80mm Planar is a fabulous lens. It is one of the sharpest lens that I have ever seen and it is already sharp at wide open from f2.8. The lens renders high contrast and vignetting is nearly unnoticeable. The bokeh rendering of the lens is absolutely beautiful – the words ‘creamy’ and ‘smooth’ come to my mind when I see the out of focus areas on the pictures made by this lens.
View at Feel Good Fair, Eindhoven. August 2012
Rolleiflex 2.8F, Fuji Neopan 100 Across, Yellow Filter
Although the lens provides definitely excellent image quality, it can still be challenging to get sharp pictures with it, especially when the focusing distance is short. The reason is that medium format cameras have a larger format size and they need a longer lens to capture the same framing as a smaller format. For example, 80mm focal length on the 6×6 format will be equivalent to 50mm focal length on the 35mm format. We also know that the longer the lens is, the shallower the dept-of-focus will be. This means that because a larger format camera uses a longer lens than a smaller one to maintain exactly the same perspective, they will accordingly have a smaller depth of field too. Fortunately, the convenient and precise manual focusing system on the Rolleiflex can help a lot to set the desired focus relatively fast, even when the DOF is small.
Finally, there is one more thing to consider about the lens: it is a built-in, fixed focal length lens. The lack of possibility for interchangeable lenses may sound very limiting. In reality, this feature is more liberating than limiting: this single, fixed focal length lens lets you concentrate on the picture, and only on the picture. You cannot change lenses, so you will not waste time on deciding which lens you should use and you will not try to fiddle with putting your compositions into wide-angle or tele perspectives. What happens after a certain time of using this camera – or any camera with a fixed focal length lens – is that you will learn to frame and pre-visualize pictures without looking into the viewfinder. Learning this pre-visualization skill seems to take less time than by the use of zoom lenses, based on my experience.
Shooting on Film
Being a 50 years old technology, the Rolleiflex 2.8F uses primarily 120 and 220 roll films. You can change the format by simply adjusting the position of the pressure plate on the back of the camera.
If you have only ever used digital cameras, you tend to think that it will be difficult or cumbersome to work with film. But that would be a misperception. To have your pictures available in digital format, you have to take two extra steps only: development of the film and scanning the negatives. Those steps are not so difficult to carry out and are easy to learn too. You may also decide to use the services of film processing outlets or professional film labs. Fortunately, it is not too difficult to find labs (at least, here in the Netherlands) to let your 120 film developed for a reasonable price. If you love B&W photography and want to have full control over the process, you can even develop your own B&W film. Again, it is easy to learn it (there are lots of good video tutorials on B&W film development) and you can scan the negatives at home with a decent flatbed scanner, such as the Epson V700/750. If you need very high-resolution scans for large format prints, I would recommend to use the high-end scan services of professional labs that use drum scanners.
Of course, there is the obvious question: is film worth the effort? It is difficult to answer that question. Since I do love both digital and film photography, I do not intend to take sides in the great ‘film vs. digital’ debate. Instead, I would like to share why I find shooting on B&W films still great.
White Town, Arcos de la Frontera, Spain. November 2012
Rolleiflex 2.8F, Kodak 400TX
One of the first thing I do after scanning and importing an image in Adobe Lightroom is to check its tonal range and tonal “limitations”. My experience with scanned B&W negatives is that they provide images with a very good degree of freedom in post-processing and applying tonal enhancement techniques. Looking at the final images, I often wonder how B&W films can produce the so many shades of grey, from the bright whites to the deep clean blacks. I also find it pretty impressive how the film medium can retain subtle details in highlight and shadow areas.
The film medium has another interesting artifact that is not present digital images: the grain. Using the film medium, you will pay for extra sensitivity in grain instead of noise. As compared to the artificial look of the noise (especially the fixed pattern noise) in digital images, the grain looks a more natural, less disturbing artifact. In addition, the grain can be utilized easily for creating artistic effects, which I have found difficult to do with the digital noise. On the other hand, in the defense of digital cameras, I also find it amazing how clean images can be captured at high ISO levels (between 800 and 3200) by the state of the art image sensors.
One can naturally say that it easy to mimic the characteristics of films on digital images by using film simulation programs, such as Alien Skin Exposure and DxO Film Pack. I have tried some of these programs and I have to admit that they are doing a relatively good job. However, the traditional film images somehow still look more authentic in my eyes. I know, this statement may call for a “blindfold” test that I would be happy to do so, just for curiosity’s sake.
There is one more thing worth mentioning on the use of film. Using the 120 roll film, there are only 12 exposures available before you need to load the next roll of film. This may put you under a sort of pressure that can help you focusing on the picture. When I work with the Rolleiflex, I tend to take more care of my compositions and pay more attention to details. Although twelve frames may seem to be not too much, it can still give you plenty of shooting opportunities. There is actually one photographer – at least whom I am aware of – who played this short of constraint to extreme: Jim Brandenburg (multiple award wining nature photographer) in his project ‘Chased by the Light’ decided to take a single exposure every day for ninety days from Autumn to Winter. The breadth and depth of the resulting collection of photos is amazing – I recommend to check out both the book and the documentary on this exquisite work.
Conclusions
The Rolleiflex is a fully mechanical camera with all manual focus and manual exposure. This means that you do not need to worry about charging your batteries in a remote oasis in the middle of the Sahara. However, this also means that you need to dispense with the auto-focus/exposure and intelligent features of modern cameras. In addition, you can take only 12 exposures before you need to load the next roll of film. These things will definitely slow your shooting process down.
However, slowing down is not necessarily bad. When we slow down, we tend to pay more attention to subtle details and we have a better chance to look at our surroundings. In my opinion, both of these things play crucial role when we are building the structure, composition of the pictures we want to take.
So what would I say if someone asks me ‘Will you stop shooting with your digital cameras’? I would say no, definitely not. To be honest, I am happy with the versatility and the efficient workflow that my digital cameras can provide. Asking this question would be similar to asking “Now that you have an Aston Martin DB5 (released in 1963), would you stop driving with your Ferrari F12 Berlinetta?” (I would not mind having to face the possibility of that question at all, by the way.)
When I look at the pictures produced by the Rolleiflex, I feel that there is something magical in them. It is hard to describe it, just like it is hard to describe why riding an old timer car is cool for some of us (which I have never done so far). This magic could be due to the beautiful black and white tones and the grain of the film medium. However, it could also be due to the awesome bokeh rending and micro-contrast of the Planar lens. Then there is the waist level viewfinder too. Very likely, the combination of all these things is what makes using this TLR camera still special today. So I know for sure that the Rolleiflex will have its place in my camerabag, especially for fine-art and creative assignments where style and character play important roles. If your interests are in fine-art photography, trying out the Rolleiflex or other TLR cameras might be a good idea for you, too.
István Nagy
February, 2013
About
István Nagy was born in 1977 in Karcag, Hungary. István holds a Master’s degree from University of Debrecen, Hungary and a PhD degree in Computer Science from University of Twente, the Netherlands. Since 2006, he works as a scientist / architect – with an unscientific artistic streak – in a large high-tech company headquartered in the Netherlands. As an autodidact photographer, he specializes in fine-art landscape and panoramic photography. In his photographic prints – characterized by compositions with simplicity and balance – he aims to capture and convey the many moods of near and distant sceneries, be that raw, dramatic, peaceful or just simply beautiful. He works with Canon 5D mark2, Rolleiflex 2.8F, Fujifilm X-E1 cameras and natural light. István lives in Eindhoven with his partner, Nicole, and his 10 month-old son, Daniël.
You can find more information about István’s work at his website,http://www.istvannagy.nl. He can be reached atistvan@istvannagy.nl.
Michael Reichmann is the founder of the Luminous Landscape. Michael passed away in May 2016. Since its inception in 1999 LuLa has become the world's largest site devoted to the art, craft, and technology of photography. Each month more than one million people from every country on the globe visit LuLa.
You May Also Enjoy...
Photokina
September 25, 2006© 2006 The Luminous Landscape Inc.All Rights ReservedPlease note that to play this web video you requireQuicktime 7 or later(a free download)for Windows
Cost of Printing with an Epson 4000
The three main cost categories are: (1) the machine, (2) ink and (3) paper. This data is in Canadian dollars (CAD). Multiply by about 0.8
