This Won’t Hurt a Bit
Many photographers new to the concepts of digital image processing, when they encounter the phrase bit depth their eyes glaze over. They know that it has something to do with image quality, and that more bits are somehow better, but that’s about it. Let’s look at this relatively simple but often misunderstood topic and see if we can make sense of it.
We should get some basics out of the way first. A bit is the smallest unit of data. It can be 1 or 0, black or white, on or off. 8 bits comprise a byte. A byte (or 8 bits) can therefore represent 256 different states; 2 ^8th power.
Most of the digital world operates on 8 bit images. This includes your inkjet printer and usually your monitor. What this means is that 8 bits of information are used to create the image that you usually see.
A Short Digression
This is why you don’t want (for example) to print a B&W image on an inkjet printer using just black ink. The printer would only be able to lay down 256 shades of gray, from black to white and these are not nearly enough for a decent image. Instead you should print using colour inks as well, which means that all three primary colours ( Red , Blue and Green ) will be mixed together to create 16 million shades of gray (256X256X256). More than enough.
8 Bit or 24 Bit, Which is It?
What gets confusing at times is that while we speak of an 8 bit image, we’re usually really talking about one that consists of 3 colours and therefore it is also referred to as a 24 bit image (3X8).
High Bit Rates
Instead of using just 8 bits to represent a single colour we can instead sometimes use 12 or 16 bits. A 16 bit image can handle 65,536 discrete levels of information instead of the 256 levels that an 8 bit image can. As you can imagine the increased degree of subtlety that this makes available is dramatic. And, just as an 8 bit image is actually 24 bit when we’re dealing with colour, a 16 bit image is actually called 48 bit (16X3) when speaking of a 3 colour composite. A 48 bit image is capable of billions of colours.
So, interesting theory, but why is this important to photographers?
Scanners and Imaging Chips
All imaging chips in scanners and digital cameras are capable of producing 24 bit (8X3) images. Some are capable of 36 bit (12X3) capture, and some high end scanners and cameras can even capture 48 bit (16X3) images.
Why would you want to, and what are the problems and limitations, if any?
A Problem Image & Missing Functions
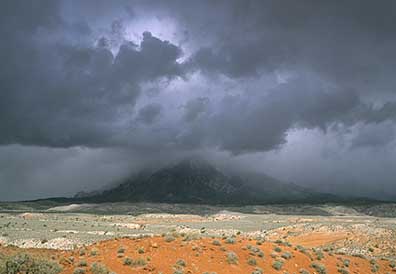 Storm Over Mt. Hillers, Utah. April, 2001
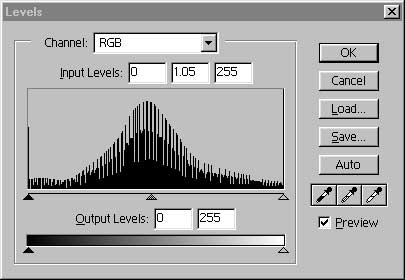
The key advantage of using a high bit image is that when you apply a Levels or Curves adjustment in Photoshop you are doing so to much more data than when you work on a low bit image. Changing the tonal range of a high bit file that has 65,536 levels Vs. a low bit file with only 256 levels means that when the data is compressed or stretched by using Levels or Curvest here is more data to work with. A low bit image simply leaves gaps (the tooth comb effect as seen below) and this leads to posterization. Posterization manifests itself as abrupt jumps in colour or brightness level.
The above photograph provides a good illustration of this. The contrast range was huge, from the almost burned-out area near the sun to the deep shadow area of the base of the mountain. There was no time for fancy footwork. From the time we crested a hill and saw this scene till it it disappeared was no more than 2-3 minutes. I had time to shoot about a half dozen frames with my Mamiya 7 II and the first one was the best compositionally.
I scanned this transparency on my Imacon Photo scanner in 48 bit mode because I wanted to gather as much data to work with as possible. Once I finished adjusting Curves and Colour Balance I then converted to 24 bit for printing and web display. Below is what the Histogram looks like after all the adjustments had been made.
The first aspect of the dark side of doing a high-bit scan is that the file size is doubled. Even cropped by some 30% before scanning, this particular scan of a 6X7cm transparency was more than 300 megabytes in size at 3200 dpi. This means that even my Dual Processor 533 Mhz Mac G4with 1 Gigabyte of RAM faces a serious challenge working on this file in Photoshop.
The second downside is that Photoshop is limited in what functions are available when working with 32 or 48 bit images. The most important of these limitations is the inability to utilize Adjustment Layers. If you’ve read my tutorial Instant Photoshop you know that I regard Adjustment Layers as vital to effective workflow. You should use Levels or Curves on your high-bit images and then when these basic adjustments are done convert the file to 8 bit using Image / Mode / 8 bits/channel and do the rest of your image processing in that mode.
What I do is first save my hi-bit scan with a name that includes the notation that it’s RAW, or 48 bit. I’ll put a couple of these on a CD-R and then salt them away. Since a CD-R costs less than $1 and takes up little physical space this is a simple and easy way to avoid having to retrieve the original transparency or negative and do another 30 minute scan if you ever want to rework the image in the future.
Is it Worth It?
Since high-bit images are very large, slow to scan and limited in what one can do with them, I don’t do all of my scanning in this mode. I only do so when a look at the transparency shows that I’m going to have some problems with the shadows. When dealing with digital camera files (such as those from the Canon EOS D30) I usually do import 48 bit RAW images, since I want to maximize my advantages in every way possible. The choice is yours.
This tutorial joins previous ones on this series, including Understanding Resolution and Understanding Sharpness.
![]()
A few weeks after this article was first published my colleague Ian Lyons of Computer Darkroom published a related article on his site called Editing Hi-Bit Images. I highly recommend it to anyone interested in learning more about this subject.
Michael Reichmann is the founder of the Luminous Landscape. Michael passed away in May 2016. Since its inception in 1999 LuLa has become the world's largest site devoted to the art, craft, and technology of photography. Each month more than one million people from every country on the globe visit LuLa.
You May Also Enjoy...
SK-Work
A 4-Day Landscape Photography Workshop Conducted by Steve Kossack October 17 - 21, 2002 This Workshop isNow Sold Out Steve Kossack is an experienced
