![]() This subject is featured in Issue #6 ofThe Luminous Landscape Video Journal.
This subject is featured in Issue #6 ofThe Luminous Landscape Video Journal.
The Problem Being Solved
In nature when doing landscape work that includes sky, especially early or late in the day, the contrast range encountered often exceeds that which film or imaging chips can handle. It’s therefore necessary to find a way to reduce the contrast range to something that the camera can handle so that the highlights don’t burn out and the shadow areas don’t turn inky black.
The Traditional Approach
The traditional method of dealing with this is to use split neutral density filters (graduated filters, some call them).
This works well much of the time, and I have rarely gone out shooting without my full filter kit at the ready. 1 stop, 2 stop and 3 stop grads, and soft and hard edged versions of each. Add filter holders and adaptor rings and the whole kit can cost over a thousand dollars and fills a small shoulder bag.
An additional downside is that using them takes time. Deciding which gradient to use and what density, attaching the rings, holders and filters and then lining them up. This takes several minutes, no matter how prepared and experienced one is, and of course the times that the use of grad filters are needed are invariably when the light is changing quickly.
Is there a better way? Yes, if you’re shooting digitally.
The technique discussed below can be used if you’re shooting film, but they require that the scans made be very precisely made and aligned, something that I won’t be exploring in this particular tutorial.
Shooting Technique
What you’re going to do is take at least two separate frames of the scene. One will be exposed for the highlights and one for the shadows. Usually there will be a two to three stop spread between them.
The simplest way to do this with a digital camera is to set the camera for auto-bracketing. Most cameras will take three frames in rapid succession‚ one normal, one underexposed and one overexposed. Set your camera so that the dark and light frames are each about 1.5 stops apart from normal. (The middle normally exposed frame is redundant, but it’s worth having as back-up if your blend doesn’t look right).
My preference is to set the camera toAperture Priorityand either manual focus orSingle Shotfocus. Tripod mounted is preferable as well. The reason for all this is that you don’t want there to be any difference between frames. If the aperture is varied there will be a focus and depth of field shift. If the focus varies the frames won’t line up, and if the camera moves you’re completely out of luck. I have had success hand-holding such shots, but only of the lens isn’t too long and the shutter speed is high enough to ensure that during the 3 frame burst there is no movement. It’s better to use a tripod.
Common First Steps
The following steps are common to all three approaches. Use your favourite digital image retrieval program to convert the dark and light frames to 8 bit TIFFs. This technique will work on JPGs as well, but not on RAW files. If you’ve imported your files into Photoshop in 16 bit mode, reduce them to 8 bit.Update:You can work in 16 bit mode inPhotoshop CS, but the combined file size will get very large.
Put both images onscreen at the same time. Select the dark frame and pressCTRL-Ato select the whole thing. (Of course you’ll always useCommandinstead ofControlif you are using a Mac.) PressCTRL-Cto copy it. Close that picture, as you no longer need it.
Select the light frame and pressCTRL-Vto paste the dark frame into it.
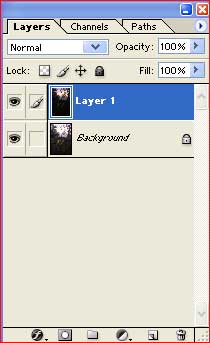 Fig. 1
If you look at the Layers palette (Figure #1) you will now see your light image asBackground Layerand your pasted dark image asLayer 1.
There are now three different approaches that you can try so as to blend these images together to increase apparent dynamic range. The first, what I callThe Painted Mask, is the traditional method that’s been around a long time. I still use it extensively when working with scanned film. It is the most labour intensive of the three and requires some manual dexterity on your part. It also is the most flexible.
The second, that I callThe Layer Mask, is easier, and doesn’t require any eye-hand coordination on your part, while the third, Fred Miranda’sDRI Action, is the simplest of all to use, but you have to purchase it.
The Painted Mask
This is the most labour intensive of the manual methods.
UseLayer / Add Layer Mask / Hide All. Now select the Paintbrush Tool and choose a fairly large brush. Start painting over the light part of the image. You are removing the overexposed layer and revealing the darker image underneath. Don’t worry about overdoing it because once the light layer is removed the process stops. Be careful not to get too close to the dark area with the large brush. Also, make sure that you don’t miss any areas that you want to include.
Change to a smaller brush and increase the magnification. Very carefully erase the light layer along the edge of where the dark area meets it. If you make a mistake, use theHistory Paletteto go back.
The only drawback with this method is that it requires sometimes finiky painting, and this can become difficult if the dark and light areas aren’t large and easily paintable. The advantage is that it gives you very precise manual control of what gets blended and what doesn’t.
The Layer Mask
This is the easiest manual technique. Starting with having done the pasting of the dark image on the light one, add a Layer Mask. This is done by clicking on the second icon on the lower left of the Layers palette. You will now see a white rectangle next to the image on theLayer 1layer. (See Figure #2).
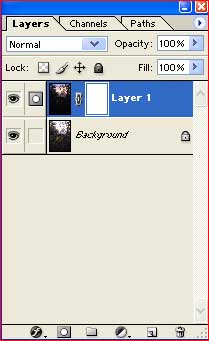 Fig. 2
Click on the background layer on the palette and the pressCTRL-Ato select the whole image. PressCTRL-C, copying it to the clipboard. Now hold down the ALT key (Optionon the Mac) and click on the white mask rectangle on the Layer 1 palette.
The whole image will now turn white. Next, press CTRL-V to paste the contents of the clipboard onto the white mask. You will now see a B&W mask image. With the B&W mask displayed go toFilter / Blur / Gaussian Blurand set the Radius to about 40 pixels. Click on the Background Layer and you’re done. (Thanks to George DeWolfe of CameraArt’s magazine for bringing this technique to my attention.)
Oh yes. With this technique you may want to select the background layer and add an appropriate curve to brighten up the dark area a bit prior to flattening the layers.
Miranda’s Dynamic Range Increase (DRI) Action
This approach is almost completely automated. TheDRI Actioncan be downloaded from Fred Miranda’s site at a cost of U.S. $8.50. It is compatible with Photoshop versions 5 through 7.
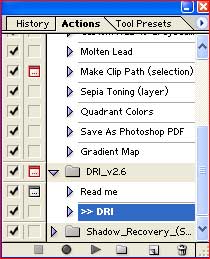 Fig. 3
Download the Action and following the provided directions load it into yourActionspalette. With the two images overlayed, as detailed above inCommon First Steps,click on theDRIheading and press thePlayarrow. You’re done.
My recommendation though is that before using DRI you open your dark frame in 16 bit mode and extract as much shadow detail as possible, because unlike with the prior two techniques you can’t work on just the shadow areas once the processing has been completed.
Next Steps
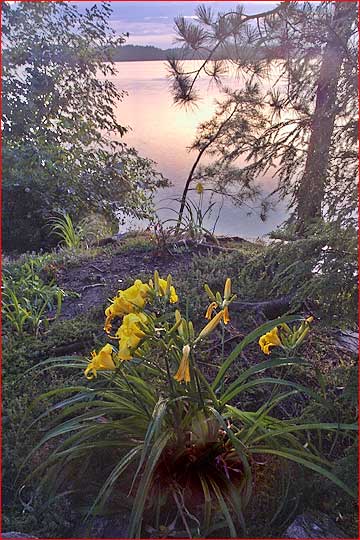
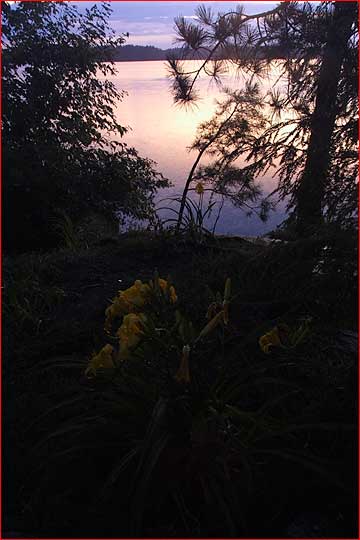
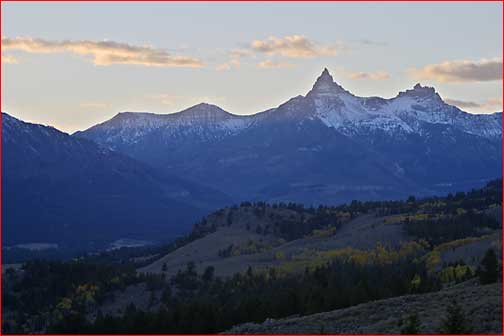
This is the final bended image. All three techniques produce roughly similar results, with the painting technique providing the most control but also the most work. The Layer Mask technique is easy to use and costs nothing. Miranda’s DRI Action costs a few dollars but is simplicity itself to use.
Once the image has been flattened your work has just begun. Now you can do fine tuning of Layers and Curves and colour balance, as well as any other adjustments that you care to make. But, you’ll be starting with an image that is much closer to what you’ll likely want the final print to look like than if you had tried to coax detail from the shadows the traditional way. Of course blown-out highlight would have been irretrievable. Naturally any sharpening should be saved for last, preferably just before printing.
Incidentally, once I had blended the example above I found that there was quite a bit of flare in the frame from shooting almost directly into the setting sun. I’ve still used this as an example because it illustrates some of the things that you’ll discover when you reach into previously unseen areas of your images with these kinds of techniques.
Additional Examples
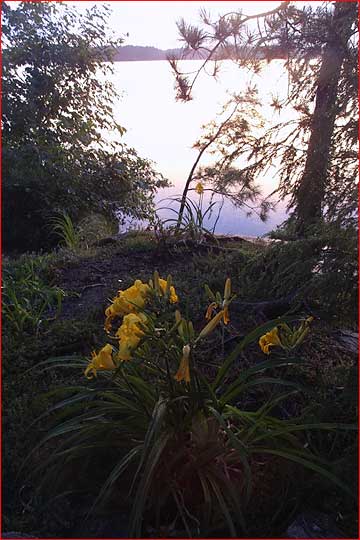
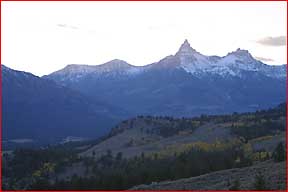
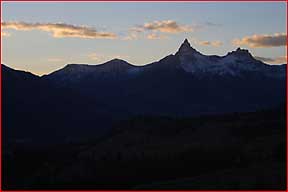
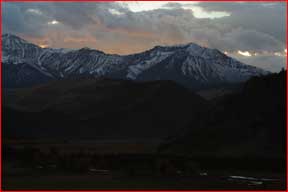
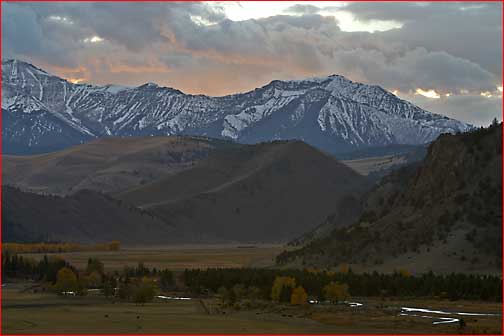
Here are a couple of additional examples. These were each done using the simple and quickLayer Masktechnique, and each was accomplished in about 30 seconds. I’ve applied no corrections at all to any of the files, though I could have easily added someLevelsorCurvesadjustments to each as needed. I simply wanted to illustrate how fast and easy this approach can be, and how if you’re shooting with a digital camera the use of split ND grad filters has essentially been rendered obsolete.
Be careful when using these techniques that you keep your prints natural looking. People expect the foreground to appear dark when the sky is bright‚ don’t overdo it.

That’s all there is to it. When you encounter a scene with very high contrast simply set your camera to auto-bracketing and do a few frames about 2 to 3 stops apart. You’ll soon wonder how you ever did without this technique.
‚ Michael
There is a fascinating technique available fromErik Krause’ web sitethat you may wish to explore.
It appears to offer a great deal of flexibility.
A live video tutorial on the use each of these three techniques is featured
inIssue #6ofThe Luminous Landscape Video Journal,
scheduled for release in November. Don’t miss it. Subscribe now!
Michael Reichmann is the founder of the Luminous Landscape. Michael passed away in May 2016. Since its inception in 1999 LuLa has become the world's largest site devoted to the art, craft, and technology of photography. Each month more than one million people from every country on the globe visit LuLa.
You May Also Enjoy...
An American Journey – Part One
Life. It is many things. For me, it has been and continues to be a journey. But a journey often involves a crossroads. My photography
