By: Jeff Ball
Maybe it is hard to explain why we have the need to image anything. For me, the images inSky and Telescopewere so inspirational, that I just had to learn how to take pictures like that. So 5 years ago, with no photographic experience, I began astrophotography. First I thought that astrophotography and photography were two different disciplines and never considered entering into an extensive study of photography in order to improve my skills. Now I realize that the two are inseparable. The more I learn about the art of photography, the more my astronomical images improve. My vision has become more focused over the past year and it is in large part do to the instruction received from theLuminous Landscape. That is why I am aLuminous Landscape Video Journalsubscriber and participated in anAlain Briotworkshop in March. I know that by improving my skills in the art of photography, my astrophotography will improve and be even more unique and hopefully, more inspirational. Many of you already possess the photographic skills. I hope you find an inspiration to perhaps bring those skills to the beauty of the universe by attempting astrophotography.
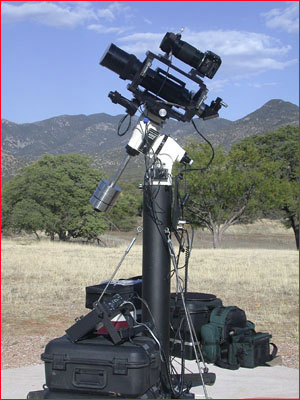
Broadly defined, astrophotography encompasses any attempt at imaging a celestial body or atmospheric phenomena. Many of you have already participated in this type of imaging by capturing sun dogs or sun pillars or lunar halos or auroras. There are two main approaches to astrophotography: tracking or non-tracking. By tracking, I am referring to utilizing a motorized platform that compensates for the earth’s polar axis tilt as well as the earth’s rotation. Non-tracking approaches would include tripod mounted or hand-held imaging. Wonderful results can be achieved with either approach. The equipment being utilized today is overwhelmingly expansive. From web cams to high end full frame dedicated astronomical CCD cameras. Astrophotographers are quite resourceful in adapting non-astrophotography designed equipment to meet their individual needs. Roughly speaking, modified web cams are now very popular for high resolution planetary imaging. Specialized CCD cameras are broadening their field of view with each new chip and are challenging film in all but the widest fields of view for deep sky imaging. Film still has a place for medium to wide fields of view. Focal lengths of equipment range from the widest angle lens to over 4000mm in length. Like all things, cost and value influence the imaging device one selects. The modified web cam can be purchased for under $100 and free software is abundant. A full frame astronomical CCD camera with color filter wheel retails for $9000. Then you have to buy the telescope, mount, laptop…it can get quite expensive. Many of you also have great equipment already. Perhaps you will find a new imaging opportunity in the world of astrophotography.
________________________________________________
What to image?
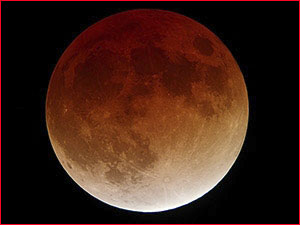
Few setups can do it all, just like in landscape photography. So you must really choose your equipment based on your area of interest. High resolution results can be achieved with the bright objects in the sky which are in our solar system. Sun, moon, and planets are the targets for long focal length setups. There is one external variable that controls the final result in high resolution imaging and that is the quality of “seeing.” Astronomers use the Pickering scale to measure the quality of “seeing” which measures the turbulence or steadiness of the image in the telescope. If you have looked through a telescope and seen stars or objects come in and out of focus, then you have seen what turbulence in the atmosphere can do to an image. The best way to control this variable is to locate in a geographic areas where seeing is historically of high quality. The Florida Keys are renowned for their high quality “seeing” conditions.
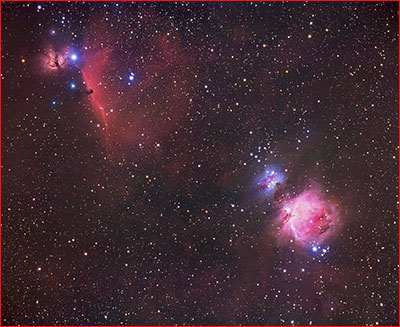
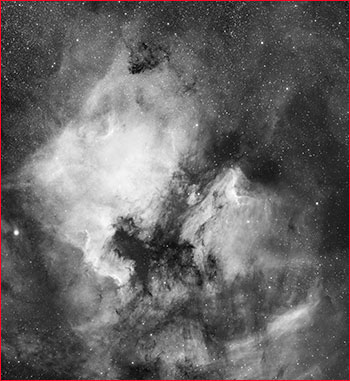
Deep sky objects like nebulae and galaxies benefit from dark skies with good “transparency.” Astronomers need clear, dark skies with little light pollution in order to bring out the faint detail of many astronomical objects. We measure the “clarity” of the sky in terms of “transparency.” Arizona and Hawaii are the hotbeds of astronomical observatories in the U.S. because of their high quality “seeing” and “transparency” in addition to their high number of cloudless nights in any given year. So it is important for one to match their equipment to their astronomical target and to choose the target with regards to the atmospheric qualities of their local geography.
________________________________________________
Techniques
Non-tracking or tripod mounted imaging:
Imaging options with tripod mounted cameras include aurora, moon in the landscape, constellations in the landscape, star trails, bright comets, and meteor showers.
When you are not compensating for the rotation of the earth, you need to calculate the amount of movement or blurring of the intended target for your given exposure time. The major determinant of acceptable blurring is the focal length of the imaging system. Longer focal lengths are less forgiving than shorter focal lengths. If you are trying to capture the moon in your landscape with a telephoto lens of 300mm, you are probably going to be limited to exposure times of 1/60 at f16 at ISO 100. You will also be challenged by keeping your depth of field at infinity for the area you desire to be in focus on the frame. Michael and Steve have covered incorporating the moon in the landscape in many articles and on the Video Journal.
We may have a decent comet or two in our skies this spring that just might be candidates for tripod imaging. Predicting comet brightness is very difficult. To get the latest on the comets, check outSky and Telescope.
My brief experience with the Canon 10D shows great promise for imaging star fields and/or the Milky Way from the tripod. These star field shots could then be layered into landscape scenes imaged during the last moments of daylight. These exposures could also be layered into landscape scenes taken with flash lighting techniques. If you find yourself at a wonderful remote landscape location with no moon in the sky, why not try a few shots with star fields or the bright glow of the Milky Way on the horizon? The skies are probably very dark and will be very conducive to getting good results, especially with a low noise digital SLR.
Tracking:
Motorized tracking mounts for astrophotography are quite an investment (hand driven drives may be built for minimal cost). If this type of investment is not in your plans, you may still be able to utilize a tracking mount. Most amateur astronomy clubs have at least one member who has a fairly significant interest in astrophotography. Many of these clubs may even have an observatory with multiple telescopes and tracking mounts. The astrophotographers in these clubs may or may not have photographic experience. The photographic insight that you could provide to these individuals would be invaluable and may lead to a situation where you may obtain access to a tracking mount and work on imaging projects cooperatively with the amateur astronomer. Imaging via a tracking platform requires new skills and techniques to insure quality images. Highly accurate polar alignment is needed for high quality results. The degree of accuracy of polar alignment is related to the focal length of the telescope, the field of view of the image, and the offset from the field of view of your guide star. A guide star is used to compensate for any movements with the mount’s mechanics as well as to the drift the star may realize as the sky moves with the rotation of the earth. Details on the specifics of these techniques can be found at the links at the end of the article.
________________________________________________
Equipment
Lenses used in astrophotography must meet the most stringent of optical requirements in order to minimize adverse effects that are related to chromatic aberration, spherical aberration, vignetting, and flatness of the photographic field. Attempting to image points of light like stars is a great challenge to all but the best photographic lenses. Focal lengths used can be from fish-eye to 4000mm. The mechanics of the lens should be of high quality-rigid body, firm focus position, and lens shield to prevent dew from collecting on the front of the lens. When choosing lenses for composition, literally, the sky is the limit! Wide field lenses can capture huge swaths of sky measured in degrees. Long focal length lenses or a multiple lens setup with eyepieces and the main optics are used for resolving small details on planets where measurements are made in arc seconds.
________________________________________________
Imaging sensors
Film
It is my opinion that film is still quite alive in astronomical imaging. Wide-field imaging is a little arbitrary by definition, but I consider using telescopes or lenses with focal lengths less than about 1000mm to be wide field in presentation. Although dedicated full frame 35mm CCDs are now available, they are all monochrome in their imaging and therefore need to image each color separately. This is very time consuming and is especially challenging for those without permanent imaging setups like an observatory. So for me, film still holds an edge over digital with regards to recording wide fields of view in color in an efficient manner. Two major challenges with film: dark skies and film selection. The non-linear recording characteristics of film make it more vulnerable to light pollution than CCD sensors. For best results with film, dark skies are needed. For most of us, this means that we must travel to remote areas to setup our equipment. This is challenging in more ways than I have time to cover here, but you can probably think of the problems inherent with this approach. Regarding film selection, it brings a tear to my eye when I read that an emulsion has become “friendlier” to “skin tones.” This generally translates into a reduction in the spectral sensitivity of the all-important 656nm line, or the Hydrogen Alpha line, in the far red end of the spectrum. Many galactic nebulas emit their photons in this spectrum. There are currently no good print films for astronomical use available in the US. Konica Centuria 400 is a good candidate, but it has limited availability in 35mm format in the U.S. and larger formats are limited to the Japanese market. We have two good options in color slide film with Kodak E200 and Fuji Provia 400. I prefer E200 most of the time, especially when an object has high emissions in the hydrogen alpha line. Imaging time required for most deep sky astronomical objects is two – four hours. The total imaging time is generally achieved through stacking multiple frames of shorter exposures. The minimum exposure for me is two 60 minute shots stacked together when shooting E200 at f6 on a 600mm focal length scope.
There are currently very few color print film options in the U.S. TechPan is a good print option, but requires very special handling and preparation and is black and white.
Dedicated astronomical CCDs:
As in nearly all photographic genres, the advancement of quality digital imaging in astronomy has been remarkable over the past 5 years. These dedicated cameras are made by companies likeSanta Barbara Instrument Group(SBIG). The CCD chips for these cameras have been selected on the basis of their ideal spectral sensitivity characteristics in order to fully capture the photons being emitted by the astronomical object. These cameras also minimize the amount of noise in the image by cooling the chip to 30 degrees below the ambient temperature. Techniques for dedicated astronomical imaging are quite numerous and detailed. For best results, a number of calibration steps must be included. These steps are subtracting dark frames, bias frames, and flat fields from the light frames. Multiple light frame images are captured and then stacked in order to smooth the digital noise inherent in the image and also to enhance the signal of the object. Some sensors come with one shot color options, but I believe the highest quality results are obtained with the monochrome chips where color is achieved by combining separate red, green, and blue filtered exposures. Initially, many were overjoyed with the sensitivity of the CCD over film and how quickly one could capture a decent image. With time and with changing standards of quality, we now find ourselves imaging for longer periods of time with the CCD than with film to achieve smooth results with color. Another popular approach to increase field size with smaller imaging chips is to construct a mosaic of images. I have completed one mosaic on my website that involved over 16 individual frames at 3 hours exposure each for a total exposure time of 48 hours! I was tired after that project. For more on imaging with astronomical CCDs, please see the resources listed at the end of the article.
Digital SLRs and digicams:
Fortunately, astrophotographers are benefiting greatly from the focus efforts of digital camera manufacturers to reduce noise in their chips. The new chips, especially the CMOS chips, have proven to be pretty good astronomical imaging devices. In their current configuration, the filters reduce the sensitivity of the chips to the 656nm spectral line, but some astronomical manufacturers are actually modifying the filter on the Digital Rebel to improve the 656nm sensitivity for astronomical imaging. To overcome the lack of sensitivity to the 656nm line you must increase the total exposure time to exceed the time you would need with a dedicated astronomical CCD camera. The current trend is to take a large number of sub-frame exposures of 5 minutes with a camera like the 10D and combine them to achieve a total exposure time of 3 hours. There is specialized software to achieve all of these results. The big advantage to digital SLRs is that most people already have one! Minimal accessories would need to be purchased to enable astronomical imaging with these cameras. So if you have a digital SLR and want to try some deep sky photography, contact your local astronomy club for more information. This is a great option for many Luminous Landscape participants. To learn more about utilizing a digital SLR, see the links at the end of the article.
Webcams:
Probably the most resourceful imagers are those modifying web cams for astronomical use. The main advantage to these systems is high video frame rate. The imager analyzes the video for only the sharpest frames and then selects and combines these. The technique works amazingly well for planetary and lunar imaging.
As you can see, there is a myriad of imaging opportunities in the world of astrophotography. I hope you find an approach that is of interest to you and please share your results with the Luminous Landscape community.
As with all evolving technologies, improvements seem to be made daily. To keep current on advances in astronomical imaging, please check out these resources.
Text and Photographs © 2004 — Jeff Ball
________________________________________________
Jeff Ball lives and works in Huntington, West Virginia. He is married to Marsha with two children, Stephen and Jennifer. He works as a pharmaceutical representative with Aventis pharmaceuticals. He can be reached atjeffball@astro-photography.com, or you can visit his website atwww.astro-photography.com.
Jeff is hosting an Astrophotography Workshop in May of 2005 in Arizona. You can find out more about ithere.
________________________________________________
Websites:
Sky and Telescope: To find an astronomical club near you and to stay up on the latest astronomical events.
Jerry Lodgriguss– The most comprehensive site on astrophotography on the net. Jerry is a professional sports photographer and brings that experience to his astrophotography pursuits. He has written a book on CD on how to use Photoshop for astrophotography enhancements. You could probably learn all you need to know about astrophotography from this site alone.
Stan Richard– Tremendous examples of what can be done from a tripod.
Chris Cook– Some terrific nightscape photography in addition to his astrophotography on a tracking mount.
Johannes Schedler– The innovator in digital SLR imaging. Since most of you already own the camera equipment, this is an easy transition to astrophotography.
Rob Gendler– for the finest imaging utilizing a dedicated full frame astronomical CCD camera.
Michael Covington– his book on astrophotography covers all of the basics in technique you should know.
SBIG Yahoo Group– for information on techniques involving dedicated astronomical CCDs
Digital imaging Yahoo Group– for information on techniques used in digital SLRs in astronomy
ToUcam Yahoo Group– for information on techniques with a web cam
Michael Reichmann is the founder of the Luminous Landscape. Michael passed away in May 2016. Since its inception in 1999 LuLa has become the world's largest site devoted to the art, craft, and technology of photography. Each month more than one million people from every country on the globe visit LuLa.
You May Also Enjoy...
Two Clouds Antarctica
Please use your browser'sBACKbutton to return to the page that brought you here.
