The Why & How of Matting Photographs
A Tutorial byAlain Briot
Why Mat Your Photographs?
Matting consists of mounting a photograph to a mat board into which an opening the size of the photograph has been cut. The photograph is attached to the back of the mat with framing or archival tape (see suppliers section at the end of this article).
Matting your photographs may be more important than you think especially if you want to sell your photographs either framed or unframed.
Matting a photograph provides three main benefits:
First, it insures that the photograph will not touch the glass once it is framed – the mat board acts as a spacer between the photograph and the glass.
Second, once the photograph is framed and displayed matting helps separate the photograph from its surroundings. It gives it its own unique space and presence.
Third, but not last, matting a photograph makes it more sellable. A matted photograph is a finished product ready to frame, since all your customer has to do is find a frame for it. If you sell your photographs matted your customers will not have to pay custom matting, which is expensive, and if you use standard mat sizes (which I recommend) they will not have to get custom framing which is even more expensive.
Popular standard frame sizes include 8×10, 11×14, 16×20, 20×30, etc. Offering your photographs matted in a standard frame size means that your customers can purchase a ready-made frame and frame the photograph themselves. This is an important selling point: to your customer it means that the cost of framing the photograph will be minimized.
How To Cut Mats For Your Photographs
There are a number of ways you can cut a mat for your photograph. In this article I will start with the simplest way and proceed to the most sophisticated way. One note before I start: no matter which tool you work with make sure you always use a very sharp blade. This means replacing the blade as soon as it starts to get dull. The cost of blades, when bought in quantity, is about 10 cents each, not an amount to be concerned with if you are selling your work. Donºt try to save money here! The goal is to get a great looking mat, not to get ragged cuts in an attempt to use blades as long as possible.
The simplest way to mat your photographs is to purchase mats that are already cut. Many companies specialize in providing ready-cut mats to photographers and artists. A listing of these companies is provided at the end of this article.
Personally I much prefer to cut my mats myself, for three reasons. First, cutting my own mats allows me to keep my costs down since this is less expensive than buying ready-cut mats. Second, cutting my own mats allow me to cut custom opening sizes and designs (ready-cut mats often come only with standard opening sizes). Third, if I need a mat today I can cut it myself, right now, while if I have to order it it may take a week for me to receive it.
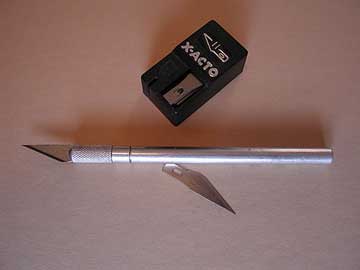
The simplest way to cut a mat yourself (and the least expensive) is to use anX-Actoknife and a straight edge ruler
The first thing to do is measure and calculate the mat opening and draw it on thebackof the mat board.
The simplest approach to calculate a mat opening is as follows:
Measure and cut an 8×10 piece of mat board (for example). You can also purchase mat board which is already cut to size but I prefer to purchase full sheets of mat board (32″x40″) and cut them to size myself. This is much more cost effective and I can get the mat board in any color I want.
Measure your photograph accurately and make sure to allow a 1/8th to 1/4th of an inch border all around the image to be covered by the mat (that is make the opening size 1/4th to 1/2 inch smaller than the image size).
Deduct these measurements from the mat size. For example if your picture size is 5×7 and you give it a 1/4æ border allowance all around you will need an opening size of 4.5″ x 6.5″. Deduct 4×5″ x 6.5 ” from 8æx10″ and you get 3.5″ in both directions (horizontal and vertical).
Divide the result of your subtraction by 2. In our case 3.5″ divided by 2 yields 1.75″. This is the size of the border you will have all around your image.
Measure a 1.75 ” border all around the image and trace this border on the back (not the front) of the mat.
Cut the opening using a straight edge and an X-Acto knife. Cut straight down (donºt try to cut at a bevel as this will make it very difficult to get a clean cut). You will need some practice to get it right but it can be done.
The X-Acto is fine to “test the waters”, learn the basics of mat cutting and see how your photographs look matted. But if you decide to cut mats on a regular basis you will need a more sophisticated tool.
The second simplest approach (and still relatively inexpensive) is to use aDexter Mat Cutter.
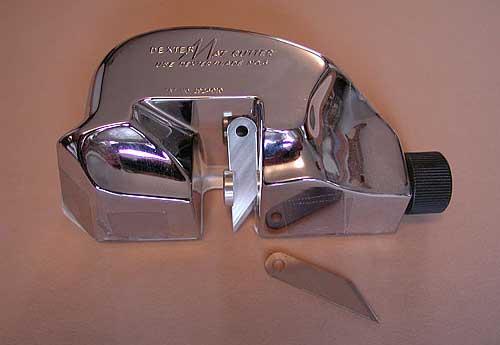
The Dexter is a hand held device which holds a blade positioned at a 45 degree angle so that your cut will be beveled. To cut simply measure and trace the opening as described above and use a straight edge ruler to guide the Dexter. Make sure that you over-cut each side approximately 1/4″ so that the opening will fall out after you are done cutting it. The over cut is necessary because the bevel makes the opening on the back of the mat slightly smaller that the opening on the front of the mat.
I graduated to the Dexter when I started selling my work and used it successfully for several years. As with the X-Acto it takes some practice to get perfect results. I also found out that taping a piece of paper cut to the shape of the Dexter underneath the Dexter made it glide more smoothly onto the mat board.
The Dexter works great for low-volume, occasional mat cutting. If your mat cutting volume increases, or if you find you need to cut more sophisticated designs, you will need to move up to a table top mat cutter.
The table top mat cutter is the third, and the most popular approach, to cutting mats professionally. I acquired aC&H Advantage Protable mat cutter when my sales volume increased to the point that using the Dexter was both time consuming and impractical. A table mat cutter will both speed up mat cutting and provide greater precision and reliability.
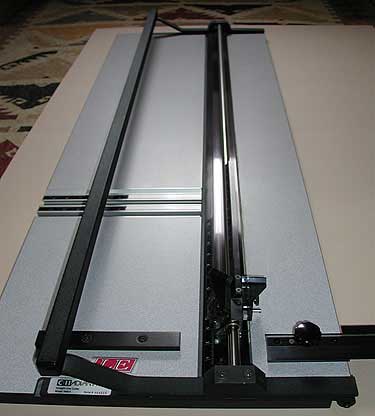
The main advantage of a table top mat cutter is that it provides you with a push down bar under which the mat is tightly held onto the table. Also, the cutting blade is mounted into a holder which glides along a steel rod. This means that a ruler is no longer required and that you no longer have to hold the mat board down with one hand while cutting the opening with the other hand (I used to cut mats on the floor with the Dexter holding on the top end of the ruler with my left hand, pushing on the other end of the ruler with my right knee and moving the Dexter with my right hand!).
In addition to cutting straight openings a table-top mat cutter may also allow you to cut decorative V-grooves on the front of the mat board or make fancy decorative cuts depending on the make and model of your machine.
The same approach to measuring mats I described above can be used with a table mat cutter. However, if you are going to cut large quantities of mats there are a few techniques which will make your life easier.
First, if your table top mat cutter came with cutting stops you can set those to the dimensions of your borders and cut the same borders repeatedly without any additional measurement. This works great if you have even borders all around your mat opening.
To gain even more time, and to not have to fuss with setting up the cutting stops, I preparetemplatesof my most commonly used mats. To do this I design and cut a specific opening as precisely as I can and then keep this mat as a template. Afterwards, each time I need to cut a similar mat I use this template to trace the opening by simply laying the template onto a new sheet of mat board of the same size and, using a pencil, tracing this opening onto the back of the new sheet of mat board. I do this for as many mats as I need to cut and then cut them all at once on the table top mat cutter.
The table top mat cutter works great for moderate volume production, multiple mat openings and cutting full sheets to size. However, there is a limit to what it can do. Intricate cuts can be difficult to do and high volume work tests the limits of both man and machine. Among the most serious problems is the possibility of developingrepetitive motion syndrome(RMS) from cutting too many mats. Each cut requires a lot of pressure from the hand that pushes down on the blade carrier and after cutting thousands of mats RMS injury can occur. This is a serious threat that is affecting many custom framers.
The solution is then to graduate to the ultimate (and most expensive) mat cutting tool: the computerized mat cutter. This is the fourth and currently the most advanced approach to mat cutting.
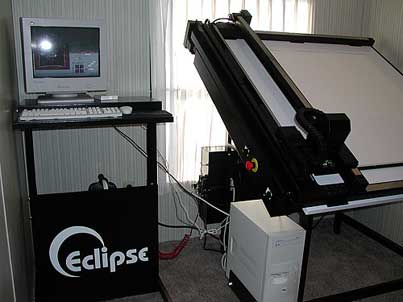
Such a machine combines three technologies to cut mats in ways that hand-operated mat cutters can never dream of: a computer running mat-design software, an x-y axis motion controller connected to two micro stepping motors, and an air compressor.
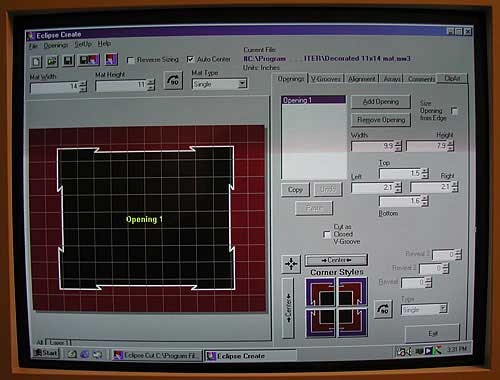
The mat cutting table is connected to a Windows-based PC via an interface card which translates the instructions sent by the mat-design and mat-cutting software into x-y motions. The mat board is held to the table via air-operated clamps which are opened and shut via a foot pedal. The cutting blade is operated by two infinite-steps x-y micro stepping motors which control its movement in the x (vertical) and y (horizontal) axis.
With a computerized mat cutter the task of calculating borders and mat opening sizes is delegated to the mat-design software. You simply type the outside dimensions of the mat (11×14 for example), the size of the opening you want (8×10 for example) and the software automatically calculates the size of each border. All you have to do is place a sheet of mat board onto the table, clamp it down, click “Cut” and there you have it. What used to take hours now takes only minutes, the cut is perfect each time and RMS is no longer something you have to worry about.
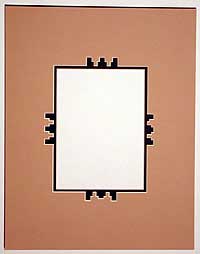
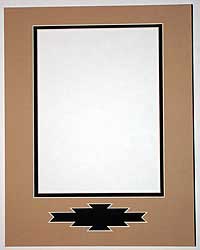
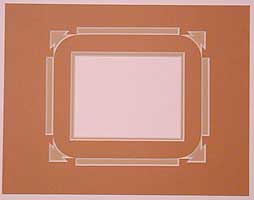
Not only that but you can design multiple mat openings with ease, make oval openings (or multiple oval openings), create flawless v-grooves and make fancy corner cuts without any more difficulty than regular cuts.
With such a tool any design is possible. The limitations are more a factor of the software than the hardware, hence the importance of looking closely at the software interface and capabilities when choosing such a machine.
In fact it is just like working inPhotoshop: if you can think of it you can probably find a way to do it. In this case if you can think of a mat design you would like to cut you can probably find a way to do it. If the mat-design software does not offer this design you can draw it in a CAD program (such asQuick Cad), import it into the mat-design program, and make it part of your overall mat layout.
If you find that calculating border measurements is headache-inducing, if you want to avoid the risk of developing RMS, if you need large quantities of mats and/or sophisticated mat designs, and if you want to cut mats yourself, then a computerized mat cutter may be just what you need.
Companies Which Offer Matting & Framing Tools and Materials
Notice:this list does not represent an endorsement of the following companies. It simply represents companies that I personally find reliable and with which I or friends have successfully done business with for many years.
Documounts
Precut mats with standard or custom openings -buy from them if you donºt want to cut your own mats:
800-293-6108
Light Impressions:
Photographic presentation and preservation supplies:
800-828-6216
http://www.lightimpressionsdirect.com
United Manufacturers Supplies Inc.
All the framing supplies you may ever need, from framing tools to framing tape:
800-645-7260
This article and accompanying photographs are Copyright 2002 by Alain Briot
Alain Briot is one of the most successful landscape photographers working in the American Southwest today. His work is widely exhibited and collected. His monthly column for this web site, of which this is part, is calledBriot’s View. An extensive interview with Alain is included in Issue #1 ofThe Luminous Landscape Video Journal.
This is one of a regular series of exclusive articles byAlain BriotcalledBriot’s View
Alain Briot creates fine art photographs, teaches workshops and offers DVD tutorials on composition, raw conversion, optimization, printing and marketing. Alain is the author of Mastering Landscape Photography, Mastering Photographic Composition and Marketing Fine Art Photography. All 3 books are available from Alain’s website as well as from most bookstores. You can find more information about Alain's work, writings and tutorials as well as subscribe to Alain’s Free Monthly Newsletter on his website. You will receive over 40 essays in PDF format, including chapters from Alain’s books, when you subscribe.
You May Also Enjoy...
Boy at Demonstration
Please use your browser'sBACKbutton to return to the page that brought you here.
