While this tutorial on photographing meteors was written for one particular meteor shower, the Leonid shower of Nov 18, 2001, it can be used any time one wants to try ones hand at shooting "shooting stars".
The Leonids
In the hours before dawn onSunday November 18ththe annualLeonidmeteor shower will take place. This year some are predicting that instead of ashowerwe may have astorm, with as many as 4,000 meteors per hour. To assist people in doing photography of the Leonids here are some tips on how to photograph meteors.
Note that there’s a bonus this year. The moon doesn’t rise until late morning, making the night as dark as possible for viewing faint meteors.
For those of us on the East Coast of North America the peak will be about 2 hours before dawn, at about 5:00 a.m. This corresponds to 4:00 a.m. CST, 3:00 a.m. MST, and 2:00 a.m. PST. Bring lots of coffee and plan on having a nap on Sunday afternoon.
For photographers on the East Coast, be aware that there won’t be too much time between peak and first light. Dawn is at 7:15am in Toronto, for example, and that means that first light is at 6:15am. That gives just an hour or so of prime photography time. Folks in the middle of the continent and especially on the west coast will have a couple of extra hours available.
Tips
Clear Skies:Check the weather forecast. If there’s a decent forecast‚ head out to a dark sky location. Even though you may not have 100% clear skies, it still will be a worthwhile show. If the forecast is for overcast and/or rain, stay in bed.
Dark Skies:While you’ll be able to see the meteor shower from the city, you’ll only be able to effectively photograph it from a dark sky site in the country. If you have a friend with a country house, now’s the time to call in a favour. Try to get at least 75-100 miles from the nearest major city. The reason for this is that you’ll be taking long exposures. The sky glow from city lights will simply overexposes your film, just the way flare does during the day.
Cameras:Any camera with a shutter than can take time exposures can be used. Set the camera toBorT. Use a locking cable release. If your camera has an electronic shutter see if it also has a long time exposure mode that doesn’t draw current (like thePentax 67 II) . Otherwise, put in fresh batteries and plan on replacing them the next day. Mechanical shutters are preferable for long time exposures for this reason. If you have aCanon EOS35mm SLR then this is a good excuse to pick up thatTC-80N3timer release you wanted but couldn’t figure out when you’d use.
Digital Cameras:If all you have is a digital camera, then give it a try. Otherwise, use a film-based camera instead. The reason for this is that digital cameras suffer from thermal noise during exposures of more than a second or so. That’s why CCD cameras designed for astrophotography have built in Peltier coolers. This brings their temperature down some 50 degrees F below ambient, thus reducing thermal noise. The lower the temperature, the better. TheCanon D30does a decent job on exposures down to about 20 seconds because of its special long exposure compensation mode. But, if you use this mode it doubles the time, since a 20 second exposure needs 20 seconds of post processing in the camera. Anything longer than 20 seconds is, in my experience, too noisy. Use film.
Lenses:You’ll likely want to use the widest and fastest lens that you have. If you have something like a 21mm f/2.8 that would be ideal. The reason for this is twofold. Firstly, you want a wide lens because you want to show as much sky as possible as well as something recognizable as a foreground silhouette. This could be a lake, some trees or a house. Without a foreground subject what you’ll have are just white streaks on film.
A fish-eye lens would be a good idea if you have one. Prime lenses are better for this type of photography than are zooms, but if a zoom is what you have use it. Don’t bother with anything longer than about 50mm. The exposure times will need to be too short, to avoid blurred star trails, as discussed below.
Film Speed:Film speed, aperture and shutter speed are of course all interrelated. We’ll look at the each separately, but make your plans in the context of understanding how they combine to affect what you can achieve.
You can use any film speed from ISO 100 to 400. 800 or higher is simply too grainy and isn’t needed. If you will be using an f/2.0 or faster lens then 100 speed film will be OK. If your lens is slower then 400 is preferable. You can use color transparency, colour negative or B&W, though negative films are preferred because of their greater exposure latitude. There is not likely to be much colour so something likeIlford XP2 Superwill give you good speed (ISO 400), reasonably fine grain, and convenient processing.
Aperture:The faster the better. But, don’t just use your lens wide-open. Try stopping down at least 1 stop for some frames. So, if you’re using an f/2 lens, stop down to f/2.8. The reason for this is that lenses are least sharp wide open and also suffer from coma at wide apertures. Coma is the inability of a lens to render a point source as a point, particularly at the corners of the frame. Instead they will appear to be smeared. Since there will be stars in your shot, which are of course point sources of light, any coma will be less visible if you’re stopped down a bit.
Shutter Speed:This is the most complex of factors to be considered. You want a long enough exposure so that you capture a good number of meteor streaks, yet not so long that the stars themselves start to streak. Because of the Earth’s rotation during the course of even a minute or less, any time exposure that includes stars will show them as streaks instead of points of light.
The simple formula for 35mm format is600 / (Focal Length) = Maximum Exposure Time. So, for example, if you’re shooting with a 24mm lens the math would be: 600/24mm = 25 seconds. (For medium format it’s roughly half this number).
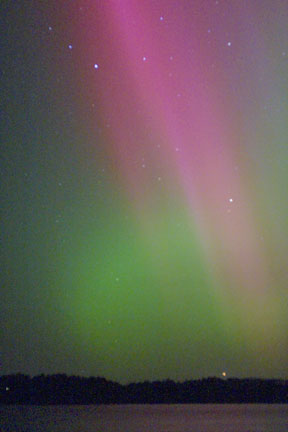 Aurora, Muskoka Ontario, Canada, October 28, 2000
Photographed with Canon D30 at ISO 400. 15 seconds @ f/2.5 with a Canon 50mm f/1.4 lens. RAW Mode. Long Exposure noise reduction mode ON.
This means that with a 24mm lens any exposure of longer than 25 seconds will show the stars as streaks rather than points of light. The frame above shows what I mean. This was taken with a 15 second exposure using a 50mm lens. According to the formula (600/50=12) a 12 second exposure was the maximum that wouldn’t show star streaking. And sure enough, even the few seconds more used for this exposure starts to show slight streaking.
You’ll also see above that a 15 second exposure at f/2.5 and ISO 400 was more than enough to record the brighter stars. Meteor trails are often brighter than this (though many are fainter).
But, now you see the quandary. Even with a 25 second exposure using a 24mm lens, how many meteor trails do you think you can capture? Not many, unless we really have a "storm". So, is the solution to simply take longer exposures and live with the star streaks? Yes, but!
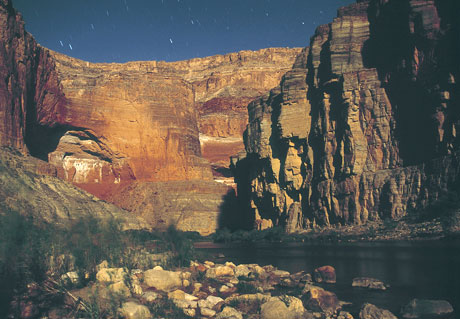 Moonlight at Saddle Canyon, May 2000
This photograph was taken at 2am under a full moon, and was a 4 minute exposure at f/4 with a 24mm lens on ISO 100 film. The star trails are just starting to appear long enough so that they don’t simply look like bad blurs.
My suggestion though is to go for some really long exposures. 30 minutes or so. This way you’ll be sure to capture a lot of meteor trails and the stars will start to look like trails rather than streaks. It’s an esthetic judgment. If you’re going to be doing 30 minute exposures you can afford to stop down another stop or two or even three. This will give you sharper images with less coma. Also, unless you are in areallydark sky environment it will help to cut down in the affect of sky glow.
For all the anal compulsives out there, here’s the scientific formula for calculating star trail exposure times as quoted fromSky & Telescope…The length l of a star’s trail on the film in millimeters can be calculated from the formula
l = [tF cos (delta)]/13,750,
where t is the exposure time in seconds, F the focal length of the lens in millimeters, and delta is the north or south declination of the star.
Happy?
Tripod:It goes without saying that you should use as large and as heavy a tripod as you have available. And a cable release.
Clothes, Comfort & Accessories:Since it’s mid-November, dress warmly. Bring a thermos of something hot. The trick for keeping warm is to wear a warm hat and scarf. The greatest heat loss is through the head, and the body’s temperature sensor is at the back of the neck. That’s why your mother told you to wear a scarf. Keep your head and neck warm and the rest of your body will feel fine. Thin gloves are a good idea too.
Flashlights are a must, of course. A small headlamp is very handy for nighttime and pre-dawn shooting as it keeps your hands free.
Location
 Illustration courtesy NASA
The prime radiant (the spot in the sky from which the majority of meteors will appear to originate) is fairly high in the southern sky. Try and find a spot to shoot from that has a southern exposure. Trees in the foreground are not a problem as the radiant is quite high, about 40 degrees above the horizon.
Aiming
Aim your lens at about 45 degreesawayfrom the prime radiant. This way you’ll capture as much of the meteor trail as possible. With a 21mm‚ 28mm lens this will allow you to capture the prime radiant where they first appearandthe full length of the meteor trails.
Focusing?
At infinity, of course. Remember to check that your lenses are racked over to their infinity stop before starting a series of exposures. It’s easy to make this mistake in the dark.
Personal Plans
Assuming that weather permits my plans are to shoot the Leonids from my country place in Muskoka, Ontario. This is located about 100 miles north of Toronto. It has very dark skies.
I plan on bringing three cameras, each on its own tripod. One will be set to take 15-30 minute exposures with a 24mm lens. The next will be used with a 14mm lens, and I’ll be doing an automated series of 40 second exposures using theTC-80N3timer release. The third will have a fast 21mm lens and I’ll experiment with various framings and exposure times. There’s as much luck to this as there is planning.
Good luck and clear skies!
Ps: If you get a good one, send it to me. (72 DPI, maximum width or height 500 pixels).
Postscript
Murphy was not only an optimist, he must have been a photographer as well. Nothing went photographically right during my shoot of the 2001 Leonid meteor shower.
Saturday PM:Chris Sanderson, the director / cameraman of theVideo Journaland I drove to Muskoka where I have a country house by the lake. It’s 100 miles from city lights and a great dark sky site. The weather forecast for Sunday morning looked surprisingly good. We spent a couple of hours before dark scouting a good shooting location for the morning and found a spot that faced south over a small lake‚ the only such vantage point that we could find.
Sunday 3 AM: A look out the window shows crystal clear skies. The temperature is around 0C (freezing). Perfect weather for mid-November. After a quick breakfast we drive to our chosen location.
4 AM: On our 15 minutes drive to our shooting spot we see fog patches. Not to worry. They won’t affect us. But, as we set up our gear in the cold and dark a fog rolls in. While we can still see stars at the zenith they are dimmed, and stars below 45 degrees elevation are block. We start to see an increasing number of meteors. Ignoring the fog, and hoping it will lift, we keep shooting. I have three camera going on three tripods. A Canon EOS 1V with 14mm lens and a timer remote, a Pentax 67II shooting long exposures and a Leica M6 with 21mm lens.
5 AM: The meteors are at their peak. Straight overhead through the thin fog we are seeing 10-20 per minute, but can’t see anything below 45 degrees. I go to change film on the Leica, which I figure is getting some decent shots nevertheless, and discover that I’ve forgotten to take off the lens cap! Since the camera is focused on infinity and I’m not metering, the warning light in the viewfinder hasn’t been detected. I’m furious.
5:15 AM: Fed up, we pack up our gear and head back to the cottage. As soon as we leave the vicinity of the small lake’s edge where we were shooting we emerge from the fog. Grrr! We quickly head back and go down to my dock. It’s perfectly fog-free, but facing north-west rather than south-east, which is the reason that we didn’t shoot there in the first place. It doesn’t matter though because now that we’re out of the fog we see that there are meteors streaking right across the sky, almost in every direction and sometimes right down to the northern horizon. We could have shot right at the cottage without any difficulty, and without fog.
5:30 AM: As quickly as possible we carry our gear from the car down to the dock. But the dock is covered with hoar frost and is treacherous to walk on. A quick misstep and we’ll be in the freezing lake along with our tripods and cameras.
5:45 AM: As we start to shoot at the new location the meteor frequency begins to fade.
6:10 AM: There are hardly any streaks anymore and within a few minutes the sky starts to brighten. Sunrise is just an hour or so away. Complete darkness is lost, and that combined with the decrease in meteor frequency means that the show is over.
11 AM: We drive back to Toronto and I drop off the film at a pro lab that’s open on Sunday. The technician says they’ve been having some trouble with their processing machine, but he thinks things will be fine. Do I want to come back tomorrow? No. I’m eager to see if I have anything at all worthwhile from the shoot.
3pm: I return to the lab. Three of the five rolls have processing marks. "No charge sir, but I did warn you."
The sad story is over. Between the fog, lens cap mistake and processing error I ended up with but one mediocre image, which you see below. It does have 3 meteor trails though. But, I did have a good time and greatly enjoyed viewing the meteor shower. Sometimes you win. Sometimes you lose.
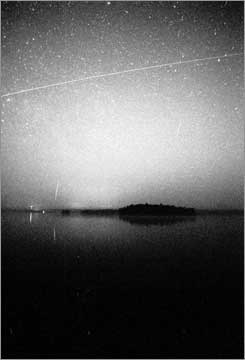 Leica M6, 21mm Elmar, Ilford XP2 Super, f/2.8 for approximately 2 minutes.
Michael Reichmann is the founder of the Luminous Landscape. Michael passed away in May 2016. Since its inception in 1999 LuLa has become the world's largest site devoted to the art, craft, and technology of photography. Each month more than one million people from every country on the globe visit LuLa.
You May Also Enjoy...
DxOMark Camera Sensor
This essay is a successor to a previous article [1] published on Luminous Landscape in early 2011. This update explains industry trends using over 50 new camera
Leica M10 Hands On Review
On January 9, 2017, I was invited to a meeting in New York City to see a preview of the brand new Leica M10. I have been a Leica user
