Care, Feeding & Proper Use
There are few more important things that a nature photographer can do to improve his or her photography than becoming familiar with the use of the polarizing filter.
What can a polarizing filter do for you? Among other things it can darken the sky, remove reflections from water, and make foliage appear less shiny. Colour saturation is also significantly enhanced. It is the only filter for use with colour film that can do all of this.
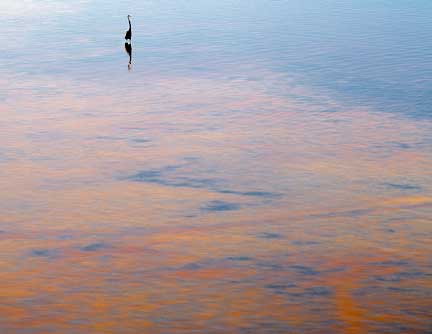
Photographed with a Pentax 645NII and Pentax (67) 200mm f/4 lens on Provia 100F Polarizer
As seen above the use of a polarizing has been effective in removing reflections and glare from the surface of the water, and also in increasing the saturation of the colours beneath the water. The remarkable colour is cased by run-off from the surrounding mangrove swamp near the estuary in Celestn, Yucatan, Mexico. (See below for more on taming reflections).
Polarization and Wide Angle Lenses
There are two issues to keep in mind when using a polarizing filter and a wide angle lens. The first is that the angle of polarization varies continuously with the angle from the sun. With a lens wider than about 28mm (in 35mm film terms) the sky will be unevenly polarized. Some pundits therefore suggest not to use a polarizer with ultra-wide lenses. Nonsense. If you like the effect, go ahead and use it.

Photographed with a Rollei 6008 and 40mm f/3.5 Schneider Super-Angulon on Fuji Provia 100F
This photograph taken in Monument Valley shows this effect to a fault. I used a polarizing filter with a wide angle lens; equivalent to about a 24mm lens in 35mm terms. The part of the sky that’s at 90 degrees to the sun is heavily darkened while the area to the right, closer to the position of the sun, is much less polarized. Nevertheless, I like the effect.
Polarization is most effective at 90 degrees to the sun. This means that the subject that you are shooting will display maximum polarization at right angles to the sun’s position. At 180 degrees, in other words with the sun right behind you, polarization is almost non-existent.
An old trick for visualizing the maximum angle is to turn your index finger into a gun (like when you were a child), with your thumb pointing upward. Make as if to shoot the sun with your finger and your thumb will point toward where polarization is at its most extreme. Remember though that this isn’t just at one angle. Rotate your wrist through 180 degrees (if you can), becausethe entire circle around the sun is equally polarized.
The second issue with polarizers and very wide-angle lenses is the thickness of the filter. By their nature polarizers are thick filters because they have a double ring the first of which mounts the filter to the lens and the second which is the rotating polarizing element itself. If the lens is wider than about 24mm, when used at small apertures the edge of the ring can cause vignetting at the corners of the frame.
The solution is to buy a “thin” polarizer. These are made by B+W and Heliopan, among others. Their downside is that they are even more expensive.
While discussing brands even though polarizers are the most expensive filter that you’re likely to buy, it’s definitely worth purchasing a top brand, like one of the above, rather than a cheapy. Store-brand polarizing filters can often “separate” after several years of use in harsh conditions. Try not to skimp in this area if you don’t absolutely have to.
Circular Vs. Linear Polarizers
There are two types of polarizing filters available linear or circular. Linear polarizers are more effective and less expensive than circular ones. But circular polarizers are needed with just about any camera that has a through-the-lens metering system, or autofocus.
The reason for this is that both of these systems use semi-silvered mirrors to siphon off some of the light coming though the lens. If that light is linearly polarized it renders either the metering or the autofocus ineffective. This means that you’re going to have to buy circular polarizers unless you’re shooting with a pre-1970’s camera, or a view camera.
Sunglasses
The easiest way to preview the effects of polarization is to wear polarized sunglasses. Just remember when looking at a scene to tilt your head from side to side to change the angle of polarization. If you feel that this makes you look like a bird searching for food, simply take the sunglasses off and hold them in front of you as you rotate them. If you wear prescription glasses you can order them polarized the next time that you renew.
The problem with wearing polarized sunglasses is that when you then put a polarizing filter on your camera and look through the viewfinder the two polarizers can cancel each other out and completely darken the viewfinder. What I do is to use sports strings on my glasses and temporarily adjust the diopter on the viewfinder so that I don’t need to wear my glasses. This is a good reason to always purchase a camera that has an adjustable viewfinder diopter. Inserting and removing interchangeable screw-in diopters in the field is simply too slow and inconvenient.
Taming Reflections

I find that a polarizer is most effective for me in taming reflections, either in water or foliage. (See as well the example at the top of the page). The two frames above were scanned together to minimize difference in post processing. The first frame was taken without a polarizer, the second one with. Look at the rock and moss around the cascading water and also at the water in the foreground. The use of a polarizer has saturated the colours and made the image much more effective.
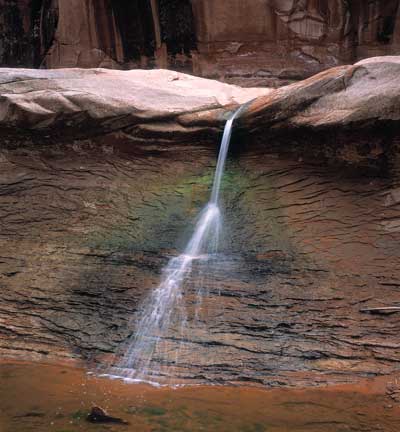
Photographed with a Mamiya 7 and 65mm f/4 lens on Provia 100F with custom Mamiya Polarizing Filter
Stitched Panoramics
As nice as it would be to use a polarizer when producing stitched panoramics this is a bad idea, as each panel will be unevenly polarized and the skies will never be made to match up.
Using a Polarizer with a Rangefinder Camera
Since it’s necessary to visually “tune” a polarizing filter, some people believe that it’s not possible to use one with a rangefinder type camera. This isn’t so. Some manufacturers have created ingenious solutions (such as for the Mamiya 7), but there’s a simpler way. If you have a polarizer that has markings around the rim simply hold the filter in front of you while pointing at the subject and note the angle of the mark. If it’s at say 11 o’clock at maximum polarization, then put the filter on the camera and turn it so that the mark is again at 11 o’clock when it’s on the lens. Heliopan polarizers are to be preferred for this reason because they have continuous numerical marks around the periphery of the filter which makes doing this quite simple.
Controlling Costs
Polarizing filters are expensive, and circular polarizers even more so. But you really must have one to fit every lens in your arsenal. Doing so can therefore be pricey.
There are a couple of ways of dealing with this. One is to buy a single polarizer of the largest size that you need and then to buy step-down rings to fit it to your smaller lenses. This can be a finicky task in the field when you’re working in a hurry, or in cold or wet conditions. It may also be difficult to find step-down rings that can take from, say, a 95mm filter down to a 52mm size. And, if the smaller lens is also a wide angle lens, then vignetting will likely occur.
For these reasons the best solution that I have found is to use a comprehensive filter system like that from Lee, my favourite. This allows you to only have to buy one set of filters of all types (especially graduated / split neutral density filters) and then with an adaptor for each filter size needed use the same filters on all your lenses.
In late 2001 Lee brought out a large circular polarizer that attaches to the front of their “Foundation Kit“. If you use this then this one polarizing filter will be the only one that you ever need to buy.
I have found though that unless you reduce the number of filter slots in the Foundation Kit to one this combination will vignette with any lens wider than about 28mm. Such is life.
Exposure Control
One final thought, and that’s with regard to exposure control. If your camera has a TTL metering system then compensation for the filter will be automatic. On a manually metered camera you’ll need to open up about 1.5 stops. I say “about”, because the exact amount will depend on the degree of polarization.
For this reason I tend to bracket critical shots taken with a polarizer, even if the camera has a TTL metering system. In this circumstance, as in many others, the right exposure isn’t necessarily the best exposure.
On Reflection
A polarizing filter is the most productive accessory that a photographer can have in his kit, second only to a decent tripod and head. Don’t leave home without one.
Michael Reichmann is the founder of the Luminous Landscape. Michael passed away in May 2016. Since its inception in 1999 LuLa has become the world's largest site devoted to the art, craft, and technology of photography. Each month more than one million people from every country on the globe visit LuLa.
You May Also Enjoy...
The Fallacy of Judging Image Quality Online
Morning Dream. Toronto. September, 2009Leica M9 with 90mm f/2 Summicron @ ISO 500I alternately chuckle and get steamed up when I read someone on a
Of Cameras and Art
by Alain Briot Each problem that I solved became a rulewhich served afterwards to solve other problems Rene Descartes 1 - IntroductionI hear it regularly
