Trekking & Photography
Traveling and trekking in the Himalayas has been a dream of mine for many years. Over the last six I have been lucky enough to make that dream come true with a number of treks in this most beautiful part of the world. This article is my way of sharing some of that experience with you, and passing on tips about trekking and photography
This article has been written especially forThe Luminous Landscape. If you want to see more of my photographs please visitwww.daveontrek.co.uk
Written By : Dave Thompson
What Do You Need to Take?
Prior to any trek, the first thing to do is think through what equipment you may need. Planning is all important‚ go through all the camera gear, film and accessories you think you need, consider what clothing etc., you are going to take, then make some hard decisions. That tripod may be useful, but if it means leaving the goose down jacket behind instead, then forget it. And by the way, who do you think is going to carry that aluminum photo case for you? Okay, you may be able to hire a porter just to carry your photographic gear, I have seen it done, but my suggestion is to travel light.
Trekking is different to day trips and staying in hotels‚ you could be out on trek for a month, and once you’re out there it may be difficult, even impossible, to get hold of film and batteries etc. Film may be expensive, but compared with what you have paid for the flights to get you there it’s nothing; make sure you have enough for the trip.
Tip:Some trails e.g. Everest region, are populated with ‘tea houses’, where you can probably buy film. But beware of how long it has been exposed to heat and sun etc. It may be fine as a last resort though.
Also remember, that you will be at altitude for some, or if not, most of the trip. Plus you may have quite a few ups and downs to negotiate during the day. You won’t want to be weighed down by heavy equipment when trekking up to the best viewpoints atKalar Patar(5,600metres). But, you also want to be able to come back with that lifetime shot, so you might need some reasonable gear with you too. Will that compact be suitable to capture the close up of the mountain or would a telephoto lens with a 35mm be more suitable.
It’s a question of choice and compromise, but whatever decision you make, never compromise on your personal safety in respect of clothing.
As a guide, this is what camera equipment I usually take.
¦ 35mm SLR
¦ 28-105mm zoom lens
¦ 70-210mm zoom lens
¦ 35 mm compact with fixed 28mm lens
¦ Ultrapod (a compact lightweight mini tripod)
¦ Spare batteries x 1 for each camera
¦ Film (allow for one every day of the trek)
¦ Polarizing filter
¦ Lens cloth
¦ Blower Brush
¦ Camera bag for each camera, which has padded protection
¦ Plastic bags (for dusty conditions)
Film Choice
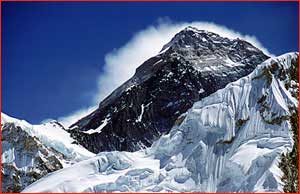
Summit of Mount Everest, Nepal. Nikon F70 (70- 210 Nikon)
Film choice is a subjective matter. For most of the time I useFuji Sensia, 100 ISO (process paid). I occasionally take 200 ISO as well as it can give an extra stop. Generally I find that this is sufficient for my needs as the lighting is usually good enough to be able to hand-hold the camera.
I tried some 400 ISO film but found that the results looked a little grainy. The other fact is I only use one camera body so I canÃt change film to suit the conditions. You could of course take two bodies, one with 100 ISO film the other with a faster film. Again itÃs a question of preference.
Although landscape photographers advocate the use of a tripod, I donÃt take a proper tripod with me as I found that the one occasion I did it was too much trouble. However, it is a personal decision, and if you want to be sure of small apertures and maximum depth of field. Plus those late evening shots‚ then you need one. I compromise and use a small mini tripod, which fits easily into my rucksack and weighs practically nothing. Okay, I may need a wall or rock to stand it on, but we are back to choices again.
Looking After Number One
The number one priority when trekking isyou. If you are not warm and comfortable then not only is it potentially dangerous (hypothermia is life threatening) but it is also unlikely that you are going to be able to concentrate on your photography. Some of the best shots are to be had near sunrise and sunset, but it’s also the coldest time of the day. Once the sun goes down the temperature can drop swiftly.
When it is below zero outside of the tent, are you going to want to get out of your sleeping bag and capture the dawn breaking over the Himalayas? Well of course you are, that’s why you are going, isn’t it? Make sure you have got warm clothing and donÃt forget some thin gloves that you can wear underneath your main gloves. This I find really useful for when I am taking photos as I can still feel the controls of the camera, but still retain some warmth in my hand. Ever tried depressing the shutter with large over-mittens?
Tip:When night temperatures are freezing, put your camera in the bottom of your sleeping bag so that it’s ready for use in the morning. When you go out, carry spare batteries in a pocket, which is close to the body to keep them warm. You may also get a signal from your camera telling you the batteries are finished. Don’ throw them away, try warming them up under your armpit inside your coat. It usually works!
Tip:If you are prone to cold hands, try using one of those chemical hand warmer packs. You shake them and the chemical reaction acts as a hand warmer for up to eight hours. Place one in your pocket and use it for getting the feeling back in your hand between shots. When itÃs finished put it back in your pack and bring it home.
Another key point is that if you are on an organized trek there will be porters to carry your main kit bag. But, you wont be able to get access to it during the day, so make sure you take with you whatever you will need for the day, photo gear and clothing. Remember that weather conditions can change and you need to make sure you are dry, warm and comfortable. When you stop to take photos it can suddenly seem a lot cooler than what you thought it was.
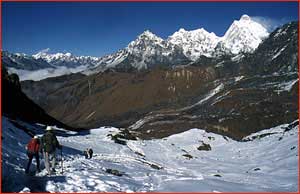
Talking of being cold, I reached the top ofPoon Hillin theAnnapurnasbefore dawn. It was about minus seven degrees Celsius. Unfortunately as the dawn came up so did the clouds. Many people (it’s a busy spot) gave up, having got cold, and left. I had wrapped up well, having taken extra clothes with me in my rucksack, and waited. Sure enough a break came in the clouds and I was rewarded for my patience.

Annapurna Range from Poon Hill. Nikon F70 (70-210 Nikon)
Getting Organized
It pays a lot to do some preparation before you go on trek. Once you are out on trek and in a tent, things can sometimes be harder to find, the cold and tiredness can fuddle your thinking.
Before I go away, I label all my film containers with coloured dots so that I can distinguish what type of film is in the canister. I always carry film in the containers (prevents dust getting into the film), these I put in a wash bag with a drawer cord fastening which makes it easy to pack with my gear whilst on the trek. I use two bags, one for the exposed film and one for fresh. That way I easily can see how many films I have used, etc.
Tip:Make sure you can easily identify your film stock. I colour code the films for film speed and type (slide/ ordinary), using coloured stick on dots.
Tip:In good time before the trek, make sure the camera gear is working properly, put fresh batteries in for the trip, and if necessary, run a roll of film through the camera if it hasn’t been used for a while to make sure things are operating okay.
You may be on the trek for weeks, and what seems like a small inconvenience of a camera around your neck for a few hours, can seem like a millstone when you have been trekking for six to eight hours. On a recent trip I had two cameras slung around my body and looked like a Wild West cowboy, I also found it was irritating. I envied the wider camera strap one of my fellow travelers had, as my thin strap was cutting into my neck after a few hours.
Tip:Make sure the camera straps are comfortable when worn for a few hours‚ try it out on a long walk at home before you go. Carry with you the same gear you are going trek with and get used to it beforehand.
Look through the camera manual again before you go on your trip (if it’s small put it in your rucksack). Familiarize yourself with the problem solving page, so that if you get a problem when your on trek you know what to do. Also it helps to reinforce the use of those controls or functions you sometimes don’t use. This is something I didn’t do on one trip and missed a great night shot because I had forgotten how to use the camera self-timer.
Tip:Consider having a back up camera should one camera fail or get damaged. Another body (compatible with the lens), a compact, even a Kodak disposable are all alternatives.
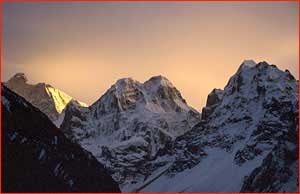
Evening at Lhonak (Kangchenjunga Region). Nikon F70 (Nikon 70-210 zoom)
I managed to prop myself against a low wall to get the low exposure needed for this shot.
Photography On Trek
It is easy to get carried away by the scenery that you will encounter. There is such variety and variation, from agricultural scenes to mountains, and of course the people who live there. The trick is to pace yourself with your film; you may not be able to get spare film if you run out. If possible plan ahead and allocate yourself a daily amount of film for use.
After a while, because you are immersed in the scenery, and its there every day it’s easy to be become blasÈ; opportunities can be missed. Be prepared; carry a camera with you at all times. I came out of the mess tent at camp to see this spectacular view, which had formed within minutes.
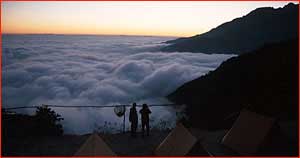
Sunset at camp above the clouds. Nikon F70 (Nikon 28-70 zoom)
Capturing the Feel For the Place
On trek, I try to capture the beauty of the landscape, and if possible, also something that portrays that you are in the Himalayas, and not in Europe or America. Look around you, there may be something that can help in the composition of the shot; it may be the porters, a chorten, a Mani wall, yaks etc.
Here, I have tried to use natural props to capture a number of elements. I think that the prayer flags, which had been put at the top of this hill, provide both perspective of scale, lead the eye into the photo, and help to distinguish the local culture.
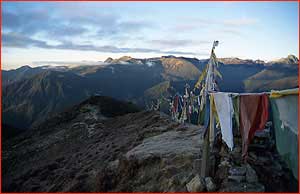
Prayer flags at Dzongri, Sikkim. Nikon F70 (Sigma 28-105 zoom)
It’s not always the large panoramic view that provides the best images. Sometimes it’s the small things that help to recapture the feeling for the trek. It could be a building, or part of it, a sign or notice (sometimes they are quite unintentionally humorous) or, an object you come across. It’s always worth taking shots of these things as they can add to your collection and can break up a slide show to provide more interest.
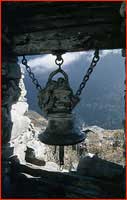
Bell at a shrine. Langtang Region. Nikon F70 (Nikon 28-70 zoom)
Capturing Perspective
One of the things to try and remember is that perspective and scale can be lost when looking at scenes that are so vast. The height of a mountain can be difficult to portray.
An occasion when this was difficult to capture was at theGoecha La(4,900 Metres) inSikkim. We had set off at three in the morning in total darkness to trek up to and catch the dawn rays of the sun onKangchenjunga(third highest mountain in the world). As we neared the pass I could see the dawn beginning to break, looking behind me the clouds too were beginning to swirl up the valley. It was a race for time, could I get there before the clouds obscured the view. Looking ahead I saw the silhouette of two of my fellow trekkers who had reached the pass ahead of me. They looked tiny, silhouetted against the huge massif of the mountain, which towered above them (the mountain is two kilometres higher than the pass). Using a telephoto lens to compress the view, I hoped that the diminutive figures would add that sense of scale (they are quite tiny in this photo, but when projected, the slide shows them sufficiently).
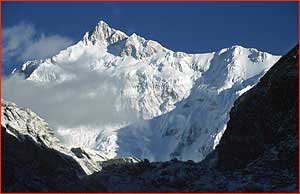
Kangchenjunga dawn. Nikon F70 (Nikon 70-210mm zoom)
Capturing the Light
Lighting conditions can be difficult in the mountains. The light is so much brighter at altitude, there is less air pollution, and so the lighting can be intense. My advice here is to bracket the exposure. Crossing theCho La, (5,400metres) a snow covered pass between theGokyoandKhumbuvalleys near Everest, was one such occasion for me. The sun was very bright and there was a lot of snow on the ground. I compensated for the meter reading by opening up the exposure by two stops, which worked quite well.
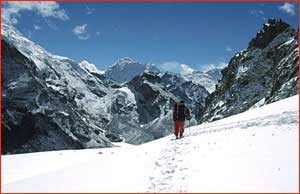
Crossing the Cho La (5,400Metres) Nikon F70 (Sigma 28-105 zoom)
Don’t Forget the People
Finally, don’t forget the people who inhabit the areas you will be visiting. They are generally very warm and welcoming people. They may be bemused by all your photographic gear, and in some cases will actively avoid you. The busiest trekking routes are usually where people will be reluctant to be photographed‚ they see trekkers almost every day. But, in the main I have found people to be willing to pose.
Tip:Always try and ask the person if you want to take a portrait. Some people can be offended if you don’t and take the shot irrespectively. I often find that trying to learn the a few phrases of the local language, and asking the person for permission in their native tongue helps to break the ice.
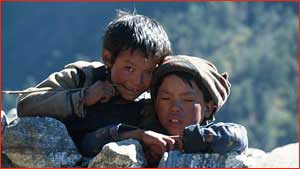
Boys. Langtang Region. Nikon F70 (Nikon 70-210 zoom)
You may get asked to send a copy of the photograph to the person. If you promise to do that, make sure you follow through as you will have created an expectation with the subject. For someone who lives miles away from anywhere, receiving such a photograph means a lot and your efforts will be gratefully received. It also helps to create a good impression of photographers and trekkers in general, so spare a thought for those who are following in your footsteps in the future.
Consider getting the individual, or someone else on their behalf, to write down the address (useful where there are language difficulties and/or they use a different form of text e.g. Sanskrit), you can always photocopy this and paste it onto the envelope when you get home.
Caution:One thing you may encounter is begging. Children and some adults will ask for money in exchange for you taking their photograph. This is something I actively avoid, particularly in rural areas as children can make more money than their parents who are working in the fields. This leads to the children being sent out to beg rather than getting educated at school. This advice is echoed by many of the conservation projects in the Himalayas.
Getting Home
There are many places, particularly inKathmanduwhere you can get your slides and photos processed. I know people who have done this and had very good results. Believe it or not there are quite good process labs tucked away in those little shops. This may be a good option if you have any concerns about X-rays at the airport.
The last job, is remembering where all those shots were taken. If you have taken a diary or a notebook with you than the job is made so much easier.
Tip:Buy a local map and mark on it where you have trekked each day. Use this with a diary or a notebook to record the events of the day and you will find that sorting out the shots when you get home is made much easier. I find this particularly useful to identify place names such as villages I have trekked through.
I hope that I have been able to give you some pointers, which you will find useful. If you want to see more of my images then please visit my web site atwww.daveontrek.co.uk
Happy trekking and good luck!
© 2001 Dave Thompson
Photography has been an interest of mine for the past twenty five years. I am based in the UK (Lincolnshire) but in recent times, I have had the opportunity to travel more, developing an interest in travel photography and writing. Having sold off my darkroom equipment, I now use the computer as a photographic aid, having integrated my photography and computer skills to branch out into web design. It’s exciting, and something I want to do more of.
Dave
You may also be interested in a complimentary article to this one titledBackpacking Photography
and also another onLightweight Backpacking For Photographers.
If you enjoyed this article, as well as the hundreds of other tutorials, features,
reviews and essays on this site, you can support its continued growth
and discover an exciting new photographic resource by …
Michael Reichmann is the founder of the Luminous Landscape. Michael passed away in May 2016. Since its inception in 1999 LuLa has become the world's largest site devoted to the art, craft, and technology of photography. Each month more than one million people from every country on the globe visit LuLa.
You May Also Enjoy...
2200 BW
By: Carl SchofieldNotwithstanding the Gray Balancer, which 2100 owners get and 2200 owners don't, this new printer from Epson is able to produce very neutral
